在 WPF 中,如果想做一个背景透明的异形窗口,基本上都要设置 WindowStyle="None"、AllowsTransparency="True" 这两个属性。如果不想自定义窗口样式,还需要设置 Background="Transparent"。这样的设置会让窗口变成 Layered Window,WPF 在这种类型窗口上的渲染性能是非常糟糕的。
本文介绍如何使用 WindowChrome 而不设置 AllowsTransparency="True" 制作背景透明的异形窗口,这可以避免异形窗口导致的低渲染性能。
背景透明的异形窗口
如下是一个背景透明异形窗口的示例:

此窗口包含很大的圆角,还包含 DropShadowEffect 制作的阴影效果。对于非透明窗口来说,这是不可能实现的。
如何实现
要实现这种背景透明的异形窗口,需要为窗口设置以下三个属性:
WindowStyle="None"ResizeMode="CanMinimize"或ResizeMode="NoResize"WindowChrome.GlassFrameThickness="-1"或设置为其他较大的正数(可自行尝试设置之后的效果)
如下就是一个最简单的例子,最关键的三个属性我已经高亮标记出来了。
1 2 3 4 5 6 7 8 9 10 11 12 13 14 15 16 17 18 19 20 21 22 23 24 25 26 27 28 29 |
    <Window x:Class="Walterlv.Demo.MainWindow"
            xmlns="http://schemas.microsoft.com/winfx/2006/xaml/presentation"
            xmlns:x="http://schemas.microsoft.com/winfx/2006/xaml"
++          WindowStyle="None" ResizeMode="CanMinimize"
            Title="walterlv demo" Height="450" Width="800">
++      <WindowChrome.WindowChrome>
++          <WindowChrome GlassFrameThickness="-1" />
++      </WindowChrome.WindowChrome>
        <Window.Template>
            <ControlTemplate TargetType="Window">
                <Border Padding="64" Background="Transparent">
                    <Border CornerRadius="16" Background="White">
                        <Border.Effect>
                            <DropShadowEffect BlurRadius="64" />
                        </Border.Effect>
                        <ContentPresenter ClipToBounds="True" />
                    </Border>
                </Border>
            </ControlTemplate>
        </Window.Template>
        <Grid>
            <TextBlock FontSize="20" Foreground="#0083d0"
                   TextAlignment="Center" VerticalAlignment="Center">
                <Run Text="欢迎访问吕毅的博客" />
                <LineBreak />
                <Run Text="blog.walterlv.com" FontSize="64" FontWeight="Light" />
            </TextBlock>
        </Grid>
    </Window>
|
网上流传的主流方法
在网上流传的主流方法中,AllowsTransparency="True" 都是一个必不可少的步骤,另外也需要 WindowStyle="None"。但是我一般都会极力反对大家这么做,因为 AllowsTransparency="True" 会造成很严重的性能问题。
如果你有留意到我的其他博客,你会发现我定制窗口样式的时候都在极力避开设置此性能极差的属性:
性能对比
既然特别说到性能,那也是口说无凭,我们要拿出数据来说话。
以下是我用来测试渲染性能所使用的例子:

相比于上面的例子来说,主要就是加了背景动画效果,这可以用来测试帧率。
1 2 3 4 5 6 7 8 9 10 11 12 13 14 15 16 17 18 19 20 21 22 23 24 25 26 27 28 29 30 31 32 33 34 35 36 37 38 39 40 41 42 43 44 45 46 47 |
    <Window x:Class="Walterlv.Demo.MainWindow"
            xmlns="http://schemas.microsoft.com/winfx/2006/xaml/presentation"
            xmlns:x="http://schemas.microsoft.com/winfx/2006/xaml"
            WindowStyle="None" ResizeMode="CanMinimize"
            Title="walterlv demo" Height="450" Width="800">
        <WindowChrome.WindowChrome>
            <WindowChrome GlassFrameThickness="-1" />
        </WindowChrome.WindowChrome>
        <Window.Template>
            <ControlTemplate TargetType="Window">
                <Border Padding="64" Background="Transparent">
                    <Border CornerRadius="16" Background="White">
                        <Border.Effect>
                            <DropShadowEffect BlurRadius="64" />
                        </Border.Effect>
                        <ContentPresenter ClipToBounds="True" />
                    </Border>
                </Border>
            </ControlTemplate>
        </Window.Template>
        <Grid>
++          <Rectangle x:Name="BackgroundRectangle" Margin="0 16" Fill="#d0d1d6">
++              <Rectangle.RenderTransform>
++                  <TranslateTransform />
++              </Rectangle.RenderTransform>
++              <Rectangle.Triggers>
++                  <EventTrigger RoutedEvent="FrameworkElement.Loaded">
++                      <BeginStoryboard>
++                          <BeginStoryboard.Storyboard>
++                              <Storyboard RepeatBehavior="Forever">
++                                  <DoubleAnimation Storyboard.TargetName="BackgroundRectangle"
++                                                   Storyboard.TargetProperty="(UIElement.RenderTransform).(TranslateTransform.X)"
++                                                   From="800" To="-800" />
++                              </Storyboard>
++                          </BeginStoryboard.Storyboard>
++                      </BeginStoryboard>
++                  </EventTrigger>
++              </Rectangle.Triggers>
++          </Rectangle>
            <TextBlock FontSize="20" Foreground="#0083d0"
                   TextAlignment="Center" VerticalAlignment="Center">
                <Run Text="欢迎访问吕毅的博客" />
                <LineBreak />
                <Run Text="blog.walterlv.com" FontSize="64" FontWeight="Light" />
            </TextBlock>
        </Grid>
    </Window>
|
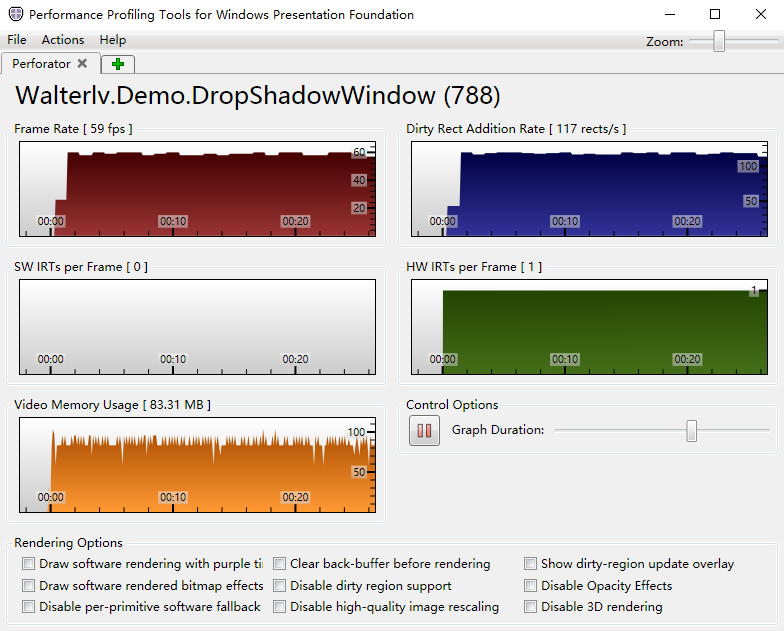
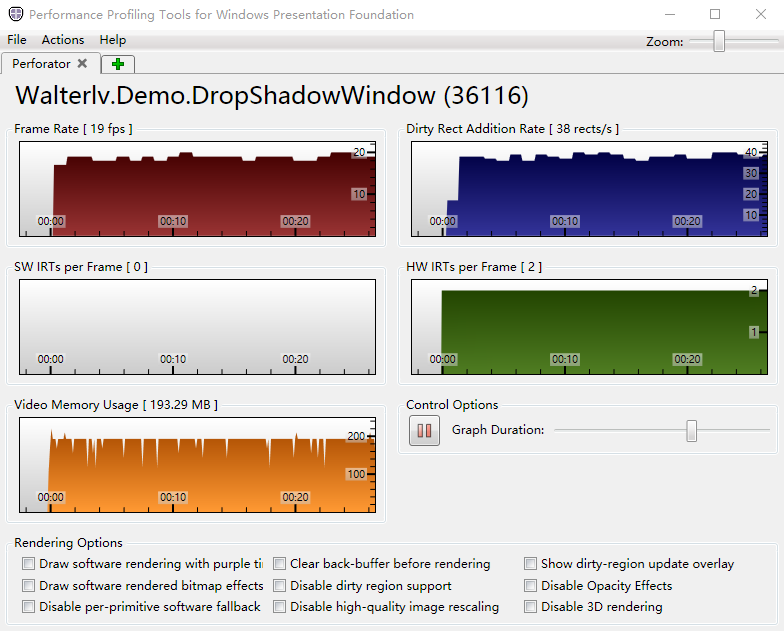
那么性能数据表现如何呢?我们让这个窗口在 2560×1080 的屏幕上全屏渲染,得出以下数据:
| 方案 | WindowChrome | AllowsTransparency |
|---|---|---|
| 帧率(fps)数值越大越好,60 为最好 | 59 | 19 |
| 脏区刷新率(rects/s)数值越大越好 | 117 | 38 |
| 显存占用(MB)数值越小越好 | 83.31 | 193.29 |
| 帧间目标渲染数(个)数值越大越好 | 2 | 1 |
另外,对于显存的使用,如果我在 7680×2160 的屏幕上全屏渲染,WindowChrome 方案依然保持在 80+MB,而 AllowsTransparency 已经达到惊人的 800+MB 了。
可见,对于渲染性能,使用 WindowChrome 制作的背景透明异形窗口性能完虐使用 AllowsTransparency 制作的背景透明异形窗口,实际上跟完全没有设置透明窗口的性能保持一致。
此性能差异的原理解读,请参阅:
功能对比
既然 WindowChrome 方法在性能上完虐网上流传的设置 AllowsTransparency 方法,那么功能呢?
值得注意的是,由于在使用 WindowChrome 制作透明窗口的时候设置了 ResizeMode="None",所以你拖动窗口在屏幕顶部和左右两边的时候,Windows 不会再帮助你最大化窗口或者靠边停靠窗口,于是你需要自行处理。不过窗口的标题栏拖动功能依然保留了下来,标题栏上的右键菜单也是可以继续使用的。
| 方案 | WindowChrome | AllowsTransparency |
|---|---|---|
| 拖拽标题栏移动窗口 | 保留 | 自行实现 |
| 最小化最大化关闭按钮 | 丢失 | 丢失 |
| 拖拽边缘调整窗口大小 | 丢失 | 丢失 |
| 移动窗口到顶部可最大化 | 丢失 | 自行实现 |
| 拖拽最大化窗口标题栏还原窗口 | 保留 | 自行实现 |
| 移动窗口到屏幕两边可侧边停靠 | 丢失 | 自行实现 |
| 拖拽摇动窗口以最小化其他窗口 | 保留 | 自行实现 |
| 窗口打开/关闭/最小化/最大化/还原动画 | 丢失 | 丢失 |
表格中:
保留表示此功能无需任何处理即可继续支持自行实现表示此功能已消失,但仅需要一两行代码即可补回功能丢失表示此功能已消失,如需实现需要编写大量代码
另外,以上表格仅针对鼠标操作窗口。如果算上使用触摸来操作窗口,那么所有标记为 自行实现 的都将变为 丢失。因为虽然你可以一句话补回功能,但在触摸操作下各种 Bug,你解不完……
这两种实现的窗口之间还有一些功能上的区别:
| 方案 | WindowChrome | AllowsTransparency |
|---|---|---|
| 点击穿透 | 在完全透明的部分点击依然点在自己的窗口上 | 在完全透明的部分点击会穿透到下面的其他窗口 |
然而,如果你希望在使用高性能的 WindowChrome 时也依然能点击穿透,那么你需要使用到一点点的小技巧来绕过 WPF 对 WS_EX_LAYERED 窗口样式的锁定。请参见:WPF 制作支持点击穿透的高性能的透明背景异形窗口。