css
1. background属性
连写顺序
background: color image repeat position;
background属性的值的书写顺序官方并没有强制标准的。
  <style>
        div {
            width: 350px;
            height: 400px;
            background: lightblue url('./images/1.png') repeat-x right center;
            /* background:  url('./images/1.png') repeat-x right center pink; */ 背景色为粉色
        }

    </style>
</head>
<body>
    <div>这是div盒子</div>
</body>

background-color
| 值 | 描述 |
|---|---|
| color_name | 规定颜色值为颜色名称的背景颜色(比如 red)。 |
| hex_number | 规定颜色值为十六进制值的背景颜色(比如 #ff0000)。 |
| rgb_number | 规定颜色值为 rgb 代码的背景颜色(比如 rgb(255,0,0))。 |
| transparent | 默认。背景颜色为透明。 |
| inherit | 规定应该从父元素继承 background-color 属性的设置。 |
background-image
| url('URL') | 指向图像的路径。 |
|---|---|
| none | 默认值。不显示背景图像。 |
| inherit | 规定应该从父元素继承 background-image 属性的设置。 |
background-repeat
background-repeat 属性设置是否及如何重复背景图像。
| repeat | 默认。背景图像将在垂直方向和水平方向重复。 |
|---|---|
| repeat-x | 背景图像将在水平方向重复。 |
| repeat-y | 背景图像将在垂直方向重复。 |
| no-repeat | 背景图像将仅显示一次。 |
| inherit | 规定应该从父元素继承 background-repeat 属性的设置。 |
分别运行结果如下:

background-position
background-position 属性设置背景图像的起始位置
| 值 | 描述 |
|---|---|
| top lefttop centertop rightcenter leftcenter centercenter rightbottom leftbottom centerbottom right | 如果您仅规定了一个关键词,那么第二个值将是"center"。默认值:0% 0%。 |
| x% y% | 第一个值是水平位置,第二个值是垂直位置。左上角是 0% 0%。右下角是 100% 100%。如果您仅规定了一个值,另一个值将是 50%。 |
| xpos ypos | 第一个值是水平位置,第二个值是垂直位置。左上角是 0 0。单位是像素 (0px 0px) 或任何其他的 CSS 单位。如果您仅规定了一个值,另一个值将是50%。您可以混合使用 % 和 position 值。 |
 background: lightblue url('./images/1.png') no-repeat 50% 50%;
 background: lightblue url('./images/1.png') no-repeat 30px 50px;
 background: lightblue url('./images/1.png') no-repeat 30px -50px;//可以设置负值
运行结果如下:

background-attachment
background-attachment 属性设置背景图像是否固定或者随着页面的其余部分滚动
| 值 | 描述 |
|---|---|
| scroll | 默认值。背景图像会随着页面其余部分的滚动而移动。 |
| fixed | 当页面的其余部分滚动时,背景图像不会移动。 |
| inherit | 规定应该从父元素继承 background-attachment 属性的设置。 |
结果如下:

background-origin
background-origin 属性规定 background-position 属性相对于什么位置来定位。
注释:如果背景图像的 background-attachment 属性为 "fixed",则该属性没有效果。
| 值 | 描述 | 测试 |
|---|---|---|
| padding-box | 背景图像相对于内边距框来定位。 | 测试 |
| border-box | 背景图像相对于边框盒来定位。 | 测试 |
| content-box | 背景图像相对于内容框来定位。 | 测试 |
background-size
background-size 属性规定背景图像的尺寸
| 值 | 描述 | 测试 |
|---|---|---|
| length | 设置背景图像的高度和宽度。第一个值设置宽度,第二个值设置高度。如果只设置一个值,则第二个值会被设置为 "auto"。 | 测试 |
| percentage | 以父元素的百分比来设置背景图像的宽度和高度。第一个值设置宽度,第二个值设置高度。如果只设置一个值,则第二个值会被设置为 "auto"。 | 测试 |
| cover | 把背景图像扩展至足够大,以使背景图像完全覆盖背景区域。背景图像的某些部分也许无法显示在背景定位区域中。 | 测试 |
| contain | 把图像图像扩展至最大尺寸,以使其宽度和高度完全适应内容区域。 | 测试 |
background-size: 300px 400px;
background-size: 30%;
background-size: cover;
background-size: contain;
cover不会留白,容器宽度超过图片原有比例,图片下面会有一部分看不见;反之,容器宽度小于图片原有比例,图片右边会少一部分
contain属性,容器宽大于图片宽,那么图片的右边会留白如果容器高大于图片高,那么图片下面会留白
结果如下

2. font属性
连写顺序
font 属性是以下属性的简写属性:
font-stylefont-variantfont-weightfont-size/line-heightfont-family
注意:font-size 和 font-family 的值是必需的。如果缺少其他值之一,则会使用其默认值。
font-style
font-style 属性定义字体的风格。
| 值 | 描述 |
|---|---|
| normal | 默认值。浏览器显示一个标准的字体样式。 |
| italic | 浏览器会显示一个斜体的字体样式。 |
| oblique | 浏览器会显示一个倾斜的字体样式。 |
| inherit | 规定应该从父元素继承字体样式。 |
font-variant
font-variant 属性设置小型大写字母的字体显示文本,这意味着所有的小写字母均会被转换为大写,但是所有使用小型大写字体的字母与其余文本相比,其字体尺寸更小
| normal | 默认值。浏览器会显示一个标准的字体。 |
|---|---|
| small-caps | 浏览器会显示小型大写字母的字体。 |
| inherit | 规定应该从父元素继承 font-variant 属性的值。 |
font-weight
font-weight 属性设置文本的粗细。
| 值 | 描述 |
|---|---|
| normal | 默认值。定义标准的字符。 |
| bold | 定义粗体字符。 |
| bolder | 定义更粗的字符。 |
| lighter | 定义更细的字符。 |
| 100 200 300 400 500 600 700 800 900 | 定义由粗到细的字符。400 等同于 normal,而 700 等同于 bold。 |
| inherit | 规定应该从父元素继承字体的粗细。 |
<style type="text/css">
p.normal {font-weight: normal}
p.thick {font-weight: bold}
p.thicker {font-weight: 900}
</style>
</head>

<body>
<p class="normal">This is a paragraph</p>

<p class="thick">This is a paragraph</p>

<p class="thicker">This is a paragraph</p>
</body>

font-size
font-size 属性可设置字体的尺寸。
font-family
font-family 可以把多个字体名称作为一个“回退”系统来保存。如果浏览器不支持第一个字体,则会尝试下一个。

3. text属性
text-align
text-align 属性规定元素中的文本的水平对齐方式。
| left | 把文本排列到左边。默认值:由浏览器决定。 |
|---|---|
| right | 把文本排列到右边。 |
| center | 把文本排列到中间。 |
| justify | 实现两端对齐文本效果。 |
| inherit | 规定应该从父元素继承 text-align 属性的值。 |
如果让文本水平居中,给父元素添加text-align:center;属性
text-decoration
| none | 默认。定义标准的文本。 |
|---|---|
| underline | 定义文本下的一条线。 |
| overline | 定义文本上的一条线。 |
| line-through | 定义穿过文本下的一条线。 |
| blink | 定义闪烁的文本。 |
| inherit | 规定应该从父元素继承 text-decoration 属性的值。 |
h1 {text-decoration: overline}
h2 {text-decoration: line-through}
h3 {text-decoration: underline}
h4 {text-decoration:blink}
a {text-decoration: none}
</style>
</head>

<body>
<h1>这是标题 1</h1>
<h2>这是标题 2</h2>
<h3>这是标题 3</h3>
<h4>这是标题 4</h4>
<p><a href="http://www.w3school.com.cn/index.html">这是一个链接</a></p>
</body>

text-indent
text-indent 属性规定文本块中首行文本的缩进。
| 值 | 描述 |
|---|---|
| length | 定义固定的缩进。默认值:0。 |
| % | 定义基于父元素宽度的百分比的缩进。 |
| inherit | 规定应该从父元素继承 text-indent 属性的值。 |
text-shadow
text-shadow 属性向文本设置阴影。
| 值 | 描述 | 测试 |
|---|---|---|
| h-shadow | 必需。水平阴影的位置。允许负值。 | 测试 |
| v-shadow | 必需。垂直阴影的位置。允许负值。 | 测试 |
| blur | 可选。模糊的距离。 | 测试 |
| color | 可选。阴影的颜色。参阅 CSS 颜色值。 | 测试 |
<style>
h1
{
text-shadow: 5px 5px 5px #FF0000;
}
</style>
</head>
<body>

<h1>文本阴影效果!</h1>

</body>

text-transform
text-transform 属性控制文本的大小写。
| 值 | 描述 |
|---|---|
| none | 默认。定义带有小写字母和大写字母的标准的文本。 |
| capitalize | 文本中的每个单词以大写字母开头。 |
| uppercase | 定义仅有大写字母。 |
| lowercase | 定义无大写字母,仅有小写字母。 |
| inherit | 规定应该从父元素继承 text-transform 属性的值。 |
text-overflow
text-overflow 属性规定当文本溢出包含元素时发生的事情。
| 值 | 描述 | 测试 |
|---|---|---|
| clip | 修剪文本。 | 测试 |
| ellipsis | 显示省略符号来代表被修剪的文本。 | 测试 |
| string | 使用给定的字符串来代表被修剪的文本。 |
vertical-align
4. line属性

5.boeder属性
连写顺序
可以按顺序设置如下属性:
border-widthborder-styleborder-color
border-width
border-width 简写属性为元素的所有边框设置宽度,或者单独地为各边边框设置宽度。
border-top-width
border-bottom-width
border-left-width
border-right-width
    <style>
        div {
            width: 300px;
            height: 300px;
            margin:  20px auto;
            border: solid pink;
            border-top-width:  5px;
            border-bottom-width: 10px ;
            border-left-width: 15px ;
            border-right-width: 20px ;
            background-color: aqua;
        }
    </style>
</head>
<body>
    <div>div</div>
</body>

border-style
border-style 属性用于设置元素所有边框的样式,或者单独地为各边设置边框样式。
border-top-style
border-bottom-style
border-left-style
border-right-style
| 值 | 描述 |
|---|---|
| none | 定义无边框。 |
| hidden | 与 "none" 相同。不过应用于表时除外,对于表,hidden 用于解决边框冲突。 |
| dotted | 定义点状边框。在大多数浏览器中呈现为实线。 |
| dashed | 定义虚线。在大多数浏览器中呈现为实线。 |
| solid | 定义实线。 |
| double | 定义双线。双线的宽度等于 border-width 的值。 |
| groove | 定义 3D 凹槽边框。其效果取决于 border-color 的值。 |
| ridge | 定义 3D 垄状边框。其效果取决于 border-color 的值。 |
| inset | 定义 3D inset 边框。其效果取决于 border-color 的值。 |
| outset | 定义 3D outset 边框。其效果取决于 border-color 的值。 |
| inherit | 规定应该从父元素继承边框样式。 |
 <style>
        div {
            width: 300px;
            height: 300px;
            margin:  20px auto;
            border: 5px pink;
            border-top-style:  solid;
            border-bottom-style: dotted ;
            border-left-style: double ;
            border-right-style: dashed ;
            background-color: aqua;
        }
    </style>11

border-color
border-color 属性设置四条边框的颜色。此属性可设置 1 到 4 种颜色。
border-color 属性是一个简写属性,可设置一个元素的所有边框中可见部分的颜色,或者为 4 个边分别设置不同的颜色
| color_name | 规定颜色值为颜色名称的边框颜色(比如 red)。 |
|---|---|
| hex_number | 规定颜色值为十六进制值的边框颜色(比如 #ff0000)。 |
| rgb_number | 规定颜色值为 rgb 代码的边框颜色(比如 rgb(255,0,0))。 |
| transparent | 默认值。边框颜色为透明。 |
| inherit | 规定应该从父元素继承边框颜色。 |
    <style>
        div {
            width: 300px;
            height: 300px;
            margin:  20px auto;
            border: 5px solid;
            border-top-color:  pink;
            border-bottom-color: green ;
            border-left-color: yellow ;
            border-right-color: peru ;
            background-color: aqua;
        }
    </style>

border-radius
border-radius 属性是一个简写属性,用于设置四个 border-*-radius 属性。
| 值 | 描述 | 测试 |
|---|---|---|
| length | 定义圆角的形状。 | 测试 |
| % | 以百分比定义圆角的形状。 | 测试 |
border-radius:2em;
等价于:
border-top-left-radius:2em;
border-top-right-radius:2em;
border-bottom-right-radius:2em;
border-bottom-left-radius:2em;
 <style>
        div {
            width: 300px;
            height: 300px;
            margin:  20px auto;
            border: 5px solid pink;
            border-radius: 20px;
        }
    </style>

border-image
border-image 属性是一个简写属性,将图片规定为包围 div 元素的边框,用于设置以下属性:
border-image-sourceborder-image-sliceborder-image-widthborder-image-outsetborder-image-repeat
| border-image-source | 用在边框的图片的路径。 | |
|---|---|---|
| border-image-slice | 图片边框向内偏移。裁切位置 | |
| border-image-width | 图片边框的宽度。 | |
| border-image-outset | 边框图像区域超出边框的量。 | |
| border-image-repeat | 图像边框是否应平铺(repeated)、铺满(rounded)或拉伸(stretched)。 |
对于border-image而言,border-image-souce是唯一必需的。若无特殊指定,其他属性即为默认值
首先准备一张图片

   <style>
        div {
            width: 400px;
            height: 300px;
            border: 15px solid pink;
            border-image-source: url(images/border.jpg);
            /* 不要跟单位 */
            border-image-slice: 168 168 168 168;
            border-image-repeat: round;
            /* border-image-width: 30px;
            border-image-repeat: round; */

        }
    </style>
</head>
<body>
    <div>boeder-image测试</div>
</body>
repeat三种模式结果如下:

repeat 会出现四个角有残缺的情况
round 全部铺满
参考链接:http://c.biancheng.net/css3/border-image.html
6. padding 盒子模型

盒子大小的计算:盒子实际大小=内容+内边距+边框
    <style>
        div {
            width: 300px;
            height: 300px;
            margin: 20px auto;
            padding: 10px;
            border: 5px solid green;
            background-color: pink;
        }
    </style>
</head>
<body>
    <div>div</div>
</body>
结果如下:盒子实际大小为330px

box-sizing
box-sizing 属性允许您以特定的方式定义匹配某个区域的特定元素。
| 值 | 描述 |
|---|---|
| content-box | 这是由 CSS2.1 规定的宽度高度行为。宽度和高度分别应用到元素的内容框。在宽度和高度之外绘制元素的内边距和边框。 |
| border-box | 为元素设定的宽度和高度决定了元素的边框盒。就是说,为元素指定的任何内边距和边框都将在已设定的宽度和高度内进行绘制。通过从已设定的宽度和高度分别减去边框和内边距才能得到内容的宽度和高度。 |
| inherit | 规定应从父元素继承 box-sizing 属性的值。 |
 div {
            width: 300px;
            height: 300px;
            margin: 20px auto;
            padding: 10px;
            border: 5px solid green;
            background-color: pink;
            box-sizing: border-box; //添加gbox-sizing属性
        }

元素添加box-sizing属性后,设置的宽高将不改变,元素的实际内容宽高是盒子实际的宽高减去边框和内边距的之后的实际宽高,如上图所示:内容大小为270px
box-shadow
box-shadow 属性向框添加一个或多个阴影
注释:box-shadow 向框添加一个或多个阴影。该属性是由逗号分隔的阴影列表,每个阴影由 2-4 个长度值、可选的颜色值以及可选的 inset 关键词来规定。省略长度的值是 0。
| 值 | 描述 | 测试 |
|---|---|---|
| h-shadow | 必需。水平阴影的位置。允许负值。 | 测试 |
| v-shadow | 必需。垂直阴影的位置。允许负值。 | 测试 |
| blur | 可选。模糊距离。 | 测试 |
| spread | 可选。阴影的尺寸。 | 测试 |
| color | 可选。阴影的颜色。请参阅 CSS 颜色值。 | 测试 |
| inset | 可选。将外部阴影 (outset) 改为内部阴影。 | 测试 |
     div {
            width: 300px;
            height: 300px;
            margin: 20px auto;
            padding: 10px;
            border: 5px solid green;
            background-color: pink;
            box-sizing: border-box;
            box-shadow: 10px 10px 5px #888888;
        }

7. margin

margin 特殊现象

8.list属性
- 无序列表(
- )- 列表项用的是项目符号标记
- 有序列表(
- )- 列表项用的是数字或字母标记
<style>
ol {
  background: #ff9999;
  padding: 20px;
}

ul {
  background: #3399ff;
  padding: 20px;
}

ol li {
  background: #ffe5e5;
  padding: 5px;
  margin-left: 35px;
}

ul li {
  background: #cce5ff;
  margin: 5px;
}
</style>
</head>
<body>

<h1>设置列表的颜色样式:</h1>

<ol>
  <li>Coffee</li>
  <li>Tea</li>
  <li>Coca Cola</li>
</ol>

<ul>
  <li>Coffee</li>
  <li>Tea</li>
  <li>Coca Cola</li>
</ul>

</body>
取消默认的圆点和序号可以这样写
list-style:none;(1)属性的种类
list-style-type:square;
list-style-position:inside;
list-style-image:url(image.gif);
(2)属性的简写
list-style:square inside url(image.gif); 1 /* list 属性简短写法 */ list-style: [list-style-type] [list-style-position] [list-style-image];/list属性与默认值/
list-style-type: disc;
list-style-image: none;
list-style-position: outside;9. outline属性
(1)属性的种类
outline-width:3px;
outline-style: dotted;
outline-color:red;
(2)属性的简写
outline: 3px dotted red;10. css选择器
标签选择器和类选择器

id选择器

通配符选择器

后代选择器
CSS 中有四种不同的组合器:
- 后代选择器 (空格)
- 子选择器 (
>) - 相邻兄弟选择器 (
+) - 通用兄弟选择器 (
~)
后代选择器匹配属于指定元素后代的所有元素。
下面的例子选择
元素内的所有元素:
<style>
div p {
  background-color: yellow;
}
</style>
</head>
<body>

<h1>后代选择器</h1>
<p>后代选择器匹配作为指定元素后代的所有元素。</p>

<div>
  <p>div 中的段落 1。</p>
  <p>div 中的段落 2。</p>
  <section><p>div 中的段落 3。</p></section>
</div>

<p>段落 4。不在 div 中。</p>
<p>段落 5。不在 div 中。</p>

</body>
子代选择器
子选择器匹配属于指定元素子元素的所有元素。
直选子代,子代的子代不选下面的例子选择属于
元素子元素的所有元素:
<style>
div > p {
  background-color: yellow;
}
</style>
</head>
<body>

<h1>子选择器</h1>
<p>子选择器 (>) 选择属于指定元素子元素的所有元素。</p>

<div>
  <p>div 中的段落 1。</p>
  <p>div 中的段落 2。</p>
  <section><p>div 中的段落 3。</p></section> <!-- 非子但属后代 -->
  <p>div 中的段落 4。</p>
</div>

<p>段落 5。不在 div 中。</p>
<p>段落 6。不在 div 中。</p>

</body>
相邻兄弟选择器
相邻兄弟选择器匹配所有作为指定元素的相邻同级的元素。
兄弟(同级)元素必须具有相同的父元素,“相邻”的意思是“紧随其后”。(一个)
下面的例子选择紧随
元素之后的所有元素:
<style>
div + p {
  background-color: yellow;
}
</style>
</head>
<body>

<h1>相邻兄弟选择器</h1>
<p>相邻的同胞选择器(+)选择所有作为指定元素的相邻的同级元素。</p>

<div>
  <p>div 中的段落 1。</p>
  <p>div 中的段落 2。</p>
</div>

<p>段落 3。不在 div 中。</p>
<p>段落 4。不在 div 中。</p>

</body>
通用兄弟选择器
通用兄弟选择器匹配属于指定元素的同级元素的所有元素。
下面的例子选择属于
元素的同级元素的所有元素:
<style>
div ~ p {
  background-color: yellow;
}
</style>
</head>
<body>

<h1>通用兄弟选择器</h1>
<p>通用的兄弟选择器(~)选择指定元素的所有同级元素。</p>

<p>段落 1。</p>

<div>
  <p>段落 2。</p>
</div>

<p>段落 3。</p>
<code>一些代码。</code>
<p>段落 4。</p>

</body>
属性选择器
我们可以设置带有特定属性或属性值的 HTML 元素的样式。
选择器 例子 例子描述 [attribute] [target] 选择带有 target 属性的所有元素。 [attribute=value] [target=_blank] 选择带有 target="_blank" 属性的所有元素。 [attribute~=value] [title~=flower] 选择带有包含 "flower" 一词的 title 属性的所有元素。 [attribute|=value] [lang|=en] 选择带有以 "en" 开头的 lang 属性的所有元素。 [attribute^=value] a[href^="https"] 选择其 href 属性值以 "https" 开头的每个 元素。 [attribute$=value] a[href$=".pdf"] 选择其 href 属性值以 ".pdf" 结尾的每个 元素。 [attribute**=value*] a[href*="w3school"] 选择其 href 属性值包含子串 "w3school" 的每个 元素。 <style> a[target] { background-color: yellow; } </style> </head> <body> <h1>CSS [attribute] 选择器</h1> <p>带有 target 属性的链接获得颜色背景:</p> <a href="https://www.w3school.com">w3school.com.cn</a> <a href="http://www.disney.com" target="_blank">disney.com</a> <a href="http://www.wikipedia.org" target="_top">wikipedia.org</a> </body>
<style>
a[target=_blank] {
  background-color: yellow;
}
</style>
</head>
<body>

<h1>CSS [attribute="value"] 选择器</h1>
<p>target="_blank" 的链接会有黄色背景:</p>

<a href="https://www.w3school.com.cn">w3school.com.cn</a>
<a href="http://www.disney.com" target="_blank">disney.com</a>
<a href="http://www.wikipedia.org" target="_top">wikipedia.org</a>

</body>
交集,并集选择器

//并集选择器
<style>
h1,p //中间用逗号分割
{
background-color:yellow;
}
</style>
</head>
<body>

<h1>Welcome to My Homepage</h1>
<div>
<p>My name is Donald.</p>
<p>I live in Duckburg.</p>
</div>
<p>My best friend is Mickey.</p>
</body>
//交集选择器 <style> p.one{ //中间不用加东西,直接连写,选择满足所有的 color: red; } </style> <body> <p class="one"> 这个元素会被应用样式 </p> <div> 这个元素不会被应用样式 </div> </body>伪元素选择器
选择器 例子 例子描述 ::after p::after 在每个 元素之后插入内容。
::before p::before 在每个 元素之前插入内容。
::first-letter p::first-letter 选择每个 元素的首字母。
::first-line p::first-line 选择每个 元素的首行。
::selection p::selection 选择用户选择的元素部分。 伪类选择器
选择器 例子 例子描述 :active a:active 选择活动的链接。 :checked input:checked 选择每个被选中的 元素。 :disabled input:disabled 选择每个被禁用的 元素。 :empty p:empty 选择没有子元素的每个 元素。
:enabled input:enabled 选择每个已启用的 元素。 :first-child p:first-child 选择作为其父的首个子元素的每个 元素。
:first-of-type p:first-of-type 选择作为其父的首个 元素的每个
元素。
:focus input:focus 选择获得焦点的 元素。 :hover a:hover 选择鼠标悬停其上的链接。 :in-range input:in-range 选择具有指定范围内的值的 元素。 :invalid input:invalid 选择所有具有无效值的 元素。 :lang(language) p:lang(it) 选择每个 lang 属性值以 "it" 开头的 元素。
:last-child p:last-child 选择作为其父的最后一个子元素的每个 元素。
:last-of-type p:last-of-type 选择作为其父的最后一个 元素的每个
元素。
:link a:link 选择所有未被访问的链接。 :not(selector) :not(p) 选择每个非 元素的元素。
:nth-child(n) p:nth-child(2) 选择作为其父的第二个子元素的每个 元素。
:nth-last-child(n) p:nth-last-child(2) 选择作为父的第二个子元素的每个 元素,从最后一个子元素计数。
:nth-last-of-type(n) p:nth-last-of-type(2) 选择作为父的第二个 元素的每个
元素,从最后一个子元素计数
:nth-of-type(n) p:nth-of-type(2) 选择作为其父的第二个 元素的每个
元素。
:only-of-type p:only-of-type 选择作为其父的唯一 元素的每个
元素。
:only-child p:only-child 选择作为其父的唯一子元素的 元素。
:optional input:optional 选择不带 "required" 属性的 元素。 :out-of-range input:out-of-range 选择值在指定范围之外的 元素。 :read-only input:read-only 选择指定了 "readonly" 属性的 元素。 :read-write input:read-write 选择不带 "readonly" 属性的 元素。 :required input:required 选择指定了 "required" 属性的 元素。 :root root 选择元素的根元素。 :target #news:target 选择当前活动的 #news 元素(单击包含该锚名称的 URL)。 :valid input:valid 选择所有具有有效值的 元素。 :visited a:visited 选择所有已访问的链接。 
11. 浮动

值 描述 left 元素向左浮动。 right 元素向右浮动。 none 默认值。元素不浮动,并会显示在其在文本中出现的位置。 <style> div { width: 100px; height: 100px; } .one { background-color: pink; float: left; } .two { background-color: blue; float: right; } .three { background-color: aqua; float: left; } </style> </head> <body> <!-- 浏览器在解析行内块或行内元素时,标签换行会默认有一个空格 --> <!-- <div class="one">one</div> <div class="two">two</div> --> <div class="one">one</div> <div class="two">two</div> <div class="three">three</div> <!-- 浮动的元素会脱离标准流,在标准流中不占位置,可以盖住元素,但是文字不能遮盖 --> <!-- 浮动找浮动 --> <!-- 浮动元素具有行内块的特点 --> <!-- 一行显示多个 --> <!-- 可以显示宽高 --> <!-- 浮动的元素不能通过text-align:center或者margin:0 auto,让浮动的元素水平居中 -->
清除浮动
清除浮动主要是为了解决,父元素因为子级元素浮动引起的内部高度为0的问题
如下:
给父盒子设置一个boder,内部放两个盒子一个big 一个small,未给big和small设置浮动,则他们会默认撑开父盒子。

当我给内部两个盒子加上float属性的时候
底部的footer盒子就会顶上来,然后父盒子因为没设置高度,变成一条线,big和small已经浮动了

清除浮动的方法(最常用的4种)
一、 额外标签法: 给谁清除浮动,就在其后额外添加一个空白标签 。
优点: 通俗易懂,书写方便。(不推荐使用)
缺点: 添加许多无意义的标签,结构化比较差。给元素small清除浮动(在small后添加一个空白标签clear(类名可以随意),设置clear:both;即可)
<div class="fahter">
        <div class="big">big</div>
        <div class="small">small</div>
        <div class="clear">额外标签法</div>
</div>

123456
.clear{
        clear:both;
    }
123
二、 父级添加overflow方法: 可以通过触发BFC的方式,实现清楚浮动效果。必须定义width或zoom:1,同时不能定义height,使用overflow:hidden时,浏览器会自动检查浮动区域的高度
优点: 简单、代码少、浏览器支持好
缺点: 内容增多时候容易造成不会自动换行导致内容被隐藏掉,无法显示需要溢出的元素。不能和position配合使用,因为超出的尺寸的会被隐藏。
.fahter{
    width: 400px;
    border: 1px solid deeppink;
    overflow: hidden;
}
12345
注意: 别加错位置,是给父亲加(并不是所有的浮动都需要清除,谁影响布局,才清除谁。)
三、使用after伪元素清除浮动:
:after方式为空元素的升级版,好处是不用单独加标签了。IE8以上和非IE浏览器才支持:after,,zoom(IE专有属性)可解决ie6,ie7浮动问题(较常用推荐)优点: 符合闭合浮动思想,结构语义化正确,不容易出现怪问题(目前:大型网站都有使用,如:腾迅,网易,新浪等等)
缺点: 由于IE6-7不支持
:after,使用zoom:1

.clearfix:after{/*伪元素是行内元素 正常浏览器清除浮动方法*/ content: ""; display: block; height: 0; clear:both; visibility: hidden; } .clearfix{ *zoom: 1;/*ie6清除浮动的方式 *号只有IE6-IE7执行,其他浏览器不执行*/ } <body> <div class="father clearfix"> <div class="big">big</div> <div class="small">small</div> <!--<div class="clear">额外标签法</div>--> </div> <div class="footer"></div> </body> 12345678910111213141516171819四、使用before和after双伪元素清除浮动:(
较常用推荐)

<style>
            .father{
                border: 1px solid black;
                *zoom: 1;
            }
            .clearfix:after,.clearfix:before{
                   content: "";
                   display: block;
                   clear: both;
               }
               .big ,.small{
                width: 200px;
                height: 200px;
                float: left;
               }
               .big{
                background-color: red;
               }
               .small{
                background-color: blue;
               }
        </style>
   <div class="father clearfix">
        <div class="big">big</div>
        <div class="small">small</div>
   </div>
    <div class="footer"></div>

</div>
12. 定位

静态定位 - static
静态定位是css中的默认定位方式,也就是没有定位。在此定位方式中设置:top,bottom,left,right,z-index 这些属性都是无效的。
相对定位 - relative
	<style>
        div{
            position: relative;
            background-color: red;
            border-top:1px solid #000
        	}
    </style>
相对位置前的位置:
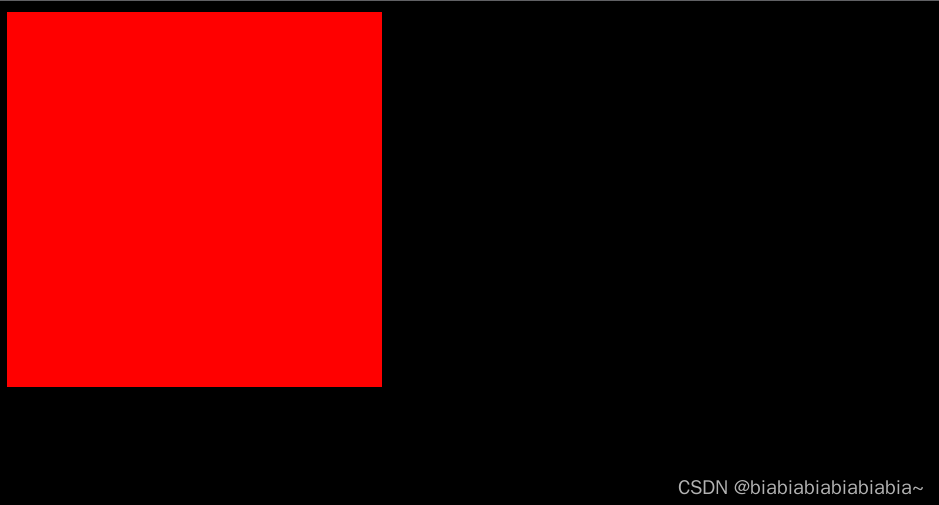
	 <style>
        div{
            position: relative;
            background-color: red;
            border-top:1px solid #000;
            top: 30px;
	        left: 30px;
        	}
    </style>
相对位置后的位置:
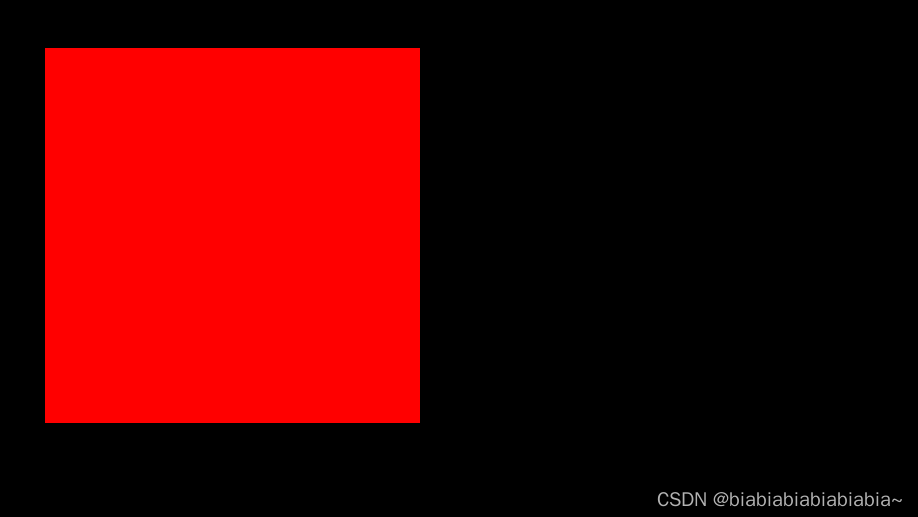
可以看到该元素向右下各偏移了30px.
相对定位的特点就是元素本身在文档流中的占位不变,无形的东西就是B元素在文档流中的占位,这也是为什么C元素不会浮动过去的原因。可以想象成B元素的本体依然处于普通文档流中,它的替身在参照本体进行移动。绝对定位 - absolute
绝对定位是参考父元素的相对定位来实现的:
 #A{
            position: relative;
            background-color: red;
            border-top:1px solid #000;
            height: 300px;
            width: 300px;
            /* left: 30px;
            top: 30px; */
        }
        #B{
            position: absolute;
            background-color: rgb(17, 255, 0);
            border-top:1px solid #000;
            height: 100px;
            width: 100px;
            left: 30px;
            top: 30px;
        }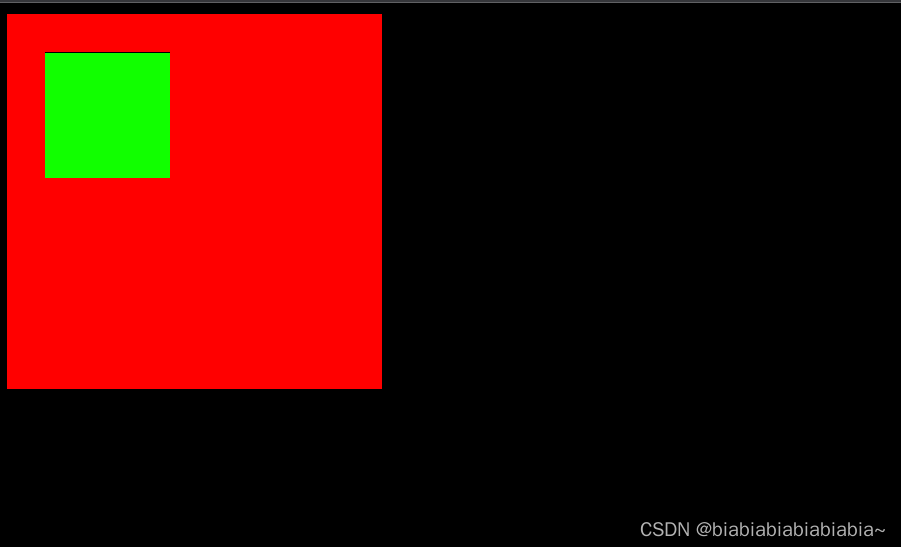
可以看出绿色div是以红色为定位位移30px,为了验证他是以父级进行定位,我们改变父级的位置:
 #A{
            position: relative;
            background-color: red;
            border-top:1px solid #000;
            height: 300px;
            width: 300px;
            left: 30px;
            top: 30px;
        }
        #B{
            position: absolute;
            background-color: rgb(17, 255, 0);
            border-top:1px solid #000;
            height: 100px;
            width: 100px;
            left: 30px;
            top: 30px;
        }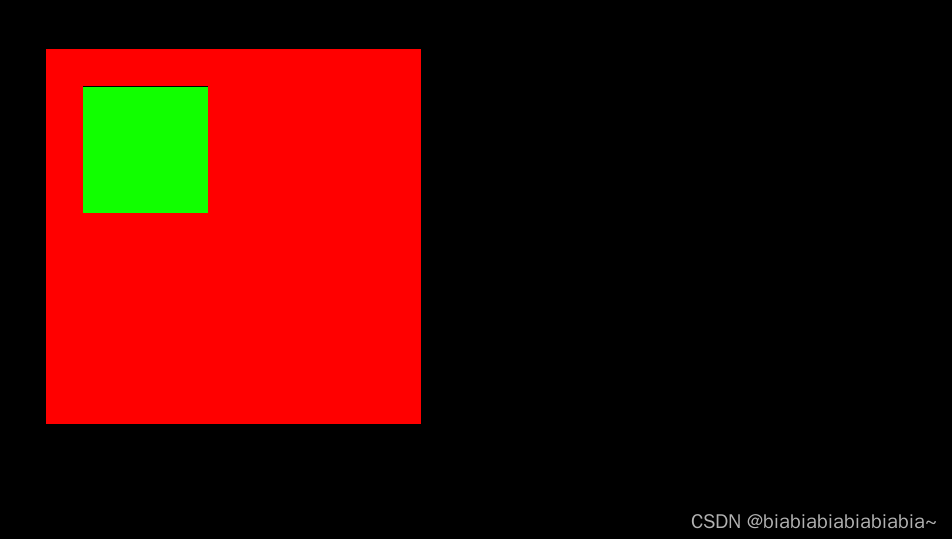
可以看出,B是以父级为参照进行定位,如果所有父级都没有设置相对定位,那么它将根据根元素html进行偏移。
  #A {
            margin: 0 auto;
            background-color: red;
            border-top:1px solid #000;
            height: 300px;
            width: 300px;
        }
        #B {
            position: absolute;
            background-color: rgb(17, 255, 0);
            border-top:1px solid #000;
            height: 100px;
            width: 100px;
            left: 30px;
            top: 30px;
        }
固定定位 - fixed
固定定位比较简单,固定定位是参照浏览器窗口的左上角进行偏移。
固定定位的特点就是:无论如何滑动页面,固定定位的元素位置都不会被改变,完全脱离文档流。
另外,如果设置了固定定位的元素也设置了width或height的百分比值,那么此百分比的值是参照窗口宽高来计算的。z-index属性
z-index属性是设置元素的层级,数值低的会被数值高的遮住。
<style type="text/css">
img
{
position:absolute;
left:0px;
top:0px;
z-index:-1;
}
</style>
</head>

<body>
<h1>This is a heading</h1>
<img src="/i/eg_smile.gif" />
<p>由于图像的 z-index 是 -1,因此它在文本的后面出现。</p>
</body>
13. vertical-align
vertical-align 属性设置元素的垂直对齐方式。
值 描述 baseline 默认。元素放置在父元素的基线上。 sub 垂直对齐文本的下标。 super 垂直对齐文本的上标 top 把元素的顶端与行中最高元素的顶端对齐 text-top 把元素的顶端与父元素字体的顶端对齐 middle 把此元素放置在父元素的中部。 bottom 把元素的顶端与行中最低的元素的顶端对齐。 text-bottom 把元素的底端与父元素字体的底端对齐。 length % 使用 "line-height" 属性的百分比值来排列此元素。允许使用负值。 inherit 规定应该从父元素继承 vertical-align 属性的值。 基本知识
vertical-align 属性设置元素的垂直对齐方式。
css中的vertical-align 属性只能用于 行内元素 和 置换元素(例如 图像和表单输入框) ,此属性不继承。
接下来我们用例子去分析这些值的意思及产生的效果:
首先我们先看一张图,文字的顶线、中线、基线,基线是字母x的下边缘

默认例子
<style>
  * {
    margin: 0;
    padding: 0;
  }
  div {
    width: 200px;
    line-height: 60px;
    margin: 10px;
    font-size: 20px;
    background-color: aquamarine;
  }
  img {
    width: 20px;
  }
  span {
    background-color: antiquewhite;
  }
</style>

<div>
   xx
   <img src="../img/1.jpg" alt="" />
   <span>I am a page.</span>
 </div>

1234567891011121314151617181920212223242526
效果:

1、baseline 基线对齐
baseline 让元素的基线 与父元素文本的基线对齐。
如果目标元素没有基线,例如 图片、表单输入框或其它置换元素,那么目标元素的底端与父元素的基线对齐。
上述例子我们可以看出来,图片和文字的基线(字母x的下边缘)对齐了。为什么我们没有给 img 标签加vertical-align属性,但是却基线对齐了呢?
因为vertical-align的默认值就是baseline,不写就默认是基线对齐。这也就是为什么图片和文字在同一行时,图片下方会有间距,因为默认与文字的基线对齐了。

2、上标 super 和 下标 sub
2.1 sub
sub把元素放在下标处,即元素的基线(对置换元素来说是底边线)低于父元素的基线。但是具体低多少是没有规定的,不同的用户代理中可能不同。

2.2 super
和sub相反,让元素的基线高于父元素的基线,具体高多少由用户代理来决定

3、top 和 bottom
3.1 top
使元素及其后代元素的顶部与整行的顶部对齐。
img {
  vertical-align: top;
}
123
3.2 bottom
bottom 与 top 相反。使元素及其后代元素的底部与整行的底部对齐。
img {
  vertical-align: bottom;
}
123
4、text-top 和 text-bottom
4.1 text-top
使元素的顶部与父元素的字体顶部对齐。

注意:这个是与父元素的字体顶部对齐,即使给子元素设置了不同大小的 font-size,也是按照父元素的字体来对齐。看例子,我新增一个子元素span标签,字体设置为30px,效果如下:

4.2 text-bottom
使元素的底部与父元素的字体底部对齐。
注意:这个是与父元素的字体底部对齐,即使给子元素设置了不同大小的 font-size,也是按照父元素的字体来对齐。

5、middle 中线对齐
使元素的中部与父元素的基线向上偏移0.5ex处的线对齐(1ex等于父元素的font-size)

6、% 百分比
百分数不能像align="middle”那样对齐图像。把vertical-align的值设为百分数,效果是把元素的基线(或置换元素的底边)相对父元素的基线抬升或下沉指定的量(指定的百分数相对元素自身而非父元素的line-height 计算)。正百分数抬升元素,负百分数下沉元素。如果抬升或下沉的量足够大,目标元素可能会出现在相邻的行上(见图6-20),因此使用百分数时要小心。
给img设置个行高为20px,vertical-align 为100%:
img {
  vertical-align: 100%;
  line-height: 20px;
}
1234
图片上移了自身line-height的100%,也就是20px

vertical-align 设置为负值的百分比后,向下沉。7、具体的值
vertical-align的效果很简单:把元素抬升或下沉声明的距离。因此,vertical-align:5px;把元素从原位置向上抬升5像素。长度值为负时,下沉元素。
设置图片的vertical-align为10px:
img {
  vertical-align: 10px;
}
123
图片上移了10px

vertical-align设置为负值时,在原来基础上下移。
14.CSS 垂直对齐问题
场景:解决行内/行内块元素垂直对齐的问题
问题:当图片和文字在一行显示时,其实底部不是对齐的,且只有行内/行内块元素才会存在这样的问题


仔细观察可以发现,文字和图片在底部并没有对齐
垂直对齐方式
属性名:vertical-align
属性值:
- baseline:默认,基线对齐
- top:顶部对齐
- middle:中部对齐
- bottom:底部对齐
一般来说,用得多的是bottom和middle
要注意的是,vertical-align只能用于行内块元素,对块级元素不起作用
vertical-align可以解决的问题:
1.文本框和表单按钮无法对齐的问题

现象:

虽然不多,但是可以看到"百度一下"的按钮比文本框要高那么一点点,这是由于vertical-align默认为baseline对齐所导致的
解决办法:
设置vertical-align,只要不是baseline即可


可以看到,此时文本框和按钮已经对齐。
2.input和img无法对齐的问题

现象:

可以看到,img和input不能对齐
解决办法:给行内块元素设置vertical-align:bottom,可以给单独一个设置,也可以都设置,推荐为都设置


3.div中的文本框无法贴顶的问题

现象:

可以看到,文本框无法紧贴在div的上部。
解决办法:给行内块元素input设置vertical-align:top


4.div高度由img撑开时,img底部与div之间会存在一定的间隙的问题


可以看到,此时img标签底部与div之间会存在一定的间隙
解决办法:给行内块元素img设置vertical-align:bottom


5.使用line-height使得img标签垂直居中的问题

现象:

可以看到,明显此时图片并没有因为line-height使得它垂直居中,这是vertical-align:baseline的问题
解决办法:
给行内块元素img设置vertical-align:middle,这样line-height属性就能让它垂直居中


对于上述问题,其实不止一种解决办法,因为只有行内/行内块元素才会存在这样的对齐问题,那么就从这方面入手:
1.转换显示方式,display:block
2.这种对齐方式是由文字来决定的,文字越大,空隙越大,所以设置font-size:0(给块级元素设置)
15.光标类型和overflow


16. 渐变
线性渐变
background-image: linear-gradient(direction, color-stop1, color-stop2, ...);<style> #grad1 { height: 200px; background-image: linear-gradient(to right, rgba(255,0,0,0), rgba(255,0,0,1)); } </style> </head> <body> <h1>线性渐变 - 透明度</h1> <p>为了增加透明度,我们使用 rgba() 函数定义色标。 rgba() 函数中的最后一个参数可以是 0 到 1 的值,它定义颜色的透明度:0 表示全透明,1 表示全色(不透明)。</p> <div id="grad1"></div> </body>
径向渐变
径向渐变由其中心定义。
background-image: radial-gradient(shape size at position, start-color, ..., last-color);默认地,shape 为椭圆形,size 为最远角,position 为中心。
<style>
#grad1 {
  height: 150px;
  width: 200px;
  background-color: red; /* 针对不支持渐变的浏览器 */
  background-image: radial-gradient(red, yellow, green);
}
</style>
</head>
<body>

<h1>径向渐变 - 均匀间隔的色标</h1>

<div id="grad1"></div>

</body>
17. css过渡
属性 描述 transition 简写属性,用于将四个过渡属性设置为单一属性。 transition-delay 规定过渡效果的延迟(以秒计)。 transition-duration 规定过渡效果要持续多少秒或毫秒。 transition-property 规定过渡效果所针对的 CSS 属性的名称。 transition-timing-function 规定过渡效果的速度曲线。 简写
transition 属性是一个简写属性,用于设置四个过渡属性:
- transition-property
- transition-duration
- transition-timing-function
- transition-delay
transition-property
transition-property 属性规定应用过渡效果的 CSS 属性的名称。(当指定的 CSS 属性改变时,过渡效果将开始)
值 描述 none 没有属性会获得过渡效果。 all 所有属性都将获得过渡效果。 property 定义应用过渡效果的 CSS 属性名称列表,列表以逗号分隔。 transition-duration
transition-duration 属性规定完成过渡效果需要花费的时间(以秒或毫秒计)。
transition-timing-function
值 描述 linear 规定以相同速度开始至结束的过渡效果(等于 cubic-bezier(0,0,1,1))。 ease 规定慢速开始,然后变快,然后慢速结束的过渡效果(cubic-bezier(0.25,0.1,0.25,1))。 ease-in 规定以慢速开始的过渡效果(等于 cubic-bezier(0.42,0,1,1))。 ease-out 规定以慢速结束的过渡效果(等于 cubic-bezier(0,0,0.58,1))。 ease-in-out 规定以慢速开始和结束的过渡效果(等于 cubic-bezier(0.42,0,0.58,1))。 cubic-bezier(n,n,n,n) 在 cubic-bezier 函数中定义自己的值。可能的值是 0 至 1 之间的数值。 transition-delay
值 描述 time 规定在过渡效果开始之前需要等待的时间,以秒或毫秒计。 <style> div { width:100px; height:100px; background:blue; transition:width 2s; -moz-transition:width 2s; /* Firefox 4 */ -webkit-transition:width 2s; /* Safari and Chrome */ -o-transition:width 2s; /* Opera */ } div:hover { width:300px; } </style> </head> <body> <div></div> <p>请把鼠标指针移动到蓝色的 div 元素上,就可以看到过渡效果。</p> <p><b>注释:</b>本例在 Internet Explorer 中无效。</p> </body>18. css动画
@keyframes
@keyframes 规则,您能够创建动画。创建动画的原理是,将一套 CSS 样式逐渐变化为另一套样式。在动画过程中,您能够多次改变这套 CSS 样式。
//语法
@keyframes animationname {keyframes-selector {css-styles;}}
值 描述 animationname 必需。定义动画的名称。 keyframes-selector 必需。动画时长的百分比。合法的值:0-100%from(与 0% 相同)to(与 100% 相同) css-styles 必需。一个或多个合法的 CSS 样式属性 animation
animation 属性是一个简写属性,用于设置六个动画属性:
- animation-name
- animation-duration
- animation-timing-function
- animation-delay
- animation-iteration-count
- animation-direction
值 描述 animation-name 规定需要绑定到选择器的 keyframe 名称。。 animation-duration 规定完成动画所花费的时间,以秒或毫秒计。 animation-timing-function 规定动画的速度曲线。 animation-delay 规定在动画开始之前的延迟。 animation-iteration-count 规定动画应该播放的次数。 animation-direction 规定是否应该轮流反向播放动画。 二三四跟过渡一样
animation-iteration-count
div
{
animation-iteration-count:3;
-webkit-animation-iteration-count:3; /* Safari 和 Chrome */
}
animation-direction
值 描述 测试 normal 默认值。动画应该正常播放。 测试 alternate 动画应该轮流反向播放。 测试 示例:
   <style>
        .box {
            width: 200px;
            height: 200px;
            background-color: pink;

        }
        .box:hover {
            animation: donghua 2s ease 2 alternate;
        }
        @keyframes donghua {
            from{
                width: 200px;
                height: 200px;
            }
            to{
                width: 400px;
                height: 200px;
                background-color: green;
            }
        }
    </style>
</head>
<body>
    <p>创建动画</p>
    <div class="box">
    </div>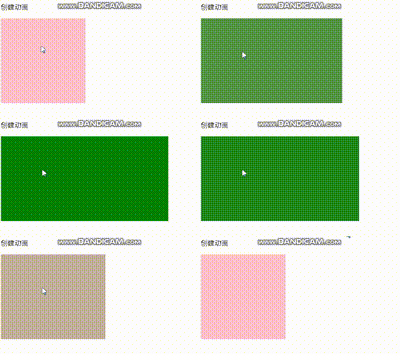
19. css2d转换
Ø 改变盒子在平面内的形态(位移、旋转、缩放)
Ø 2D转换
l平面转换属性
Ø transform

20. css3d转换

perspective加给父级元素
21. flex布局
CSDN:https://blog.csdn.net/lq313131/article/details/126005111
菜鸟教程: https://www.runoob.com/w3cnote/flex-grammar.html
22. 网格布局
知乎:https://zhuanlan.zhihu.com/p/256353171
CSDN: https://blog.csdn.net/leilei__66/article/details/122360901
- 有序列表(