目录
一,WebService的基本概念
二, ApacheCXF 框架介绍
三, ApacheCXF 实现WebService(Jax-ws)
四, Spring 整合 ApacheCXF 实现WebService(Jax-ws)
五,ApacheCXF 实现webservice (Jax-rs)
六,Sping整合CXF实现基于Restful风格的webservice(jax-rs)
一到六内容直接跳转在线文档:https://gitee.com/fanjiangfeng/courseware-notes/raw/master/WebService/webservice讲义.pdf
##springboot整合CXF的快速入门##
一,服务端提供webservice服务
1,实体类User
public class User implements Serializable {
    private static final long serialVersionUID = -3628469724795296287L;
    private  int id;
    private String userName;
    private String passWord;
    private String userSex;
    private String nickName;
}
2,webservice接口
package com.example.demo.webservice;
import javax.jws.WebParam;
import javax.jws.WebService;

@WebService
public interface UserService {
    String getUser(@WebParam(name = "userId") String userId);
}
3,webservice接口的实现类
package com.example.demo.webservice;
import org.springframework.stereotype.Service;
import javax.jws.WebService;
import java.util.HashMap;
import java.util.Map;

@WebService(serviceName="userService",//对外发布的服务名
        targetNamespace="http://service.demo.example.com",//指定你想要的名称空间,通常使用使用包名反转
        endpointInterface="com.example.demo.webservice.UserService")
@Service
public class UserServiceImpl implements UserService{

    private Map<String, User> userMap = new HashMap<String, User>();
    public UserServiceImpl() {
        System.out.println("向实体类插入数据");
        User user = new User();
        user.setId(111);
        user.setUserName("test1");

        userMap.put(user.getId() + "", user);

        user = new User();
        user.setId(112);
        user.setUserName("test2");
        userMap.put(user.getId() + "", user);

        user = new User();
        user.setId(113);
        user.setUserName("test3");
        userMap.put(user.getId() + "", user);
    }

    @Override
    public String getUser(String userId) {
        return "userId为:" +userMap.get(userId).getUserName();
    }
}
4,CXF配置类
package com.example.demo.webservice;
import org.apache.cxf.Bus;
import org.apache.cxf.jaxws.EndpointImpl;
import org.apache.cxf.transport.servlet.CXFServlet;
import org.springframework.beans.factory.annotation.Autowired;
import org.springframework.boot.web.servlet.ServletRegistrationBean;
import org.springframework.context.annotation.Bean;
import org.springframework.context.annotation.Configuration;

import javax.xml.ws.Endpoint;

@Configuration
public class CxfConfig {

    @Autowired
    private Bus bus;

    @Autowired
    UserService userService;

    /**
     * 此方法作用是改变项目中服务名的前缀名,此处127.0.0.1或者localhost不能访问时,请使用ipconfig查看本机ip来访问
     * 此方法被注释后:wsdl访问地址为http://127.0.0.1:8080/services/user?wsdl
     * 去掉注释后:wsdl访问地址为:http://127.0.0.1:8080/soap/user?wsdl
     * @return
     */
    @SuppressWarnings("all")
    @Bean
    public ServletRegistrationBean dispatcherServlet1() {
        return new ServletRegistrationBean(new CXFServlet(), "/soap/*");
    }


    /** JAX-WS
     * 站点服务
     * **/
    @Bean
    public Endpoint endpoint() {
        EndpointImpl endpoint = new EndpointImpl(bus, userService);
        endpoint.publish("/user");
        return endpoint;
    }
}
5,pom依赖配置
		<dependency>
			<groupId>org.springframework.boot</groupId>
			<artifactId>spring-boot-starter-web</artifactId>
		</dependency>
		<!--webservice服务-->
		<dependency>
			<groupId>org.apache.cxf</groupId>
			<artifactId>cxf-spring-boot-starter-jaxws</artifactId>
			<version>3.2.4</version>
		</dependency>
		<!--所需支持的包-->
		<dependency>
			<groupId>org.hibernate</groupId>
			<artifactId>hibernate-validator</artifactId>
			<version>5.2.4.Final</version>
		</dependency>
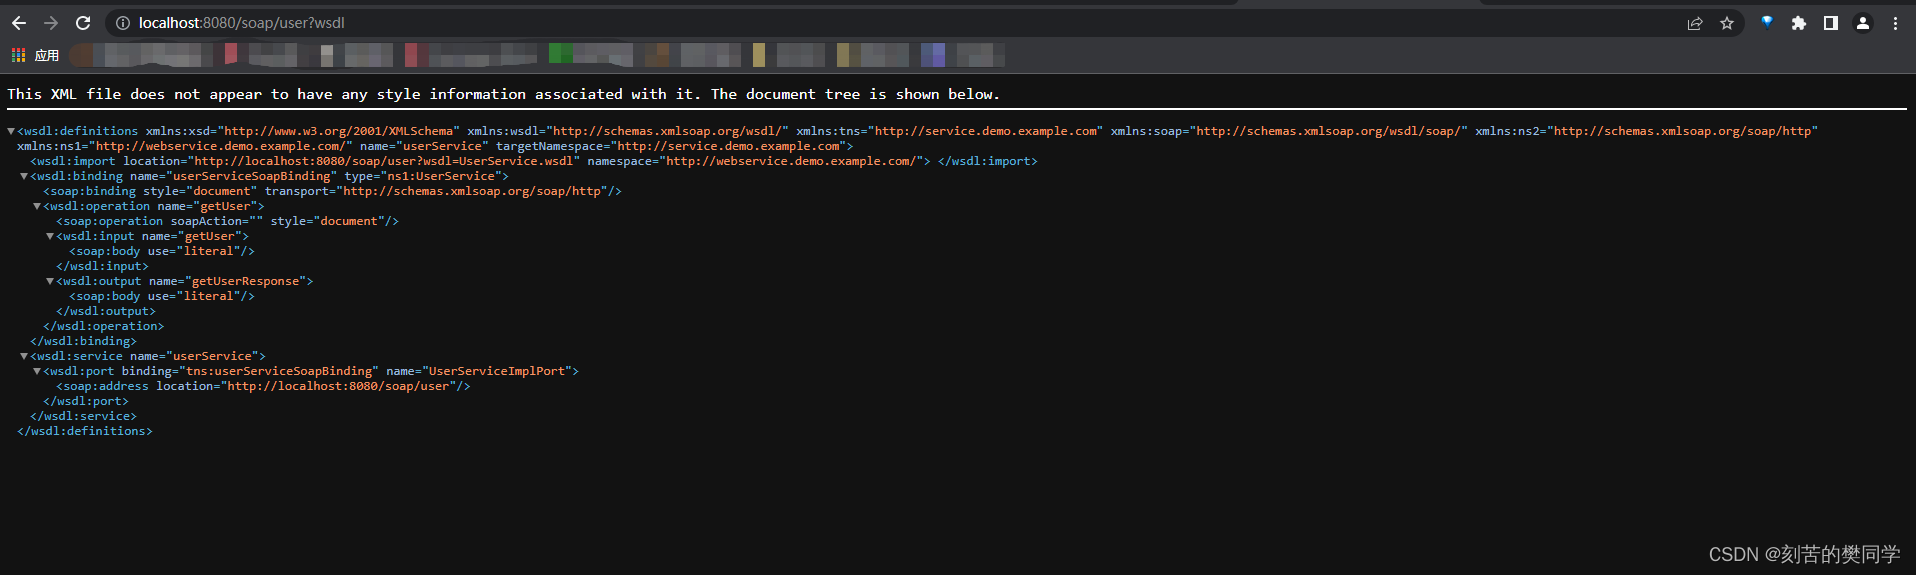
6,页面访问服务
二,客户端访问webservice服务
方式一:代理类工厂的方式,需要拿到对方的接口地址
创建一个客户端项目
1,pom依赖配置
		<dependency>
			<groupId>org.springframework.boot</groupId>
			<artifactId>spring-boot-starter-web</artifactId>
		</dependency>
		<!--webservice服务-->
		<dependency>
			<groupId>org.apache.cxf</groupId>
			<artifactId>cxf-spring-boot-starter-jaxws</artifactId>
			<version>3.2.4</version>
		</dependency>
		<!--所需支持的包-->
		<dependency>
			<groupId>org.hibernate</groupId>
			<artifactId>hibernate-validator</artifactId>
			<version>5.2.4.Final</version>
		</dependency>
		<!--客户端调用服务端时用到的httpclient-->
		<dependency>
			<groupId>org.apache.httpcomponents</groupId>
			<artifactId>httpclient</artifactId>
			<version>4.5.5</version>
		</dependency>
2,创建和服务端相同的接口
package com.example.demo.webservice;
import javax.jws.WebParam;
import javax.jws.WebService;

@WebService
public interface UserService {
    String getUser(@WebParam(name = "userId") String userId);
}
3,测试
	/**
     * 1.代理类工厂的方式,需要拿到对方的接口地址
     */
public static void main1() {
        try {
            // 接口地址
            String address = "http://127.0.0.1:8080/soap/user?wsdl";
            // 代理工厂
            JaxWsProxyFactoryBean jaxWsProxyFactoryBean = new JaxWsProxyFactoryBean();
            // 设置代理地址
            jaxWsProxyFactoryBean.setAddress(address);
            // 设置接口类型
            jaxWsProxyFactoryBean.setServiceClass(UserService.class);
            // 创建一个代理接口实现
            UserService us = (UserService) jaxWsProxyFactoryBean.create();
            // 数据准备
            String userId = "111";
            // 调用代理接口的方法调用并返回结果
            String result = us.getUser(userId);
            System.out.println("返回结果:" + result);
        } catch (Exception e) {
            e.printStackTrace();
        }
    }
......
16:29:57.528 [main] DEBUG org.apache.cxf.phase.PhaseInterceptorChain - Invoking handleMessage on interceptor org.apache.cxf.wsdl.interceptors.DocLiteralInInterceptor@662b4c69
16:29:57.528 [main] DEBUG org.apache.cxf.phase.PhaseInterceptorChain - Invoking handleMessage on interceptor org.apache.cxf.binding.soap.interceptor.SoapHeaderInterceptor@fa49800
16:29:57.528 [main] DEBUG org.apache.cxf.phase.PhaseInterceptorChain - Invoking handleMessage on interceptor org.apache.cxf.jaxws.interceptors.WrapperClassInInterceptor@581ac8a8
16:29:57.543 [main] DEBUG org.apache.cxf.phase.PhaseInterceptorChain - Invoking handleMessage on interceptor org.apache.cxf.interceptor.StaxInEndingInterceptor@54a7079e
16:29:57.543 [main] DEBUG org.apache.cxf.phase.PhaseInterceptorChain - Invoking handleMessage on interceptor org.apache.cxf.jaxws.interceptors.SwAInInterceptor@57d7f8ca
16:29:57.543 [main] DEBUG org.apache.cxf.phase.PhaseInterceptorChain - Invoking handleMessage on interceptor org.apache.cxf.jaxws.interceptors.HolderInInterceptor@6d4e5011
16:29:57.543 [main] DEBUG org.apache.cxf.phase.PhaseInterceptorChain - Invoking handleMessage on interceptor org.apache.cxf.ws.policy.PolicyVerificationInInterceptor@16610890
16:29:57.543 [main] DEBUG org.apache.cxf.ws.policy.PolicyVerificationInInterceptor - Verified policies for inbound message.
返回结果:userId为:test1Process finished with exit code 0
方式二:HttpClient封装WebService请求直接发起调用
此种方法需要手动封装xml请求信息,和手动解析xml响应信息
1,HttpClient直接调用
package com.example.demo.webservice;
import org.apache.cxf.jaxws.JaxWsProxyFactoryBean;
import org.apache.http.HttpResponse;
import org.apache.http.client.methods.HttpPost;
import org.apache.http.entity.StringEntity;
import org.apache.http.impl.client.DefaultHttpClient;
import org.apache.http.protocol.HTTP;
import org.apache.http.util.EntityUtils;
import org.apache.http.HttpEntity;
import org.w3c.dom.Document;
import org.w3c.dom.Element;
import org.w3c.dom.Node;
import org.xml.sax.InputSource;
import javax.xml.parsers.DocumentBuilder;
import javax.xml.parsers.DocumentBuilderFactory;
import java.io.StringReader;

	/**
     * 2:httpClient调用
     */
    public static void main2() {
        try {
            final String SERVER_URL = "http://127.0.0.1:8080/soap/user"; // 定义需要获取的内容来源地址
            HttpPost request = new HttpPost(SERVER_URL);
            String soapRequestData = getRequestXml();
            HttpEntity re = new StringEntity(soapRequestData, HTTP.UTF_8);
            request.setHeader("Content-Type","application/soap+xml; charset=utf-8");
            request.setEntity(re);
            HttpResponse httpResponse = new DefaultHttpClient().execute(request);
            if (httpResponse.getStatusLine().getStatusCode() ==200) {
                String xmlString = EntityUtils.toString(httpResponse.getEntity());
                String jsonString = parseXMLSTRING(xmlString);
                System.out.println("---"+jsonString);
            }
        } catch (Exception e) {
            e.printStackTrace();
        }
    }

    public static String parseXMLSTRING(String xmlString) {

        String returnJson = "";
        try {
            DocumentBuilderFactory factory = DocumentBuilderFactory.newInstance();
            DocumentBuilder builder = factory.newDocumentBuilder();
            Document doc = builder.parse(new InputSource(new StringReader(xmlString)));
            Element root = doc.getDocumentElement();//根节点
            Node node = root.getFirstChild();
            while (!node.getNodeName().equals("return")) {
                node = node.getFirstChild();
            }
            if (node.getFirstChild() != null) returnJson = node.getFirstChild().getNodeValue();
            System.out.println("获取的返回参数为:" + returnJson);
        } catch (Exception e) {
            e.printStackTrace();
        }
        return returnJson;
    }

    private static String getRequestXml(){
        StringBuilder sb = new StringBuilder();
        sb.append("<?xml version=\"1.0\"?>");
        sb.append("<soap:Envelope xmlns:xsi=\"http://www.w3.org/2001/XMLSchema-instance\" ");
        sb.append(" xmlns:sam=\"http://webservice.demo.example.com/\" ");  //前缀,这一串由服务端提供
        sb.append(" xmlns:xsd=\"http://www.w3.org/2001/XMLSchema\"");
        sb.append(" xmlns:soap=\"http://schemas.xmlsoap.org/soap/envelope/\">");
        sb.append("<soap:Header/>");
        sb.append("<soap:Body>");
        sb.append("<sam:getUser>");  //“getUser”调用方法名
        sb.append("<userId>111</userId>"); //传参,“userId”是配置在服务端的参数名称,“111”是要传入的参数值
        sb.append("</sam:getUser>");
        sb.append("</soap:Body>");
        sb.append("</soap:Envelope>");
        return sb.toString();
    }
2,测试结果
标签:http,WebService,简单,教学,cxf,import,apache,org,String From: https://www.cnblogs.com/fantongxue/p/16989148.html16:31:42.596 [main] DEBUG org.apache.http.headers - << Content-Length: 234
16:31:42.596 [main] DEBUG org.apache.http.headers - << Date: Sat, 17 Dec 2022 08:31:42 GMT
16:31:42.596 [main] DEBUG org.apache.http.headers - << Keep-Alive: timeout=60
16:31:42.596 [main] DEBUG org.apache.http.headers - << Connection: keep-alive
16:31:42.611 [main] DEBUG org.apache.http.impl.client.DefaultHttpClient - Connection can be kept alive for 60000 MILLISECONDS
16:31:42.611 [main] DEBUG org.apache.http.wire - << "<soap:Envelope xmlns:soap="http://schemas.xmlsoap.org/soap/envelope/">soap:Body<ns2:getUserResponse xmlns:ns2="http://webservice.demo.example.com/">userId[0xe4][0xb8][0xba][0xef][0xbc][0x9a]test1 </ns2:getUserResponse></soap:Body></soap:Envelope>"
16:31:42.611 [main] DEBUG org.apache.http.impl.conn.BasicClientConnectionManager - Releasing connection org.apache.http.impl.conn.ManagedClientConnectionImpl@59e5ddf
16:31:42.611 [main] DEBUG org.apache.http.impl.conn.BasicClientConnectionManager - Connection can be kept alive for 60000 MILLISECONDS
获取的返回参数为:userId为:test1
---userId为:test1