windows服务管理
在 Windows 系统中,有多种方法可以管理服务。以下是一些常用的服务管理方法:1. 服务控制管理器 (SCM)
服务控制管理器是一个系统级别的工具,用于启动、停止、暂停和恢复服务。它可以通过以下方式访问:
- 运行命令:在“运行”对话框(快捷键 Win + R)中输入
services.msc并按 Enter 键。- 命令行:使用
sc命令行工具。例如,sc start <servicename>启动服务,sc stop <servicename>停止服务。2. Windows 服务管理器 (services.msc)
这是一个图形界面工具,提供了一个用户友好的方式来查看、启动、停止和管理 Windows 服务。如上所述,您可以通过运行services.msc来访问它。3. PowerShell
PowerShell 提供了一套完整的 cmdlet 来管理服务。以下是一些常用的 cmdlet:
Get-Service:获取系统中的服务列表。Start-Service:启动服务。Stop-Service:停止服务。Restart-Service:重启服务。Set-Service:设置服务的属性,如启动类型。4. NSSM(Non-Sucking Service Manager)
NSSM 是一个第三方工具,可以将任何可执行程序作为 Windows 服务运行。它提供了一个命令行界面和图形界面来管理服务。使用方法如下:
- 下载并安装 NSSM。
- 使用
nssm install <servicename>命令创建服务。- 使用
nssm start <servicename>、nssm stop <servicename>和nssm restart <servicename>命令来管理服务。5. Task Scheduler
虽然 Task Scheduler 主要用于任务调度,但它也可以用来启动和停止服务。您可以创建一个任务来执行sc start <servicename>或sc stop <servicename>命令。6. 第三方软件
有许多第三方软件提供了服务管理功能,如 SolarWinds Service Manager、PRTG Network Monitor 等。这些工具通常提供更高级的功能,如监控、报告和自动化。7. 注册表编辑器
通过修改注册表,您可以更改服务的启动类型和其他属性。但是,这种方法需要谨慎使用,因为错误的修改可能会导致系统不稳定。总结
选择哪种方法取决于您的具体需求和偏好。对于简单的服务管理任务,Windows 服务管理器或 PowerShell 可能是最方便的选择。对于更复杂的需求,您可能需要使用 NSSM 或第三方软件。无论选择哪种方法,都建议在进行任何更改之前备份相关配置。
nssm 工具入门
https://zhuanlan.zhihu.com/p/14674945370
https://nssm.cc/download
How to deploy FastAPI on IIS server
https://medium.com/@memorygaurav/how-to-deploy-fastapi-on-iis-server-ba69e6a1c80a
FastAPI is a Web framework for developing RESTful APIs in Python. FastAPI is based on Pydantic and type hints to validate, serialize, and deserialize data, and automatically auto-generate OpenAPI documents. It fully supports asynchronous programming and can run Uvicorn and Gunicorn.
In this topic, we will cover how to publish the FastAPI application with on windows server 2019.
Let’s assume you already have a FastAPI project and python environment associated with it and you successfully uploaded it on the server.
First, we will test it locally by following steps.
- Activate your environment by enve_fold_path/Scripts/activate.bat command in cmd.
- Go to your project directory using cmd ex: cd path/to/project/folder
- Now, if you are in your project folder on the same cmd window then run
python -m uvicorn main:app — reload command.
here uvicorn is the asgi server, the main is the python file and the app is the FastAPI constructor function.
Command for running fastapi on local
4. If everything has done well so far then you can see your FastAPI is running on 127.0.0.1:8000 or localhost:8000.
Now we will host it on the IIS server, there are two ways of hosting on IIS
- by Proxy server
- by making the service and running it
Here we will follow the second that is By making the service and running it on the server.
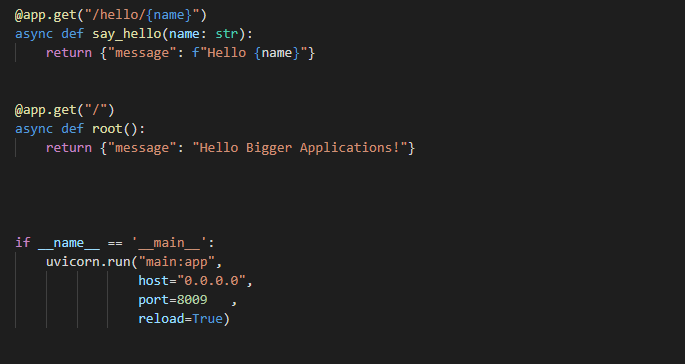
- We will add the command arguments inside our main.py file like given below

- Download the NSSM for creating the service from given below
https://nssm.cc/download- Unzip the nssm folder and go to your OS specific folder…. and open the command window here(cmd or Powershell)

nssm download folder
3. run the following command
nssm.exe install "FastAPIWindowsService"
"[Folder\path\to\your\python.exe]" "[Folder\path\to\your\main.py]"
Once you hit the enter button, you will see the confirmation message.
Woohoo!!! now service is created successfully and you can check it in services that one service will be there with the name “FastAPIWindowsService”.Next, you need to start the service.
After service successfully starts, now you can browse the API URL and will see that your API is running successfully.
Setting up Fast API in IIS and run APIs in Python
https://jstoppa.com/posts/artificial-intelligence/fundamentals/setting-up-fast-api-in-iis-and-use--apis-written-in-python/post/
Many clients I meet struggle to implement AI within their corporate infrastructure. They often become frustrated because their companies are mostly on-premises and use Windows, while the AI industry largely operates in the cloud. Although they can call APIs like ChatGPT and Azure OpenAI, they face problems when attempting to integrate more advanced AI features into solutions primarily written in Java and .NET.
This is where I see Python playing a crucial role. The AI industry predominantly uses it to develop solutions, making it easier to get up to speed with any AI example. The real question is whether you can integrate Python into your existing tech stack if it’s already based on Windows.
This article will show you how to setup an API written in Python using an amazing framework called FastAPI. This article is an introduction on how to use the framework, I blog later on more advanced use cases.
Setting up the app example in IIS
Follow the steps below to start with
NOTE: you’ll need to have Python and PIP installed for this, follow these steps if you haven’t installed it already
Create the website in IIS as shown in the image, note I’m using the port 8080
Copy the code example below into a main.py code (the example was taken from the Fast API website)
from typing import Union
from fastapi import FastAPI

app = FastAPI()

@app.get("/")
def read_root():
    return {"Hello": "World"}

@app.get("/items/{item_id}")
def read_item(item_id: int, q: Union[str, None] = None):
    return {"item_id": item_id, "q": q}
- Install Fast API using the pip command
pip install fastapiConfiguring the HttpPlatformHandler
The next step is to get the
HttpPlatformHandlerworking in IIS, this is a handler that passes socket connections directly to the Python process (more info here).
- Create a
web.configfile inside the website folder with the following content, make sure you change the folder to point at the location where python is installed in your local machine<?xml version="1.0" encoding="utf-8"?> <configuration> <system.webServer> <handlers accessPolicy="Read, Execute, Script"> <add name="FastAPIHttpPlatformHandler" path="*" verb="*" modules="httpPlatformHandler" resourceType="Unspecified" /> </handlers> <httpPlatform processPath="C:\Users\<username>\AppData\Local\Programs\Python\Python312\python.exe" arguments="-m uvicorn --port %HTTP_PLATFORM_PORT% main:app" stdoutLogEnabled="true" stdoutLogFile="C:\logs\python.log" startupTimeLimit="120" requestTimeout="00:05:00"> </httpPlatform> <httpErrors errorMode="Detailed" /> </system.webServer> </configuration>
- Navigate to the http://localhost:8080/ which should load the API already
Fast API also comes with swagger already installed, you can simply navigate to http://localhost:8080/docs
Other considerations
You might find some recommendations to use hypercorn rather than uvicorn, I tried that initially but I couldn’t resolve an issue with socket permission, I raised it as a bug in their GitHub repo.
You might also find issues where the API loads and hangs forever. In that case, you’ll most likely need to grant
IIS_IUSRSread access to the folder where the app and Python are located, as mentioned in here.
Configure Python web apps for IIS
Option 1 : Configure the HttpPlatformHandler
Option 2 : Configure the FastCGI handler
https://learn.microsoft.com/en-us/visualstudio/python/configure-web-apps-for-iis-windows?view=vs-2022#configure-the-httpplatformhandler
How to deploy ASGI on IIS?
https://learn.microsoft.com/en-us/answers/questions/505512/how-to-deploy-asgi-on-iis
If you just want to run a program at system startup, you can use the Windows task scheduler or a tool like NSSM that runs command line programs as a service.
Deploy FastAPI on IIS:
https://github.com/anwar-moj/Deploy-FastAPI-App-on-IIS
Running FastAPI Web Apps on IIS with HttpPlatformHandler
https://docs.lextudio.com/blog/running-fastapi-web-apps-on-iis-with-httpplatformhandler/
标签:nssm,服务,IIS,管理,windows,FastAPI,Python,your From: https://www.cnblogs.com/lightsong/p/18687791


