Nginx实现四层负载均衡
什么是四层负载均衡
四层、七层都是指OSI网络模型的。四层就是在传输层(TCP、UDP那一层)做端口转发(端口映射)
四层负载均衡应用场景
1、4层+7层来做负载均衡,四层可以保证七层负载均衡的高可用。
2、TCP协议的负载均衡。有些请求是TCP协议的(mysql、ssh),或者说这些请求只需要使用四层进行端口的转发就可以了,所以使用四层负载均衡。

总结:
1、四层负载均衡仅能转发TCP、UDP协议、通常用来转发端口,如:tcp/22、udp/53; 2、四层负载均衡可以用来解决七层负载均衡端口限制问题;(七层负载均衡最大使用65535个端口号) 3、四层负载均衡可以解决七层负载均衡高可用问题;(多台后端七层负载均衡能同时的使用)4、四层的转发效率比七层的高得多,但仅支持tcp协议,不支持http和https协议; (无法识别域名)5、通常大并发场景通常会选择使用在七层负载前面增加四层负载均衡。
nginx实现四层负载
- 七层负载均衡:upstream模块
- 四层负载均衡:stream模块(nginx 1.9版本后才有stream模块,可以支持四层负载均衡)
nginx四层负载均衡实践
环境准备
可以在之前实现博客7层负载均衡的环境基础上部署
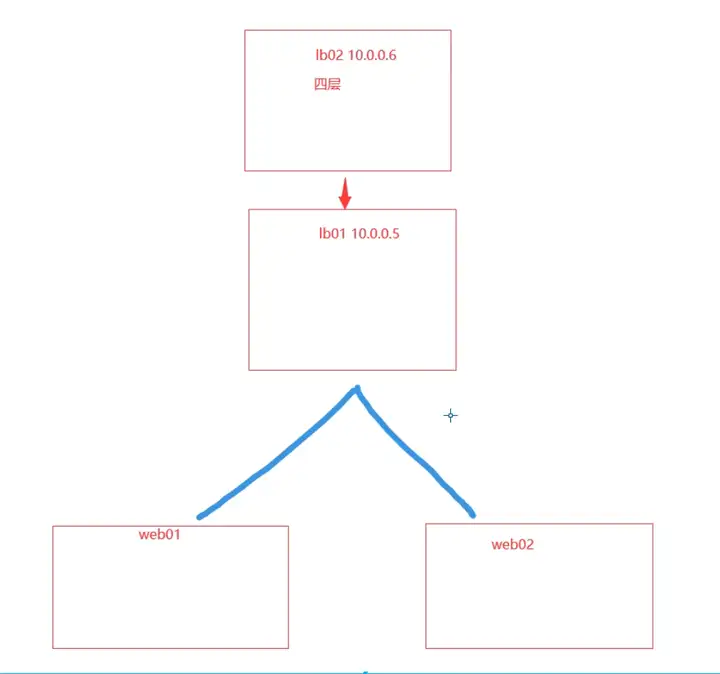
| 主机名 | 角色 | 应用 | IP |
|---|---|---|---|
| lb01 | 七层负载均衡 | Nginx | 10.0.0.5 |
| lb02 | 四层负载均衡 | Nginx | 10.0.0.6 |
| web01 | web网站 | nginx php wordpress博客网站 | 10.0.0.7 |
| web02 | web网站 | nginx php wordpress博客网站 | 10.0.0.8 |
| db01 | 数据库 | mysql | 10.0.0.51 |
部署
1、web01和web02还是之前的配置,都可以访问http://xxxx.xxx的状态
2、lb01的环境是之前的博客七层负载均衡
[root@lb01 /etc/nginx/conf.d]# cat blog_lb.conf
upstream blog_pools{
      server 172.16.1.7 weight=2;
      server 172.16.1.8 weight=1;
}
server {
      listen 80;
      server_name blog.andrew.com;
      location / {
              proxy_pass http://blog_pools;
              include /etc/nginx/conf.d/proxy_params;
      }
}

# 前面做实验重新源码装了nginx,可以把配置文件include进来即可
[root@lb01 /app/nginx/conf]# vim nginx.conf

include /app/nginx/conf/conf.d/*.conf;
include /etc/nginx/conf.d/*.conf;
3、lb02:四层负载均衡(核心部分)
# 官方源安装nginx
vim /etc/yum.repos.d/nginx.repo
[nginx-stable]
name=nginx stable repo
baseurl=http://nginx.org/packages/centos/$releasever/$basearch/
gpgcheck=1
enabled=1
gpgkey=https://nginx.org/keys/nginx_signing.key
module_hotfixes=true
# 修改配置文件:添加stream层
ngx_stream_core_module
配置可参考https://nginx.org/en/docs/stream/ngx_stream_core_module.html
#//在events层和http层之间加入stream层:(注意stream层不可以放在http层里面,放http层是七层,会报错)
[root@lb02 ~]# cd /etc/nginx
[root@lb02 /etc/nginx]# vim nginx.conf
events {
worker_connections 1024;
}
stream{
upstream backend{
server 172.16.1.5:80; #//拿lb02(172.16.1.6)代理lb01(172.16.1.5)的80端口
}
server{
listen 80;
proxy_pass backend; #//前面叫backend这里也叫backend
}
}
http{} # 注释掉http层的内容
...
# 重载nginx
[root@lb02 /etc/nginx]# nginx -t
[root@lb02 /etc/nginx]# systemctl reload nginx
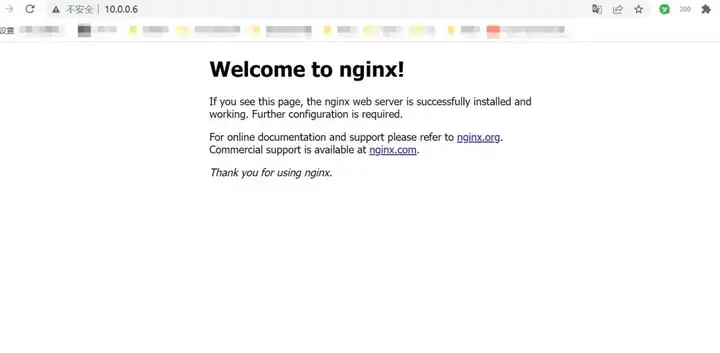
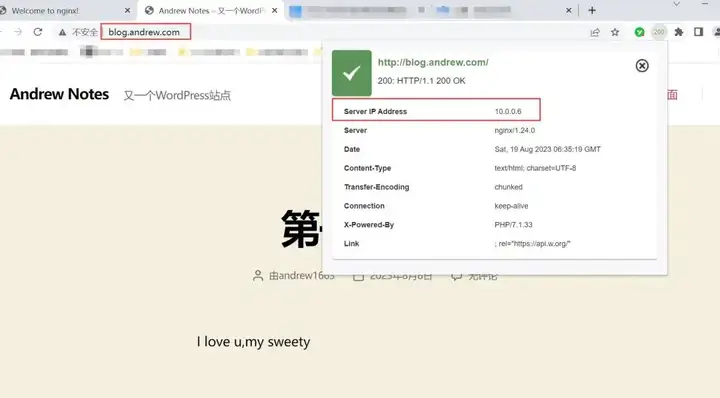
# 域名解析
#10.0.0.5 blog.andrew.com
10.0.0.6 blog.andrew.com
# 访问
# 修改配置
stream{
      upstream backend{
              server 172.16.1.5:80;
      }
      server{
              listen 90;    # 开放90端口
              proxy_pass backend;
      }
}

# 再次访问测试

更复杂的架构:两台lb做四层负载均衡

# 注:lb01配置同lb02,lb4配置示例如下
stream {
  upstream lbserver {
      server 10.0.0.4:80;
      server 10.0.0.5:80;
  }

  server {
      listen 80;
      proxy_pass lbserver;
      proxy_connect_timeout 1s;
      proxy_timeout 3s;
  }
}
四层负载均衡配置日志
#四层负载均衡是没有access的日志的,因为在nginx.conf的配置中,access的日志格式是配置在http下的,而四层负载均衡配置是在http以外的;

#如果需要日志则需要配置在stream下面
[root@lb4 ~]# vim /etc/nginx/conf.c/linux.lb4.com.conf
stream {
  log_format proxy '$remote_addr $remote_port - [$time_local] $status $protocol '
                 '"$upstream_addr" "$upstream_bytes_sent" "$upstream_connect_time"';
  access_log /var/log/nginx/proxy.log proxy;

  upstream lbserver {
      server 10.0.0.4:80;
      server 10.0.0.5:80;
  }

  server {
      listen 80;
      proxy_pass lbserver;
      proxy_connect_timeout 1s;
      proxy_timeout 3s;
  }
}

#查看所有web服务器日志
[root@web01 ~]# tail -f /var/log/nginx/access.log
[root@web02 ~]# tail -f /var/log/nginx/access.log
四层负载端口转发
测试环境
# 比如web02
[root@web02 ~]# ifdown eth0 //关闭eth0网卡。这时xshell再连web02便连不上了
# 如何用外网连上呢?
虽然web02外网关了,里面nginx,22端口还在
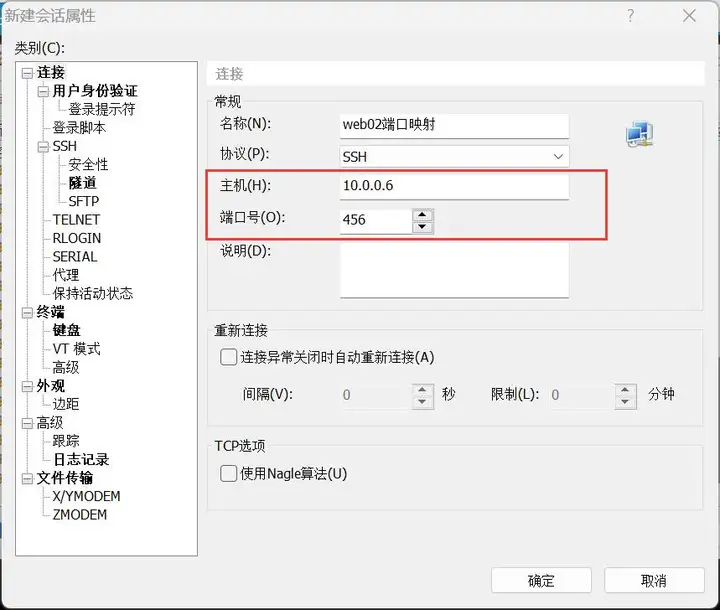
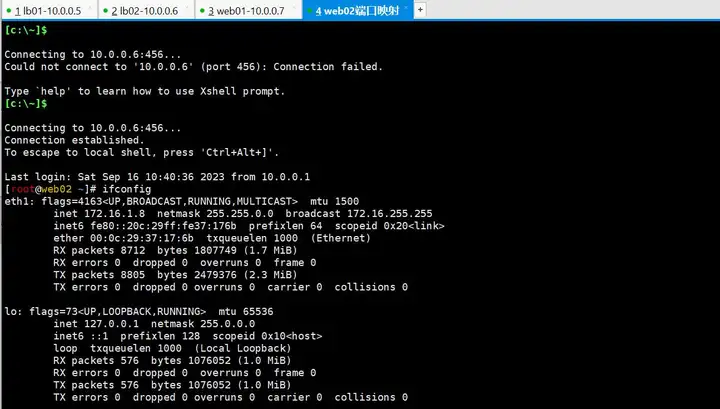
# 在lb02里面起一个456端口映射22端口,配置如下:
[root@lb02 /etc/nginx]# vim nginx.conf
...
stream{
upstream backend{
server 172.16.1.5:80;
}
server{
listen 90;
proxy_pass backend;
}
# 加入以下配置
upstream web02_ssh {
server 172.16.1.8:22;
}
server{
listen 456;
proxy_pass web02_ssh;
}
}
# 检查语法,重载nginx
这时在xshell便可以连web02:
结束实验,恢复设置:
标签:负载,Nginx,七层,server,四层,proxy,均衡,nginx From: https://www.cnblogs.com/beyang/p/18019316