一、直接apt安装
** 如果本机安装了nginx,卸载nginx
apt-get --purge autoremove nginx
检查本机是否还有nginx程序在后台运行,如果有直接kill掉。
ps -ef | grep nginx
1、默认版本安装
方便简单,很多依赖都自动给安装好了,一个命令即可:
apt-get update

apt-get install nginx
2、选择其它版本安装
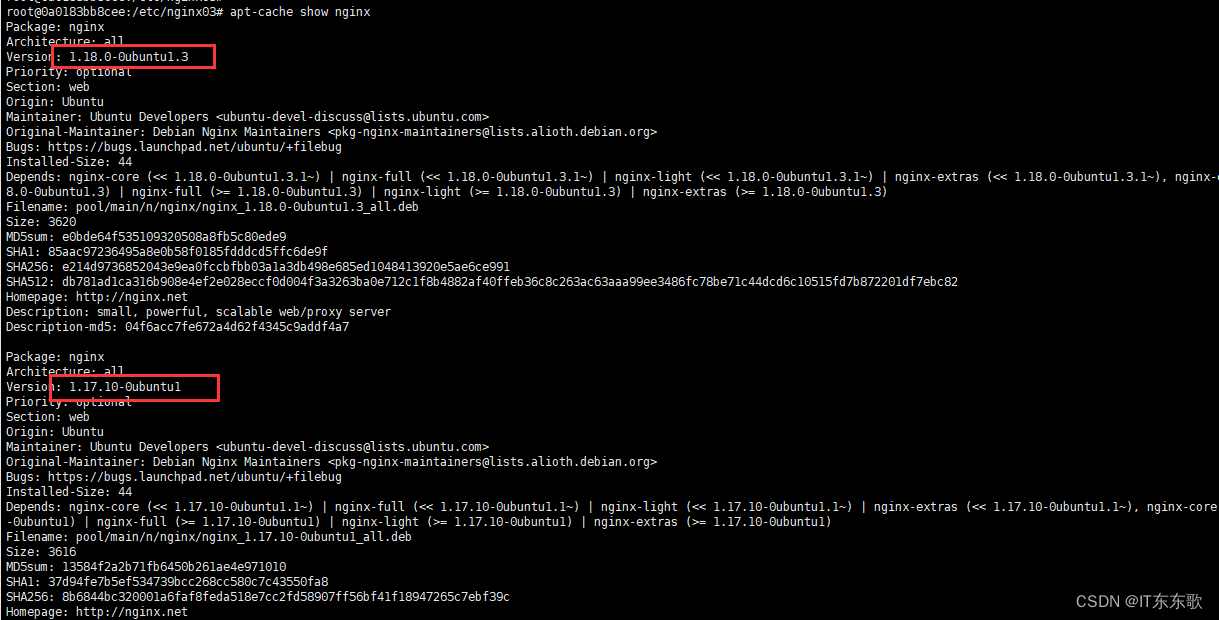
首先查看有什么版本
apt-get update

apt-cache show nginx

发现有2个版本可以安装,还伴随了其他版本信息的显示。然后选择我们想要的版本按照即可
apt-get install nginx=1.18.0-0ubuntu1.3
3、目录说明
/usr/sbin/nginx:主程序,启动文件
/etc/nginx:存放配置文件
/var/www/html:存放项目目录
/var/log/nginx:存放日志
一般自动安装配置文件目录和主程序目录不变,因为版本原因,其它目录可能会变,但是都可以从配置文件里ngxin.conf里找到对应的位置。
4、nginx管理命令
service nginx start
service nginx restart
service nginx stop
二、编译安装
1、下载nginx文件
下载想要的版本 Index of /nginx/
2、下载nginx的依赖
这一步对应上面的自动安装就显得麻烦了
apt-get install -y gcc
apt-get install -y libpcre3 libpcre3-dev
apt-get install -y zlib1g zlib1g-dev
apt-get install -y openssl
apt-get install -y libssl-dev
3、解压nginx压缩包
找个目录,把刚刚下载的nginx放进去,解压后进入:
# 如果你是从Windows拖压缩包到Linux,需要安装 lrzsz

apt-get -y install lrzsz

tar -xvf nginx-1.18.0.tar.gz

cd nginx-1.18.0

4、安装nginx
执行命令:
# 先把编译安装一下
apt-get install -y make
# 执行安装命令
./configure \
--prefix=/usr/local/nginx \
--sbin-path=/usr/local/nginx/sbin/nginx \
--conf-path=/etc/nginx/nginx.conf \
&& make \
&& make install
说明:
1) configure:是用来编译之前的配置工作
--prefix:指定最终安装到的目录 默认值 /usr/local/ngnix
--sbin-path:用来指定可执行文件目录:默认的是 sbin/nginx
--conf-path:用来指定配置文件目录:默认的是 conf/nginx.conf
2) make: 编译,生成了可执行文件
3) make install: 开始安装
4) 其实是三个命令,我用&&连在一起了,怕小白不明白说明下。因为我第一次看就懵了。
*** 当然还有配置其他参数,比如--user=nginx --group=nginx,详情可以百度哈。
5、nginx管理命令
1)把nginx加入环境变量
echo "PATH=/usr/local/nginx/sbin:${PATH}" > /etc/profile.d/nginx.sh
source /etc/profile.d/nginx.sh
2)配置启动项命令
把下面的脚本复制到这里
vim /etc/init.d/nginx
官网是提供了centos启动脚本,见下面链接,我这里盗了一份ubuntu的,亲测好使。两份还是不一样的。注意修改里面的红色字体参数和自己的环境所匹配。
:Red Hat NGINX Init Script | NGINX
#! /bin/sh
# chkconfig: 2345 55 25
# Description: Startup script for nginx webserver on Debian. Place in /etc/init.d and
# run 'update-rc.d -f nginx defaults', or use the appropriate command on your
# distro. For CentOS/Redhat run: 'chkconfig --add nginx'
### BEGIN INIT INFO
# Provides: nginx
# Required-Start: $all
# Required-Stop: $all
# Default-Start: 2 3 4 5
# Default-Stop: 0 1 6
# Short-Description: starts the nginx web server
# Description: starts nginx using start-stop-daemon
### END INIT INFO
# Author: licess
# website: http://lnmp.org
PATH=/usr/local/sbin:/usr/local/bin:/sbin:/bin:/usr/sbin:/usr/bin
NAME=nginx
NGINX_BIN=/usr/local/nginx/sbin/$NAME
CONFIGFILE=/etc/nginx/$NAME.conf
PIDFILE=/usr/local/nginx/logs/$NAME.pid
case "$1" in
start)
echo -n "Starting $NAME... "
if netstat -tnpl | grep -q nginx;then
echo "$NAME (pid `pidof $NAME`) already running."
exit 1
fi
$NGINX_BIN -c $CONFIGFILE
if [ "$?" != 0 ] ; then
echo " failed"
exit 1
else
echo " done"
fi
;;
stop)
echo -n "Stoping $NAME... "
if ! netstat -tnpl | grep -q nginx; then
echo "$NAME is not running."
exit 1
fi
$NGINX_BIN -s stop
if [ "$?" != 0 ] ; then
echo " failed. Use force-quit"
exit 1
else
echo " done"
fi
;;
status)
if netstat -tnpl | grep -q nginx; then
PID=`pidof nginx`
echo "$NAME (pid $PID) is running..."
else
echo "$NAME is stopped"
exit 0
fi
;;
force-quit)
echo -n "Terminating $NAME... "
if ! netstat -tnpl | grep -q nginx; then
echo "$NAME is not running."
exit 1
fi
kill `pidof $NAME`
if [ "$?" != 0 ] ; then
echo " failed"
exit 1
else
echo " done"
fi
;;
restart)
$0 stop
sleep 1
$0 start
;;
reload)
echo -n "Reload service $NAME... "
if netstat -tnpl | grep -q nginx; then
$NGINX_BIN -s reload
echo " done"
else
echo "$NAME is not running, can't reload."
exit 1
fi
;;
configtest)
echo -n "Test $NAME configure files... "
$NGINX_BIN -t
;;
*)
echo "Usage: $0 {start|stop|force-quit|restart|reload|status|configtest}"
exit 1
;;
esac
3)保存后修改执行权限
chmod a+x /etc/init.d/nginx
注意**:如果你是从Windows挪过来的nginx文件,需要在/etc/init.d/nginx保存的时候设置下格式,要不执行的时候报格式错误,(vim 的命令行设置)
:set ff=unix
4)测试启动nginx
完毕
注:官网还提供了一个方法:我还没试过,大家也多看官网信息,那里是最权威的。https://github.com/Fleshgrinder/nginx-sysvinit-script/blob/master/README.md
来自于
https://blog.csdn.net/u014225032/article/details/125283332
标签:NAME,nginx,get,apt,echo,Nginx,usr,Ubuntu,安装 From: https://www.cnblogs.com/sexintercourse/p/17860297.html