目录
1 Elasticsearch
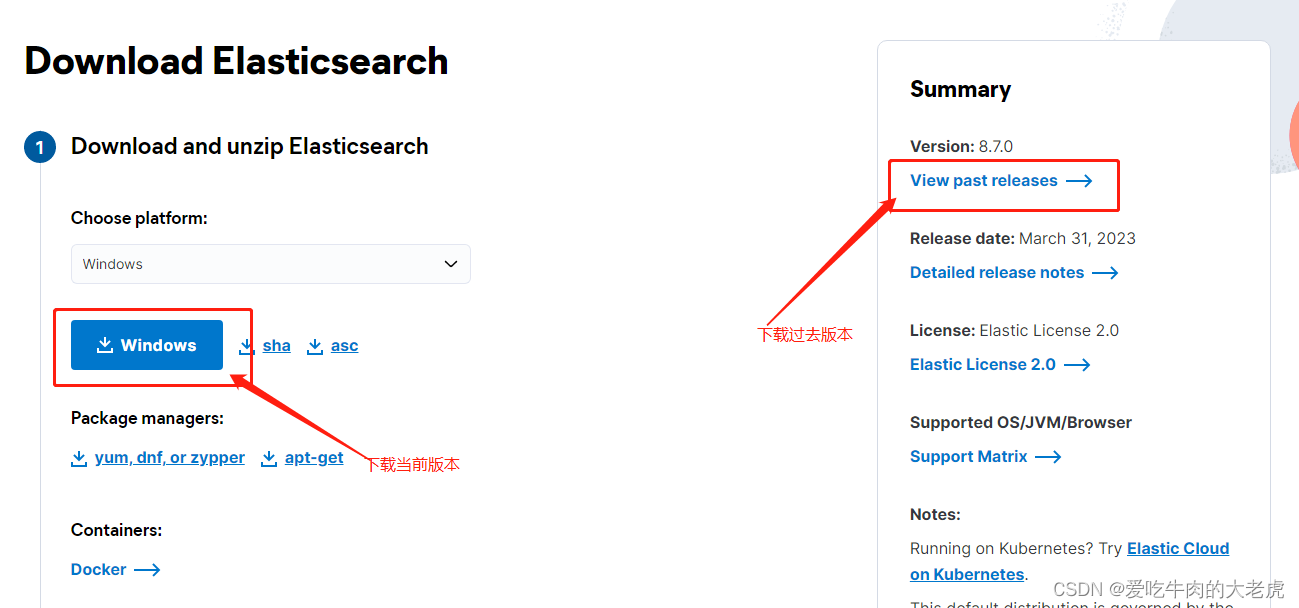
1.1 下载
Elasticsearch 高版本内置jdk,无需使用系统安装的java
官网下载:https://www.elastic.co/cn/downloads/elasticsearch#ga-release
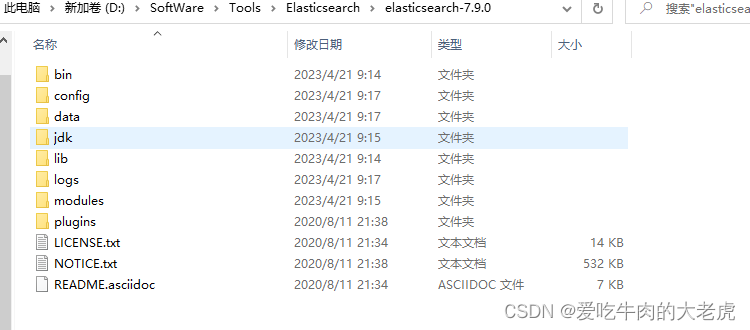
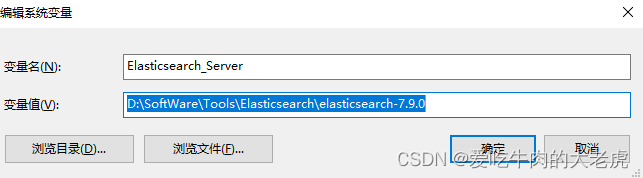
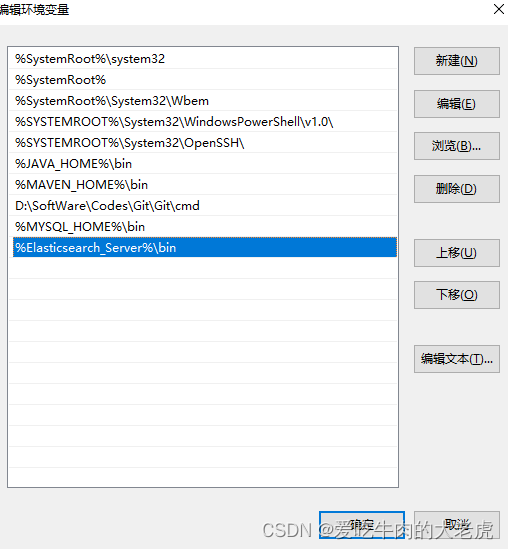
1.2 解压并添加环境变量
解压后,进入bin 目录,双击 elasticsearch.bat 启动 elasticsearch 服务
添加到环境变量 Elasticsearch_Server,并加入到 PATH 中
1.3 访问
如果是 低版本访问,直接访问 http://127.0.0.1:9200/
{
  "name" : "WIN10-0005",
  "cluster_name" : "elasticsearch",
  "cluster_uuid" : "N1y8VKIrSJetMBTokWxFoA",
  "version" : {
    "number" : "7.9.0",
    "build_flavor" : "default",
    "build_type" : "zip",
    "build_hash" : "a479a2a7fce0389512d6a9361301708b92dff667",
    "build_date" : "2020-08-11T21:36:48.204330Z",
    "build_snapshot" : false,
    "lucene_version" : "8.6.0",
    "minimum_wire_compatibility_version" : "6.8.0",
    "minimum_index_compatibility_version" : "6.0.0-beta1"
  },
  "tagline" : "You Know, for Search"
}
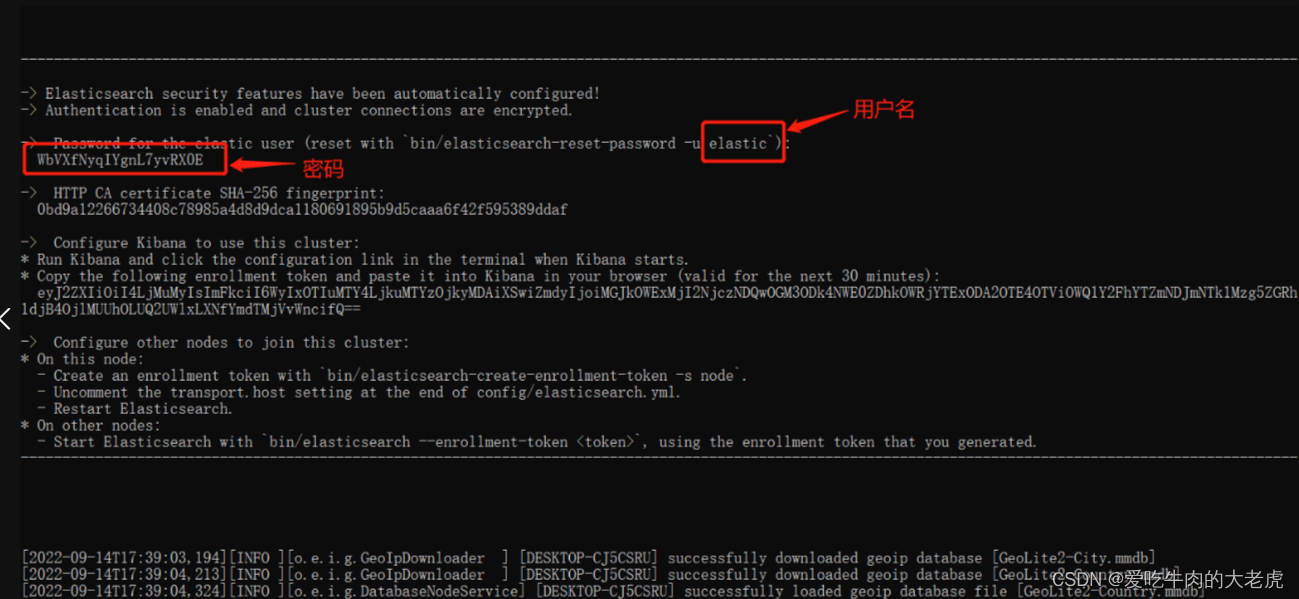
如果是高版本,则需要以https的方式访问:https://127.0.0.1:9200/,同时还得留意启动时日志的用户名+密码
1.4 cmd命令
注意:以下命令最好用 管理员身份 运行
安装 Elasticsearch 服务:elasticsearch-service.bat install

卸载Elasticsearch服务:elasticsearch-service.bat remove
如下的elasticsearch-service命令需要以上面的install为基础,才能进行下面的命令:
- 启动Elasticsearch服务:
elasticsearch-service.bat start,这种方式启动和上面的双击elasticsearch.bat启动区别是后置启动,不会一直占着dos窗口刷日志 - 停止Elasticsearch服务:
elasticsearch-service.bat stop - 启动 Elasticsearch 属性gui:
elasticsearch-service.bat manager
1.5 中文分词器
1.5.1 下载
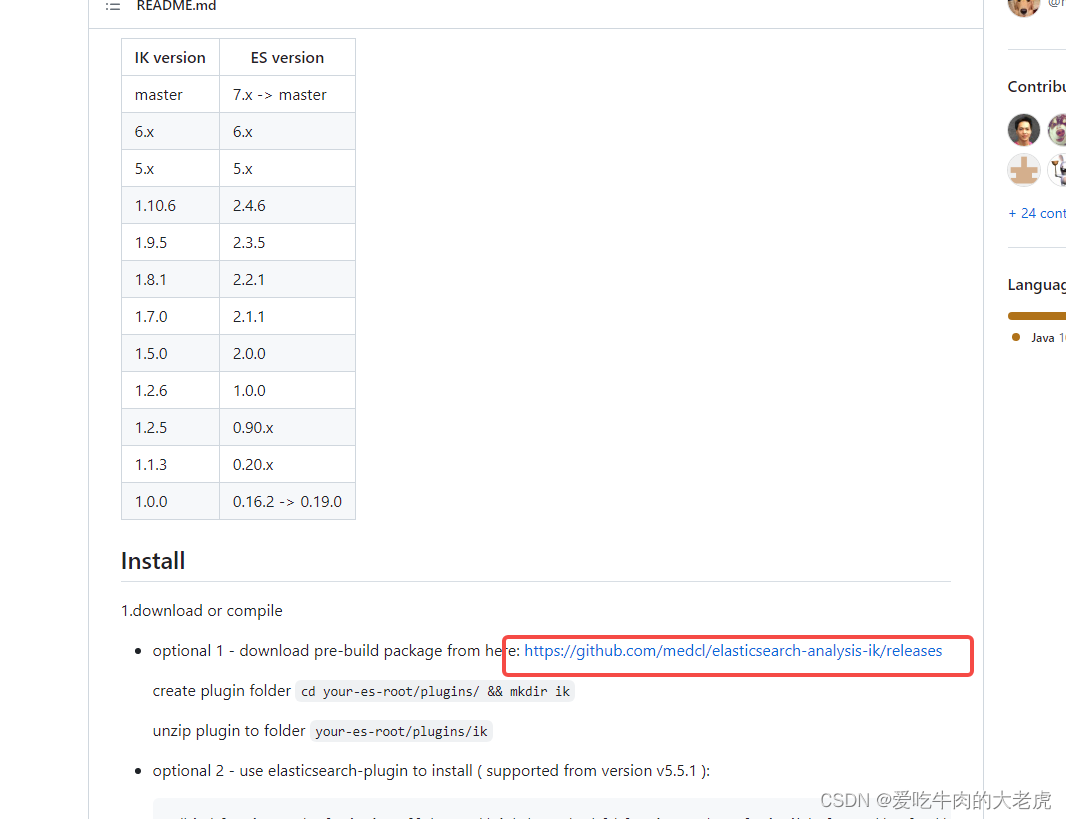
下载 ik分词器:https://github.com/medcl/elasticsearch-analysis-ik,如果不能访问github,就用国内的这个gitee也可以:https://gitee.com/mirrors/elasticsearch-analysis-ik/tree/master/
注意:IK分词器插件的版本要和 ElasticSearch的版本一致,github上点击下面下载历史分词器
1.5.2 安装
1.5.2.1 命令安装
把下载的zip包随便放个位置,比如在解压文件夹下,使用bin目录中的elasticsearch-plugin命令即可安装成功:elasticsearch-plugin install
D:\SoftWare\Tools\Elasticsearch\elasticsearch-7.9.0\bin>elasticsearch-plugin install file:\\\\D:\SoftWare\Tools\Elasticsearch\elasticsearch-7.9.0\elasticsearch-analysis-ik-7.9.0.zip
-> Installing file:\\\\D:\SoftWare\Tools\Elasticsearch\elasticsearch-7.9.0\elasticsearch-analysis-ik-7.9.0.zip
-> Downloading file:\\\\D:\SoftWare\Tools\Elasticsearch\elasticsearch-7.9.0\elasticsearch-analysis-ik-7.9.0.zip
[=================================================] 100%??
@@@@@@@@@@@@@@@@@@@@@@@@@@@@@@@@@@@@@@@@@@@@@@@@@@@@@@@@@@@
@     WARNING: plugin requires additional permissions     @
@@@@@@@@@@@@@@@@@@@@@@@@@@@@@@@@@@@@@@@@@@@@@@@@@@@@@@@@@@@
* java.net.SocketPermission * connect,resolve
See http://docs.oracle.com/javase/8/docs/technotes/guides/security/permissions.html
for descriptions of what these permissions allow and the associated risks.

Continue with installation? [y/N]y
-> Installed analysis-ik
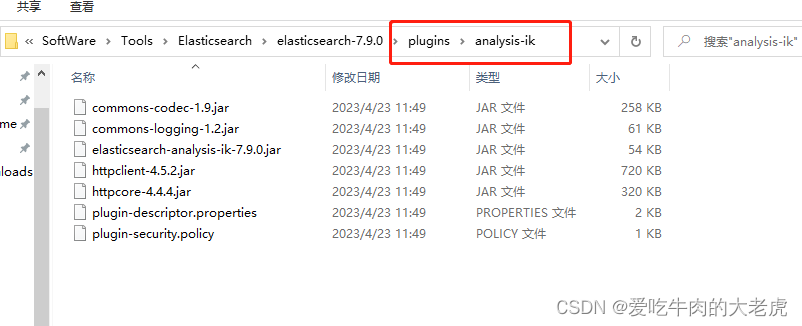
安装成功后在plugins下有一个analysis-ik文件夹,同时下面会有很多jar包
1.5.2.2 手动安装
直接手动解压后,在plgins下新建一个文件夹,比如ik,并把解压后的jar包放进新建的ik包中,同时把在新建的ik下新建config文件夹,存放解压后的配置文件
复制解压后的ik分词器中的config文件夹中配置 IKAnalyzer.cfg.xml 文件放在ES 目录 /plugins/ik/config/IKAnalyzer.cfg.xml
<?xml version="1.0" encoding="UTF-8"?>
<!DOCTYPE properties SYSTEM "http://java.sun.com/dtd/properties.dtd">
<properties>
        <comment>IK Analyzer 扩展配置</comment>
        <!--用户可以在这里配置自己的扩展字典 -->
        <entry key="ext_dict"></entry>
         <!--用户可以在这里配置自己的扩展停止词字典-->
        <entry key="ext_stopwords"></entry>
        <!--用户可以在这里配置远程扩展字典 -->
        <!-- <entry key="remote_ext_dict">words_location</entry> -->
        <!--用户可以在这里配置远程扩展停止词字典-->
        <!-- <entry key="remote_ext_stopwords">words_location</entry> -->
</properties>
1.5.2.3 验证分词
在kibana 的开发工具中输入以下来验证,其中
ik_max_word:会做最细粒度的拆分,把能拆分的词都拆出来ik_smart:会做最粗粒度的拆分,贪心算法,尽可能把词分得长
GET _analyze
{
  "analyzer":"ik_max_word",
  "text": "我们是中国人"
}
1.6 使用curl批量导入
把下载的 curl.exe 和要上传的文件放进一个文件夹内
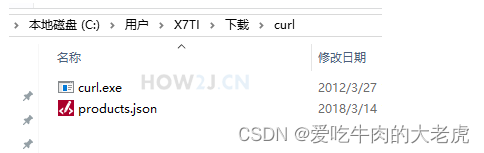
在cmd中,先切换到 curl 所在目录内,再运行如下命令:
curl -H "Content-Type: application/json"
	-XPOST "localhost:9200/test001/product/_bulk?refresh"
	--data-binary "@products.json"
2 安装 kibana
Kibana 是在ElasticSearch 有了相当多的数据之后,进行分析这些数据用的工具。 Kibana 里面有一个叫做 Dev Tools的,可以很方便地以Restful 风格向 ElasticSearch 服务器提交请求
2.1 下载kibana
下载地址和ElasticSearch一样地址,下载Kibana是在 Elasticsearch 历史版本中查找:https://www.elastic.co/cn/downloads/elasticsearch#ga-release
注意:下载与 Elasticsearch 相同版本的 kibana
加压后进入 bin 目录 运行启动中的 kibana.bat
运行测试,在浏览器中输入:127.0.0.1:5601,进入页面
GET /_cat/health?v:然后点击绿色箭头进行运行,就可以看到右侧出现查询结果
GET /_cat/health?v 这个命令用来查看服务器状态(健康度),green 表示一切OK

2.2 中文界面
修改 config\kibana.yml 文件,将 i18n.locale: "en", 改为 i18n.locale: "zh-CN"
i18n.locale: "zh-CN"
2.3 操作索引
索引相当于就是一个数据库服务器上的某个数据库,所以索引也可以看成是ElasticSearch 里的某个数据库
由于 ElasticSearch 支持Restful 风格,因此可以直接使用
在使用 Restful 风格之前,进行所以管理需要这样的访问地址: add,delete,update,get 等不同的访问地址来表示不同的业务请求。
但是使用 Restful 风格,就通过提交不同的method 来表示 CRUD:
PUT表示增加GET表示获取POST表示更新DELETE表示删除
2.3.1 增加索引
2.3.1.1 单条新增
在 kibana 控制台中输入如下命令:
打开 kibana控制台:http://127.0.0.1:5601/app/dev_tools#/console
运行如下命令:
PUT /test001?pretty

返回:
{
  "acknowledged" : true,
  "shards_acknowledged" : true,
  "index" : "test001"
}
表示创建成功了,索引名称是test001
PUT /test001/product/1?pretty
{
  "name": "蜡烛"
}
返回
{
  "_index" : "test001",
  "_type" : "product",
  "_id" : "1",
  "_version" : 1,
  "result" : "created",
  "_shards" : {
    "total" : 2,
    "successful" : 1,
    "failed" : 0
  },
  "_seq_no" : 0,
  "_primary_term" : 1
}
返回如图所示增加成功的响应
注意: 其中 test001 是索引,product 在 elastic search 里是 type 的概念,相当于数据库里的表,这里就相当于向 product 表里插入了一条数据
2.3.1.2 批量新增
使用 POST _bulk 命令
发送
POST _bulk
{"index":{"_index":"test001","_type":"product","_id":10001}}
{"code":"540785126782","price":398,"name":"房屋卫士自流平美缝剂瓷砖地砖专用双组份真瓷胶防水填缝剂镏金色","place":"上海","category":"品质建材"}
{"index":{"_index":"test001","_type":"product","_id":10002}}
{"code":"24727352473","price":21.799999237060547,"name":"艾瑞泽手工大号小号调温热熔胶枪玻璃胶枪硅胶条热溶胶棒20W-100W","place":"山东青岛","category":"品质建材"}
{"index":{"_index":"test001","_type":"product","_id":10003}}
2.3.2 查看索引
使用命令:GET /_cat/indices?v
发送:GET /_cat/indices?v
返回:
health status index                          uuid                   pri rep docs.count docs.deleted store.size pri.store.size
green  open   .apm-custom-link               4sDRsROYSv2Awz9mZRrdYg   1   0          0            0       208b           208b
green  open   .kibana_task_manager_1         Nvzs-tllQhW7sU1ITpW__w   1   0          6            5    200.4kb        200.4kb
green  open   .kibana-event-log-7.9.0-000001 TT6RfcaeSQ26KI2URoXHoA   1   0          3            0     16.2kb         16.2kb
green  open   .apm-agent-configuration       YHrdAyKbQSCVjAbw3gSBsQ   1   0          0            0       208b           208b
yellow open   test001                        vZZ9KuO-R0qH_lNl0iWE-A   1   1          0            0       208b           208b
green  open   .kibana_1                      WNX2ylpfRGSIWUTXfZNyOg   1   0         74            0     10.7mb         10.7mb
使用单个命令 GET /test001/product/1?pretty 查看单个
发送:GET /test001/product/1?pretty
返回
{
  "_index" : "test001",
  "_type" : "product",
  "_id" : "1",
  "_version" : 1,
  "_seq_no" : 0,
  "_primary_term" : 1,
  "found" : true,
  "_source" : {
    "name" : "蜡烛"
  }
}
2.3.3 修改索引
使用 PUT /test001/product/1?pretty
发送:
PUT /test001/product/1?pretty
{
  "name": "红色蜡烛"
}
第二种使用 POST,这才是正规的修改,其实和修改文档1 效果一样的
POST /test001/product/1/_update?pretty
{
  "doc": { "name": "蓝色蜡烛" }
}
2.3.4 删除索引
使用命令:DELETE /test001?pretty
发送:DELETE /test001?pretty
返回:
{
  "acknowledged" : true
}
使用命令:DELETE /test001/product/1?pretty
返回
{
  "_index" : "test001",
  "_type" : "product",
  "_id" : "1",
  "_version" : 4,
  "result" : "deleted",
  "_shards" : {
    "total" : 2,
    "successful" : 1,
    "failed" : 0
  },
  "_seq_no" : 3,
  "_primary_term" : 1
}
2.4 查询操作
2.4.1 查询对象
query查询对象中有值:
match_all:代表查询所有match:匹配查询
match类型查询,会把查询条件进行分词,然后进行查询,多个词条之间是or的关系and关系
某些情况下,我们需要更精确查找,我们希望这个关系变成and,可以这样做
or关系查询
{
    "query":{
        "match":{
            "title":"小米电视"
        }
    }
}
and 关系查询
{
    "query":{
        "match": {
          "title": {
            "query": "小米电视",
            "operator": "and"
          }
        }
    }
}
or和and都包含:match 查询支持 minimum_should_match 最小匹配参数, 这让我们可以指定必须匹配的词项数用来表示一个文档是否相关
{
    "query":{
        "match":{
            "title":{
            	"query":"小米曲面电视",
            	"minimum_should_match": "75%"
            }
        }
    }
}
multi_match:多字段查询
multi_match与match类似,不同的是它可以在多个字段中查询
我们会在title字段和subtitle字段中查询小米这个词
{
    "query":{
        "multi_match": {
            "query":    "小米",
            "fields":   [ "title", "subTitle" ]
        }
	}
}
term:词条匹配
term查询被用于精确值匹配,这些精确值可能是数字、时间、布尔或者那些未分词的字符串terms:多词条精确匹配
terms查询和term查询一样,但它允许你指定多值进行匹配。如果这个字段包含了指定值中的任何一个值,那么这个文档满足条件:
{
    "query":{
        "terms":{
            "price":[2699.00,2899.00,3899.00]
        }
    }
}
2.4.2 分页排序查询
2.4.2.1 排序查询
GET /test001/_search
{
  "query": { "match_all": {} },
  "sort": [
    { "_id": "desc" }
  ]
}
或者
{
  "query": { "match_all": {} },
  "sort": [
    { "_id": {"order":"desc"} }
  ]
}
2.4.2.2 分页查询
GET /test001/_search
{
  "query": { "match_all": {} },
  "from": 1,
  "size": 3,
  "sort": { "_id": { "order": "desc" } }
}
2.4.3 只返回部分字段
通过_source或者 includes 和 excludes
_source和includes:来指定想要显示的字段excludes:来指定不想要显示的字段
只用_source
GET /test001/_search
{
  "query": { "match_all": {} },
  "_source": ["name","price"]
}

使用includes
{
  "_source": {
    "includes":["title","price"]
  },
  "query": {
    "term": {
      "price": 2699
    }
  }
}
使用excludes
{
  "_source": {
     "excludes": ["images"]
  },
  "query": {
    "term": {
      "price": 2699
    }
  }
}
2.4.4 高级查询
2.4.4.1 布尔组合
bool把各种其它查询通过must(与)、must_not(非)、should(或)的方式进行组合
{
    "query":{
        "bool":{
        	"must":     { "match": { "title": "大米" }},
        	"must_not": { "match": { "title":  "电视" }},
        	"should":   { "match": { "title": "手机" }}
        }
    }
}
2.4.4.2 范围查询
range 查询找出那些落在指定区间内的数字或者时间
{
    "query":{
        "range": {
            "price": {
                "gte":  1000.0,
                "lt":   2800.00
            }
    	}
    }
}
2.4.4.3 模糊查询
fuzzy 查询是 term 查询的模糊等价。它允许用户搜索词条与实际词条的拼写出现偏差,但是偏差的编辑距离不得超过2
{
  "query": {
    "fuzzy": {
      "title": "appla"
    }
  }
}
2.4.4.4 过滤
所有的查询都会影响到文档的评分及排名。如果我们需要 在查询结果中进行过滤,并且不希望过滤条件影响评分,那么就不要把过滤条件作为查询条件来用。而是使用filter方式:
{
    "query":{
        "bool":{
        	"must":{ "match": { "title": "小米手机" }},
        	"filter":{
                "range":{"price":{"gt":2000.00,"lt":3800.00}}
        	}
        }
    }
}
注意:filter中还可以再次进行bool组合条件过滤。
如果一次查询只有过滤,没有查询条件,不希望进行评分,我们可以使用constant_score取代只有 filter 语句的 bool 查询。在性能上是完全相同的,但对于提高查询简洁性和清晰度有很大帮助。
{
    "query":{
        "constant_score":   {
            "filter": {
            	 "range":{"price":{"gt":2000.00,"lt":3000.00}}
            }
        }
}
2.4.5 聚合操作
如下查询,第一个size:0表示 不用显示每条数据,第二个size:3表示分组数据显示3条
GET /test001/_search
{
  "size": 0,
  "aggs": {
    "group_by_place": {
      "terms": {
        "field": "place.keyword",
        "size": 3
      }
    }
  }
}