一、简述
dynamic-tp是一个轻量级的动态线程池插件,它是一个基于配置中心的动态线程池,线程池的参数可以通过配置中心配置进行动态的修改,目前支持的配置中心有Apollo,Nacos和Zookeeper,同时dynamic-tp支持线程池的监控和报警,具体特性如下:
- 基于Spring框架,现只支持SpringBoot项目使用,轻量级,引入starter即可使用
- 基于配置中心实现线程池参数动态调整,实时生效;集成主流配置中心,已支持Nacos、Apollo,Zookeeper,同时也提供SPI接口可自定义扩展实现
- 内置通知报警功能,提供多种报警维度(配置变更通知、活性报警、容量阈值报警、拒绝策略触发报警),默认支持企业微信、钉钉报警,同时提供SPI接口可自定义扩展实现
- 内置线程池指标采集功能,支持通过MicroMeter、JsonLog日志输出、Endpoint三种方式,可通过SPI接口自定义扩展实现
- 集成管理常用第三方组件的线程池,已集成SpringBoot内置WebServer(tomcat、undertow、jetty)的线程池管理
- Builder提供TTL包装功能,生成的线程池支持上下文信息传递
二、源码分析
在分析源码之前,我们先来思考下如果是我们来实现动态线程池组件应该如何设计。
- 首先不论是硬编码的线程池还是通过配置化动态生成的线程池都是一类线程池(同一基类),而这一类线程池的参数可以抽象成
配置,这个配置既可以是本项目中的文件;也可以是任意远程端口的文件,例如包括业界的配置中心们例如nacos,zookeeper,apollo,etcd等;当然它甚至可以不依赖配置中心,通过前端管理系统页面配置,走DB,通过刷新API接口中的String类型的文本配置,进而刷新线程池配置,这也是一种实现思路。 - 提供一个功能入口可以将
配置构造成一个线程池对象,内部维护一个线程池注册表,将配置对应的线程池添加至注册表中。 - 实例化线程池对象,Spring环境则注入依赖Bean,以供IOC容器使用。
- 项目启动时首先先加载
配置实例化线程池对象 - 如果
配置指向的是远端配置中心,则注册监听器,当远端注册配置中心刷新时回调,当前系统监听到回调刷新配置,刷新线程池(动态调参),刷新本地线程池注册表。
至此我们设计出来的简易动态线程池组件应该可以基本使用了。
其实简易动态线程池组件还有很多进步的空间,例如线程池调参监控,异常报警等。
当然以上说的这些基础功能以及额外的高级功能,dynamic-tp都已经实现了,不过它目前没有提供支持我们刚刚所说通过管理系统页面配置走DB通过接口刷新的官方实现,且不支持除配置中心应用外的选择,也就是说无配置中心应用,目前不支持线程池动态调参(但支持监控),但事实上你可以根据它提供的SPI自行实现。
这可能dynamic-tp定位是轻量级动态线程池组件,且配置中心是现在大多数互联网系统都会使用的组件有关。
2.1 配置
dynamic-tp通过DtpProperties来做配置的统一收口,这个配置包括本地文件或者配置中心中的文件(properties,json,yml,txt,xml),可以看到目前已支持Nacos、Apollo、Zookeeper、Consul、Etcd配置中心
@Slf4j
@Data
@ConfigurationProperties(prefix = DynamicTpConst.MAIN_PROPERTIES_PREFIX)
public class DtpProperties {

    /**
     * If enabled DynamicTp.
     */
    private boolean enabled = true;

    /**
     * If print banner.
     */
    private boolean enabledBanner = true;

    /**
     * Nacos config.
     */
    private Nacos nacos;

    /**
     * Apollo config.
     */
    private Apollo apollo;

    /**
     * Zookeeper config.
     */
    private Zookeeper zookeeper;

    /**
     * Etcd config.
     */
    private Etcd etcd;

    /**
     * Config file type.
     */
    private String configType = "yml";

    /**
     * If enabled metrics collect.
     */
    private boolean enabledCollect = false;

    /**
     * Metrics collector types, default is logging.
     */
    private List<String> collectorTypes = Lists.newArrayList(MICROMETER.name());

    /**
     * Metrics log storage path, just for "logging" type.
     */
    private String logPath;

    /**
     * Monitor interval, time unit(s)
     */
    private int monitorInterval = 5;

    /**
     * ThreadPoolExecutor configs.
     */
    private List<ThreadPoolProperties> executors;

    /**
     * Tomcat worker thread pool.
     */
    private SimpleTpProperties tomcatTp;

    /**
     * Jetty thread pool.
     */
    private SimpleTpProperties jettyTp;

    /**
     * Undertow thread pool.
     */
    private SimpleTpProperties undertowTp;

    /**
     * Dubbo thread pools.
     */
    private List<SimpleTpProperties> dubboTp;

    /**
     * Hystrix thread pools.
     */
    private List<SimpleTpProperties> hystrixTp;

    /**
     * RocketMq thread pools.
     */
    private List<SimpleTpProperties> rocketMqTp;

    /**
     * Grpc thread pools.
     */
    private List<SimpleTpProperties> grpcTp;

    /**
     * Motan server thread pools.
     */
    private List<SimpleTpProperties> motanTp;

    /**
     * Okhttp3 thread pools.
     */
    private List<SimpleTpProperties> okhttp3Tp;

    /**
     * Brpc thread pools.
     */
    private List<SimpleTpProperties> brpcTp;

    /**
     * Tars thread pools.
     */
    private List<SimpleTpProperties> tarsTp;

    /**
     * Sofa thread pools.
     */
    private List<SimpleTpProperties> sofaTp;

    /**
     * Notify platform configs.
     */
    private List<NotifyPlatform> platforms;

    @Data
    public static class Nacos {

        private String dataId;

        private String group;

        private String namespace;
    }

    @Data
    public static class Apollo {

        private String namespace;
    }

    @Data
    public static class Zookeeper {

        private String zkConnectStr;

        private String configVersion;

        private String rootNode;

        private String node;

        private String configKey;
    }

    /**
     * Etcd config.
     */
    @Data
    public static class Etcd {

        private String endpoints;

        private String user;

        private String password;

        private String charset = "UTF-8";

        private Boolean authEnable = false;

        private String authority = "ssl";

        private String key;
    }
}
项目中提供了一个配置解析接口ConfigParser
public interface ConfigParser {

    // 是否支持配置解析
    boolean supports(ConfigFileTypeEnum type);

    // 解析支持的类型
    List<ConfigFileTypeEnum> types();

    // 解析
    Map<Object, Object> doParse(String content) throws IOException;

    // 解析指定前缀
    Map<Object, Object> doParse(String content, String prefix) throws IOException;
}
ConfigFileTypeEnum如下,覆盖了主流文件类型
@Getter
public enum ConfigFileTypeEnum {
    PROPERTIES("properties"),
    XML("xml"),
    JSON("json"),
    YML("yml"),
    YAML("yaml"),
    TXT("txt");
}
项目中实现了配置解析基类,以及默认提供了3中文件类型配置解析类,json,properties以及yaml,使用者完全可以通过继承AbstractConfigParser来补充配置解析模式。

AbstractConfigParser代码如下,模板方法由子类实现具体的解析逻辑。
public abstract class AbstractConfigParser implements ConfigParser {

    @Override
    public boolean supports(ConfigFileTypeEnum type) {
        return this.types().contains(type);
    }

    @Override
    public Map<Object, Object> doParse(String content, String prefix) throws IOException {
        return doParse(content);
    }
}
子类的实现这里就不看了,大差不差就是通过读取文件,解析每一行配置项,最后将结果封装成Map<Object, Object> result返回。
接着通过Spring-bind提供的解析方法将Map<Object, Object> result绑定到DtpProperties配置类上
实现代码如下:
public class PropertiesBinder {

    private PropertiesBinder() { }

    public static void bindDtpProperties(Map<?, Object> properties, DtpProperties dtpProperties) {
        ConfigurationPropertySource sources = new MapConfigurationPropertySource(properties);
        Binder binder = new Binder(sources);
        ResolvableType type = ResolvableType.forClass(DtpProperties.class);
        Bindable<?> target = Bindable.of(type).withExistingValue(dtpProperties);
        binder.bind(MAIN_PROPERTIES_PREFIX, target);
    }

    public static void bindDtpProperties(Environment environment, DtpProperties dtpProperties) {
        Binder binder = Binder.get(environment);
        ResolvableType type = ResolvableType.forClass(DtpProperties.class);
        Bindable<?> target = Bindable.of(type).withExistingValue(dtpProperties);
        binder.bind(MAIN_PROPERTIES_PREFIX, target);
    }
}
到这里已经拿到了配置,我们来看接下来的流程。
2.2 注册线程池
DtpBeanDefinitionRegistrar实现了ConfigurationClassPostProcessor利用Spring的动态注册bean机制,在bean初始化之前注册BeanDefinition以达到注入bean的目的
ps:最终被Spring ConfigurationClassPostProcessor执行出来对这块不熟悉的小伙伴可以去翻看Spring源码。
来看下DtpBeanDefinitionRegistrar具体做了什么吧
@Slf4j
public class DtpBeanDefinitionRegistrar implements ImportBeanDefinitionRegistrar, EnvironmentAware {

    private Environment environment;

    @Override
    public void setEnvironment(Environment environment) {
        this.environment = environment;
    }

    @Override
    public void registerBeanDefinitions(AnnotationMetadata importingClassMetadata,
                                        BeanDefinitionRegistry registry) {
        DtpProperties dtpProperties = new DtpProperties();
        // 从 Environment 读取配置信息绑定到 DtpProperties
        PropertiesBinder.bindDtpProperties(environment, dtpProperties);
        // 获取配置文件中配置的线程池
        val executors = dtpProperties.getExecutors();
        if (CollectionUtils.isEmpty(executors)) {
            log.warn("DynamicTp registrar, no executors are configured.");
            return;
        }
        // 遍历并注册线程池 BeanDefinition
        executors.forEach(x -> {
            // 类型选择,common->DtpExecutor,eager->EagerDtpExecutor
            Class<?> executorTypeClass = ExecutorType.getClass(x.getExecutorType());
            // 通过 ThreadPoolProperties 来构造线程池所需要的属性
            Map<String, Object> properties = buildPropertyValues(x);
            Object[] args = buildConstructorArgs(executorTypeClass, x);
            // 工具类 BeanDefinition 注册 Bean 相当于手动用 @Bean 声明线程池对象
            BeanUtil.registerIfAbsent(registry, x.getThreadPoolName(), executorTypeClass,
                    properties, args);
        });
    }
}
registerBeanDefinitions方法中主要做了这么几件事
- 从Environment读取配置信息绑定到DtpProperties
- 获取配置文件中配置的线程池,如果没有则结束
- 遍历线程池,绑定配置构造线程池所需要的属性,根据配置中的executorType注册不同类型的线程池Bean(下面会说)
- BeanUtil#registerIfAbsent()注册Bean
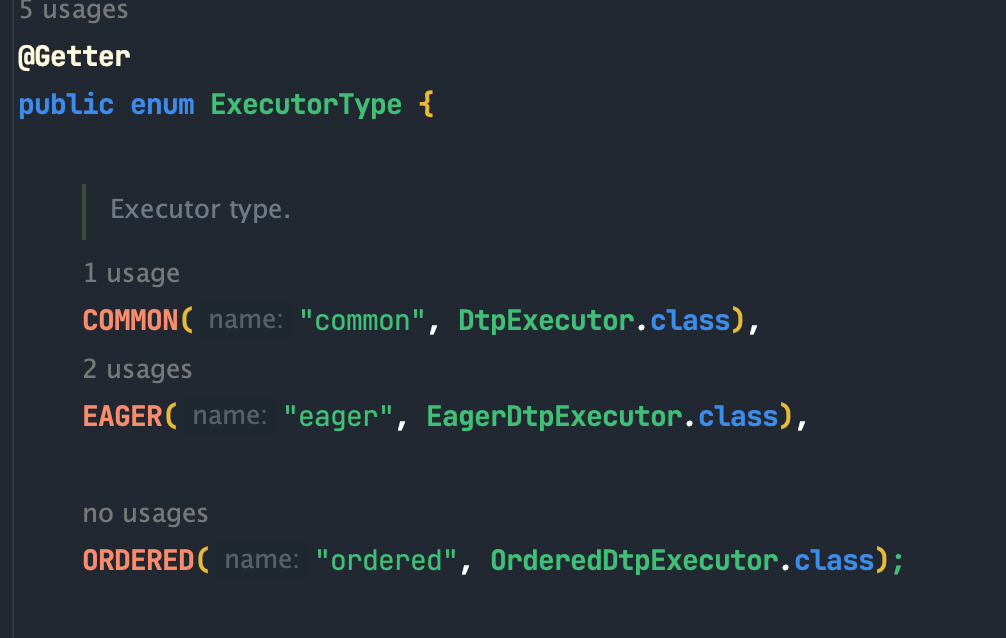
ExecutorType目前项目支持3种类型,分别对应3个线程池,这里先跳过,我们下文详细介绍

回到刚才的步骤,接下来通过ThreadPoolProperties来构造线程池所需要的属性
private Map<String, Object> buildPropertyValues(ThreadPoolProperties tpp) {
    Map<String, Object> properties = Maps.newHashMap();
    properties.put(THREAD_POOL_NAME, tpp.getThreadPoolName());
    properties.put(THREAD_POOL_ALIAS_NAME, tpp.getThreadPoolAliasName());
    properties.put(ALLOW_CORE_THREAD_TIMEOUT, tpp.isAllowCoreThreadTimeOut());
    properties.put(WAIT_FOR_TASKS_TO_COMPLETE_ON_SHUTDOWN, tpp.isWaitForTasksToCompleteOnShutdown());
    properties.put(AWAIT_TERMINATION_SECONDS, tpp.getAwaitTerminationSeconds());
    properties.put(PRE_START_ALL_CORE_THREADS, tpp.isPreStartAllCoreThreads());
    properties.put(RUN_TIMEOUT, tpp.getRunTimeout());
    properties.put(QUEUE_TIMEOUT, tpp.getQueueTimeout());

    val notifyItems = mergeAllNotifyItems(tpp.getNotifyItems());
    properties.put(NOTIFY_ITEMS, notifyItems);
    properties.put(NOTIFY_ENABLED, tpp.isNotifyEnabled());

    val taskWrappers = TaskWrappers.getInstance().getByNames(tpp.getTaskWrapperNames());
    properties.put(TASK_WRAPPERS, taskWrappers);

    return properties;
}
选择阻塞队列,这里针对EagerDtpExecutor做了单独处理,选择了TaskQueue作为阻塞队列(下文说明)
private Object[] buildConstructorArgs(Class<?> clazz, ThreadPoolProperties tpp) {
    BlockingQueue<Runnable> taskQueue;
    // 如果是 EagerDtpExecutor 的话,对工作队列就是 TaskQueue
    if (clazz.equals(EagerDtpExecutor.class)) {
        taskQueue = new TaskQueue(tpp.getQueueCapacity());
    } else {
        // 不是 EagerDtpExecutor的话,就根据配置中的 queueType 来选择阻塞的队列
        taskQueue = buildLbq(tpp.getQueueType(), tpp.getQueueCapacity(), tpp.isFair(),
            tpp.getMaxFreeMemory());
    }

    return new Object[]{
            tpp.getCorePoolSize(),
            tpp.getMaximumPoolSize(),
            tpp.getKeepAliveTime(),
            tpp.getUnit(),
            taskQueue,
            new NamedThreadFactory(tpp.getThreadNamePrefix()),
            RejectHandlerGetter.buildRejectedHandler(tpp.getRejectedHandlerType())
    };
}
非EagerDtpExecutor则根据配置中的queueType来选择阻塞的队列
public static BlockingQueue<Runnable> buildLbq(String name, int capacity, boolean fair,
        int maxFreeMemory) {
    BlockingQueue<Runnable> blockingQueue = null;
    if (Objects.equals(name, ARRAY_BLOCKING_QUEUE.getName())) {
        blockingQueue = new ArrayBlockingQueue<>(capacity);
    } else if (Objects.equals(name, LINKED_BLOCKING_QUEUE.getName())) {
        blockingQueue = new LinkedBlockingQueue<>(capacity);
    } else if (Objects.equals(name, PRIORITY_BLOCKING_QUEUE.getName())) {
        blockingQueue = new PriorityBlockingQueue<>(capacity);
    } else if (Objects.equals(name, DELAY_QUEUE.getName())) {
        blockingQueue = new DelayQueue();
    } else if (Objects.equals(name, SYNCHRONOUS_QUEUE.getName())) {
        blockingQueue = new SynchronousQueue<>(fair);
    } else if (Objects.equals(name, LINKED_TRANSFER_QUEUE.getName())) {
        blockingQueue = new LinkedTransferQueue<>();
    } else if (Objects.equals(name, LINKED_BLOCKING_DEQUE.getName())) {
        blockingQueue = new LinkedBlockingDeque<>(capacity);
    } else if (Objects.equals(name, VARIABLE_LINKED_BLOCKING_QUEUE.getName())) {
        blockingQueue = new VariableLinkedBlockingQueue<>(capacity);
    } else if (Objects.equals(name, MEMORY_SAFE_LINKED_BLOCKING_QUEUE.getName())) {
        blockingQueue = new MemorySafeLinkedBlockingQueue<>(capacity, maxFreeMemory * M_1);
    }
    if (blockingQueue != null) {
        return blockingQueue;
    }
    log.error("Cannot find specified BlockingQueue {}", name);
    throw new DtpException("Cannot find specified BlockingQueue " + name);
}
到这里我们已经构造好了创建一个线程池需要的所有参数
调用BeanUtil#registerIfAbsent(),先判断是否同名bean,如果同名先删除后注入。
@Slf4j
public final class BeanUtil {

    private BeanUtil() { }

    public static void registerIfAbsent(BeanDefinitionRegistry registry,
                                        String beanName,
                                        Class<?> clazz,
                                        Map<String, Object> properties,
                                        Object... constructorArgs) {
        // 如果存在同名bean,先删除后重新注入bean
        if (ifPresent(registry, beanName, clazz) || registry.containsBeanDefinition(beanName)) {
            log.warn("DynamicTp registrar, bean definition already exists," +
                            " overrides with remote config, beanName: {}", beanName);
            registry.removeBeanDefinition(beanName);
        }
        doRegister(registry, beanName, clazz, properties, constructorArgs);
    }


    /**
     * 注册Bean 相当于手动用 @Bean 声明线程池对象
     * @param registry
     * @param beanName
     * @param clazz
     * @param properties
     * @param constructorArgs
     */
    public static void doRegister(BeanDefinitionRegistry registry,
                                  String beanName,
                                  Class<?> clazz,
                                  Map<String, Object> properties,
                                  Object... constructorArgs) {
        BeanDefinitionBuilder builder = BeanDefinitionBuilder.genericBeanDefinition(clazz);
        for (Object constructorArg : constructorArgs) {
            builder.addConstructorArgValue(constructorArg);
        }
        if (MapUtils.isNotEmpty(properties)) {
            properties.forEach(builder::addPropertyValue);
        }
        // 注册 Bean
        registry.registerBeanDefinition(beanName, builder.getBeanDefinition());
    }
}
至此线程池对象已经交由IOC容器管理了。
我们的线程池对象总不能无脑塞入IOC容器就不管了吧,肯定是要留根的,也就是需要一个线程池注册表,记录有哪些线程池是受dynamic-tp托管的,这样除了可以进行统计外,也就可以实现通知报警了。
下面我们来看下项目是如何实现注册表的
2.3 注册表
DtpPostProcessor利用了Spring容器启动BeanPostProcessor机制增强机制,在bean初始化的时候调用postProcessAfterInitialization,它实现了获取被IOC容器托管的线程池bean然后注册到本地的注册表中。
代码实现如下:
@Slf4j
public class DtpPostProcessor implements BeanPostProcessor {

    @Override
    public Object postProcessAfterInitialization(@NonNull Object bean, @NonNull String beanName)
            throws BeansException {
        // 只增强线程池相关的类
        if (!(bean instanceof ThreadPoolExecutor) && !(bean instanceof ThreadPoolTaskExecutor)) {
            return bean;
        }

        // 如果是 DtpExecutor 类型注册到注册表 DTP_REGISTRY
        if (bean instanceof DtpExecutor) {
            DtpExecutor dtpExecutor = (DtpExecutor) bean;
            if (bean instanceof EagerDtpExecutor) {
                ((TaskQueue) dtpExecutor.getQueue()).setExecutor((EagerDtpExecutor) dtpExecutor);
            }
            registerDtp(dtpExecutor);
            return dtpExecutor;
        }

        // 获取上下文
        ApplicationContext applicationContext = ApplicationContextHolder.getInstance();
        String dtpAnnotationVal;
        try {
            // 读取标注 @DynamicTp 注解的 bean 则为基本线程池,但受组件管理监控
            DynamicTp dynamicTp = applicationContext.findAnnotationOnBean(beanName, DynamicTp.class);
            if (Objects.nonNull(dynamicTp)) {
                dtpAnnotationVal = dynamicTp.value();
            } else {
                BeanDefinitionRegistry registry = (BeanDefinitionRegistry) applicationContext;
                AnnotatedBeanDefinition annotatedBeanDefinition =
                        (AnnotatedBeanDefinition) registry.getBeanDefinition(beanName);
                MethodMetadata methodMetadata = (MethodMetadata) annotatedBeanDefinition.getSource();
                if (Objects.isNull(methodMetadata)
                        || !methodMetadata.isAnnotated(DynamicTp.class.getName())) {
                    return bean;
                }
                dtpAnnotationVal = Optional.ofNullable(methodMetadata.getAnnotationAttributes(
                        DynamicTp.class.getName()))
                            .orElse(Collections.emptyMap())
                            .getOrDefault("value", "")
                            .toString();
            }
        } catch (NoSuchBeanDefinitionException e) {
            log.error("There is no bean with the given name {}", beanName, e);
            return bean;
        }

        // 如果说bean上面的DynamicTp注解,使用注解的值作为线程池的名称,没有的话就使用bean的名称
        String poolName = StringUtils.isNotBlank(dtpAnnotationVal) ? dtpAnnotationVal : beanName;
        if (bean instanceof ThreadPoolTaskExecutor) {
            // 注册到注册表 COMMON_REGISTRY
            ThreadPoolTaskExecutor taskExecutor = (ThreadPoolTaskExecutor) bean;
            registerCommon(poolName, taskExecutor.getThreadPoolExecutor());
        } else {
            registerCommon(poolName, (ThreadPoolExecutor) bean);
        }
        return bean;
    }

    /**
     * 动态线程池注册 向Map集合put元素
     *
     * @param executor
     */
    private void registerDtp(DtpExecutor executor) {
        DtpRegistry.registerDtp(executor, "beanPostProcessor");
    }

    /**
     * 非动态线程池注册 向Map集合put元素
     *
     * @param poolName
     * @param executor
     */
    private void registerCommon(String poolName, ThreadPoolExecutor executor) {
        ExecutorWrapper wrapper = new ExecutorWrapper(poolName, executor);
        DtpRegistry.registerCommon(wrapper, "beanPostProcessor");
    }
}
简单总结下,和刚刚我们分析完全一致
- 获取到bean后,如果是非线程池类型则结束。
- 如果是DtpExecutor则注册到DTP_REGISTRY注册表中
- 如果是非动态线程池且标注了@DynamicTp注解则注册到COMMON_REGISTRY注册表中
- 如果是非动态线程池且未标注@DynamicTp注解则结束不做增强
DtpRegistry主要负责注册、获取、刷新某个动态线程池(刷新线程池我们会下文分析)
@Slf4j
public class DtpRegistry implements ApplicationRunner, Ordered {

    /**
     * Maintain all automatically registered and manually registered DtpExecutors.
     * 动态线程池 key为线程池name
     * DtpExecutor ThreadPoolExecutor加强版
     */
    private static final Map<String, DtpExecutor> DTP_REGISTRY = new ConcurrentHashMap<>();

    /**
     * Maintain all automatically registered and manually registered JUC ThreadPoolExecutors.
     * <p>
     * 标有DynamicTp注解的线程池
     */
    private static final Map<String, ExecutorWrapper> COMMON_REGISTRY = new ConcurrentHashMap<>();

    private static final Equator EQUATOR = new GetterBaseEquator();

    /**
     * 配置文件映射
     */
    private static DtpProperties dtpProperties;

    public static List<String> listAllDtpNames() {
        return Lists.newArrayList(DTP_REGISTRY.keySet());
    }

    public static List<String> listAllCommonNames() {
        return Lists.newArrayList(COMMON_REGISTRY.keySet());
    }

    public static void registerDtp(DtpExecutor executor, String source) {
        log.info("DynamicTp register dtpExecutor, source: {}, executor: {}",
                source, ExecutorConverter.convert(executor));
        DTP_REGISTRY.putIfAbsent(executor.getThreadPoolName(), executor);
    }

    public static void registerCommon(ExecutorWrapper wrapper, String source) {
        log.info("DynamicTp register commonExecutor, source: {}, name: {}",
                source, wrapper.getThreadPoolName());
        COMMON_REGISTRY.putIfAbsent(wrapper.getThreadPoolName(), wrapper);
    }

    public static DtpExecutor getDtpExecutor(final String name) {
        val executor = DTP_REGISTRY.get(name);
        if (Objects.isNull(executor)) {
            log.error("Cannot find a specified dtpExecutor, name: {}", name);
            throw new DtpException("Cannot find a specified dtpExecutor, name: " + name);
        }
        return executor;
    }

    public static ExecutorWrapper getCommonExecutor(final String name) {
        val executor = COMMON_REGISTRY.get(name);
        if (Objects.isNull(executor)) {
            log.error("Cannot find a specified commonExecutor, name: {}", name);
            throw new DtpException("Cannot find a specified commonExecutor, name: " + name);
        }
        return executor;
    }

    @Autowired
    public void setDtpProperties(DtpProperties dtpProperties) {
        DtpRegistry.dtpProperties = dtpProperties;
    }

    @Override
    public void run(ApplicationArguments args) {
        // 线程池名称
        Set<String> remoteExecutors = Collections.emptySet();
        // 获取配置文件中配置的线程池
        if (CollectionUtils.isNotEmpty(dtpProperties.getExecutors())) {
            remoteExecutors = dtpProperties.getExecutors().stream()
                    .map(ThreadPoolProperties::getThreadPoolName)
                    .collect(Collectors.toSet());
        }
        // DTP_REGISTRY中已经注册的线程池
        val registeredDtpExecutors = Sets.newHashSet(DTP_REGISTRY.keySet());
        // 找出所有线程池中没有在配置文件中配置的线程池
        val localDtpExecutors = CollectionUtils.subtract(registeredDtpExecutors, remoteExecutors);
        // 日志
        log.info("DtpRegistry initialization is complete, remote dtpExecutors: {}," +
                        " local dtpExecutors: {}, local commonExecutors: {}",
                remoteExecutors, localDtpExecutors, COMMON_REGISTRY.keySet());
    }

    @Override
    public int getOrder() {
        return Ordered.HIGHEST_PRECEDENCE + 1;
    }
}
代码比较简单,这里不再说明了。
流程至此,动态线程池,标注了@DynamicTp注解的线程池,都已经准备就绪了。
你可能会问那配置刷新配置刷新动态调参是如何实现的呢,别急,我们继续分析。
2.4 配置刷新 动态调参
Dynamic-tp提供了配置刷新接口Refresher,和基类AbstractRefresher,支持不同配置中心的刷新基类,甚至完全可以自行扩展,其原理其实就是当配置中心监听到配置文件的变动后,解析配置文件,刷新配置文件,最后通过Spring ApplicationListener机制发送RefreshEvent刷新事件,由对应的Adapter来处理。
public interface Refresher {

    /**
     * Refresh with specify content.
     *
     * @param content content
     * @param fileType file type
     */
    void refresh(String content, ConfigFileTypeEnum fileType);
}

@Slf4j
public abstract class AbstractRefresher implements Refresher {

    @Resource
    protected DtpProperties dtpProperties;

    @Override
    public void refresh(String content, ConfigFileTypeEnum fileType) {
        if (StringUtils.isBlank(content) || Objects.isNull(fileType)) {
            log.warn("DynamicTp refresh, empty content or null fileType.");
            return;
        }

        try {
            val configHandler = ConfigHandler.getInstance();
            val properties = configHandler.parseConfig(content, fileType);
            doRefresh(properties);
        } catch (IOException e) {
            log.error("DynamicTp refresh error, content: {}, fileType: {}", content, fileType, e);
        }
    }

    protected void doRefresh(Map<Object, Object> properties) {
        if (MapUtils.isEmpty(properties)) {
            log.warn("DynamicTp refresh, empty properties.");
            return;
        }
        // 将发生变化的属性绑定到DtpProperties对象上
        PropertiesBinder.bindDtpProperties(properties, dtpProperties);
        // 更新线程池属性
        doRefresh(dtpProperties);
    }

    protected void doRefresh(DtpProperties dtpProperties) {
        DtpRegistry.refresh(dtpProperties);
        publishEvent(dtpProperties);
    }

    private void publishEvent(DtpProperties dtpProperties) {
        RefreshEvent event = new RefreshEvent(this, dtpProperties);
        ApplicationContextHolder.publishEvent(event);
    }
}
接下来我们以Zookeeper为配置中心举例说明,代码如下。
@Slf4j
public class ZookeeperRefresher extends AbstractRefresher
        implements EnvironmentAware, InitializingBean {

    @Override
    public void afterPropertiesSet() {

        final ConnectionStateListener connectionStateListener = (client, newState) -> {
            // 连接变更
            if (newState == ConnectionState.RECONNECTED) {
                loadAndRefresh();
            }
        };

        final CuratorListener curatorListener = (client, curatorEvent) -> {
            final WatchedEvent watchedEvent = curatorEvent.getWatchedEvent();
            if (null != watchedEvent) {
                switch (watchedEvent.getType()) {
                    // 监听节点变更
                    case NodeChildrenChanged:
                    case NodeDataChanged:
                        // 刷新
                        loadAndRefresh();
                        break;
                    default:
                        break;
                }
            }
        };

        CuratorFramework curatorFramework = CuratorUtil.getCuratorFramework(dtpProperties);
        String nodePath = CuratorUtil.nodePath(dtpProperties);

        curatorFramework.getConnectionStateListenable().addListener(connectionStateListener);
        curatorFramework.getCuratorListenable().addListener(curatorListener);

        log.info("DynamicTp refresher, add listener success, nodePath: {}", nodePath);
    }

    /**
     * load config and refresh
     */
    private void loadAndRefresh() {
        doRefresh(CuratorUtil.genPropertiesMap(dtpProperties));
    }

    @Override
    public void setEnvironment(Environment environment) {
        ConfigurableEnvironment env = ((ConfigurableEnvironment) environment);
        env.getPropertySources().remove(ZK_PROPERTY_SOURCE_NAME);
    }
}
利用了Spring机制,实现了InitializingBean并重写afterPropertiesSet,在Bean实例化完成之后会被自动调用,在这期间针对Zookeeper连接,节点变更监听器进行注册,监听连接变更和节点变更后执行刷新操作。
doRefresh(CuratorUtil.genPropertiesMap(dtpProperties));实现由基类统一处理,解析配置并绑定DtpProperties上,执行DtpRegistry#refresh()刷新后发布一个RefreshEvent事件。
protected void doRefresh(Map<Object, Object> properties) {
    if (MapUtils.isEmpty(properties)) {
        log.warn("DynamicTp refresh, empty properties.");
        return;
    }
    // 解析配置并绑定 DtpProperties 上
    PropertiesBinder.bindDtpProperties(properties, dtpProperties);
    // 更新线程池属性
    doRefresh(dtpProperties);
}

protected void doRefresh(DtpProperties dtpProperties) {
    DtpRegistry.refresh(dtpProperties);
    publishEvent(dtpProperties);
}

private void publishEvent(DtpProperties dtpProperties) {
    RefreshEvent event = new RefreshEvent(this, dtpProperties);
    ApplicationContextHolder.publishEvent(event);
}
来看DtpRegistry#refresh()的实现,代码如下:
public static void refresh(DtpProperties properties) {
    if (Objects.isNull(properties) || CollectionUtils.isEmpty(properties.getExecutors())) {
        log.warn("DynamicTp refresh, empty threadPoolProperties.");
        return;
    }
    // 属性不为空 从属性中拿到所有的线程池属性配置
    properties.getExecutors().forEach(x -> {
        if (StringUtils.isBlank(x.getThreadPoolName())) {
            log.warn("DynamicTp refresh, threadPoolName must not be empty.");
            return;
        }
        // 从 DTP_REGISTRY 线程注册池表中拿到对应的线程池对象
        val dtpExecutor = DTP_REGISTRY.get(x.getThreadPoolName());
        if (Objects.isNull(dtpExecutor)) {
            log.warn("DynamicTp refresh, cannot find specified dtpExecutor, name: {}.",
                x.getThreadPoolName());
            return;
        }
        // 刷新 更新线程池对象
        refresh(dtpExecutor, x);
    });
}
private static void refresh(DtpExecutor executor, ThreadPoolProperties properties) {
    // 参数合法校验
    if (properties.getCorePoolSize() < 0
            || properties.getMaximumPoolSize() <= 0
            || properties.getMaximumPoolSize() < properties.getCorePoolSize()
            || properties.getKeepAliveTime() < 0) {
        log.error("DynamicTp refresh, invalid parameters exist, properties: {}", properties);
        return;
    }
    // 线程池旧配置
    DtpMainProp oldProp = ExecutorConverter.convert(executor);
    // 真正开始刷新
    doRefresh(executor, properties);
    // 线程池新配置
    DtpMainProp newProp = ExecutorConverter.convert(executor);
    // 相等不作处理
    if (oldProp.equals(newProp)) {
        log.warn("DynamicTp refresh, main properties of [{}] have not changed.",
            executor.getThreadPoolName());
        return;
    }
    List<FieldInfo> diffFields = EQUATOR.getDiffFields(oldProp, newProp);
    List<String> diffKeys = diffFields.stream().map(FieldInfo::getFieldName).collect(toList());
    // 线程池参数变更 平台提醒
    NoticeManager.doNoticeAsync(new ExecutorWrapper(executor), oldProp, diffKeys);
    // 更新参数 日志打印
    log.info("DynamicTp refresh, name: [{}], changed keys: {}, corePoolSize: [{}]," +
        " maxPoolSize: [{}], queueType: [{}], queueCapacity: [{}], keepAliveTime: [{}], " +
        "rejectedType: [{}], allowsCoreThreadTimeOut: [{}]",
        executor.getThreadPoolName(),
        diffKeys,
        String.format(PROPERTIES_CHANGE_SHOW_STYLE, oldProp.getCorePoolSize(), newProp.getCorePoolSize()),
        String.format(PROPERTIES_CHANGE_SHOW_STYLE, oldProp.getMaxPoolSize(), newProp.getMaxPoolSize()),
        String.format(PROPERTIES_CHANGE_SHOW_STYLE, oldProp.getQueueType(), newProp.getQueueType()),
        String.format(PROPERTIES_CHANGE_SHOW_STYLE, oldProp.getQueueCapacity(), newProp.getQueueCapacity()),
        String.format("%ss => %ss", oldProp.getKeepAliveTime(), newProp.getKeepAliveTime()),
        String.format(PROPERTIES_CHANGE_SHOW_STYLE, oldProp.getRejectType(), newProp.getRejectType()),
        String.format(PROPERTIES_CHANGE_SHOW_STYLE, oldProp.isAllowCoreThreadTimeOut(),
            newProp.isAllowCoreThreadTimeOut()));
}
总结一下上述代码无非做了这么几件事
- 参数合法校验
- 获取到线程池旧配置
- 执行刷新
- 获取到线程池新配置
- 如果新旧配置相同,则证明没有改动,不做处理
- 否则线程池变更发送通知,并记录变更日志(ps:通知相关处理下文会说,这里先跳过)
doRefresh真正执行线程池的刷新,也依靠于JUC原生线程池支持动态属性变更。
private static void doRefresh(DtpExecutor dtpExecutor, ThreadPoolProperties properties) {
    // 调用相应的setXXX方法更新线程池参数
    doRefreshPoolSize(dtpExecutor, properties);
    if (!Objects.equals(dtpExecutor.getKeepAliveTime(properties.getUnit()),
            properties.getKeepAliveTime())) {
        dtpExecutor.setKeepAliveTime(properties.getKeepAliveTime(), properties.getUnit());
    }

    if (!Objects.equals(dtpExecutor.allowsCoreThreadTimeOut(),
            properties.isAllowCoreThreadTimeOut())) {
        dtpExecutor.allowCoreThreadTimeOut(properties.isAllowCoreThreadTimeOut());
    }

    // update reject handler
    if (!Objects.equals(dtpExecutor.getRejectHandlerName(),
            properties.getRejectedHandlerType())) {
        dtpExecutor.setRejectedExecutionHandler(RejectHandlerGetter.getProxy(
                properties.getRejectedHandlerType()));
        dtpExecutor.setRejectHandlerName(properties.getRejectedHandlerType());
    }

    // update Alias Name
    if (!Objects.equals(dtpExecutor.getThreadPoolAliasName(), properties.getThreadPoolAliasName())) {
        dtpExecutor.setThreadPoolAliasName(properties.getThreadPoolAliasName());
    }

    updateQueueProp(properties, dtpExecutor);
    dtpExecutor.setWaitForTasksToCompleteOnShutdown(properties.isWaitForTasksToCompleteOnShutdown());
    dtpExecutor.setAwaitTerminationSeconds(properties.getAwaitTerminationSeconds());
    dtpExecutor.setPreStartAllCoreThreads(properties.isPreStartAllCoreThreads());
    dtpExecutor.setRunTimeout(properties.getRunTimeout());
    dtpExecutor.setQueueTimeout(properties.getQueueTimeout());

    List<TaskWrapper> taskWrappers = TaskWrappers.getInstance().getByNames(
            properties.getTaskWrapperNames());
    dtpExecutor.setTaskWrappers(taskWrappers);

    // update notify items
    val allNotifyItems = mergeAllNotifyItems(properties.getNotifyItems());
    // 刷新通知平台
    NotifyHelper.refreshNotify(dtpExecutor.getThreadPoolName(), dtpProperties.getPlatforms(),
            dtpExecutor.getNotifyItems(), allNotifyItems);
    dtpExecutor.setNotifyItems(allNotifyItems);
    dtpExecutor.setNotifyEnabled(properties.isNotifyEnabled());
}
doRefreshPoolSize调用ThreadPoolExecutor原生setXXX方法支持在运行时动态修改
private static void doRefreshPoolSize(ThreadPoolExecutor dtpExecutor,
        ThreadPoolProperties properties) {
    // 调用ThreadPoolExecutor原生setXXX方法 支持在运行时动态修改
    if (properties.getMaximumPoolSize() < dtpExecutor.getMaximumPoolSize()) {
        if (!Objects.equals(dtpExecutor.getCorePoolSize(), properties.getCorePoolSize())) {
            dtpExecutor.setCorePoolSize(properties.getCorePoolSize());
        }
        if (!Objects.equals(dtpExecutor.getMaximumPoolSize(), properties.getMaximumPoolSize())) {
            dtpExecutor.setMaximumPoolSize(properties.getMaximumPoolSize());
        }
        return;
    }
    if (!Objects.equals(dtpExecutor.getMaximumPoolSize(), properties.getMaximumPoolSize())) {
        dtpExecutor.setMaximumPoolSize(properties.getMaximumPoolSize());
    }
    if (!Objects.equals(dtpExecutor.getCorePoolSize(), properties.getCorePoolSize())) {
        dtpExecutor.setCorePoolSize(properties.getCorePoolSize());
    }
}
updateQueueProp更新线程池阻塞队列大小
private static void updateQueueProp(ThreadPoolProperties properties, DtpExecutor dtpExecutor) {
    // queueType 非 VariableLinkedBlockingQueue MemorySafeLinkedBlockingQueue
    // 且executorType为EagerDtpExecutor 不刷新
    if (!canModifyQueueProp(properties)) {
        return;
    }
    // 获取到线程池原来的队列
    val blockingQueue = dtpExecutor.getQueue();
    // 如果原来的队列容量和现在的不一样
    if (!Objects.equals(dtpExecutor.getQueueCapacity(), properties.getQueueCapacity())) {
        // 并且原来的队列是 VariableLinkedBlockingQueue 类型的,那么就设置队列的容量
        if (blockingQueue instanceof VariableLinkedBlockingQueue) {
            ((VariableLinkedBlockingQueue<Runnable>) blockingQueue)
                .setCapacity(properties.getQueueCapacity());
        } else {
            // 否则不设置
            log.error("DynamicTp refresh, the blockingqueue capacity cannot be reset, dtpName: {}," +
                " queueType {}", dtpExecutor.getThreadPoolName(), dtpExecutor.getQueueName());
        }
    }
    // 如果队列是 MemorySafeLinkedBlockingQueue,那么设置最大内存
    if (blockingQueue instanceof MemorySafeLinkedBlockingQueue) {
        ((MemorySafeLinkedBlockingQueue<Runnable>) blockingQueue)
            .setMaxFreeMemory(properties.getMaxFreeMemory() * M_1);
    }
}
上述代码提到了几个眼生的队列,他们都是dynamic-tp自行实现的阻塞队列,我们来看下
VariableLinkedBlockingQueue: 可以设置队列容量,且支持变更队列容量
MemorySafeLinkedBlockingQueue: 继承VariableLinkedBlockingQueue,可以通过maxFreeMemory设置队列容量,在构造器中对容量有默认的大小限制
首先我们思考一下,为什么dynamic-tp要自行实现的阻塞队列?
当你翻看Java原生LinkedBlockingQueue队列时你就会发现,队列容量被定义为private final类型的,不能修改,那肯定是不符合我们修改阻塞队列大小还能实现刷新线程池的效果。
其中着重说明下MemorySafeLinkedBlockingQueue队列,LinkedBlockingQueue的容量默认是Integer.MAX_VALUE,所以当我们不对其进行限制时,就有可能导致OOM问题,所以MemorySafeLinkedBlockingQueue构造函数设置了默认队列大小
当我们往队列添加元素的时候,会先判断有没有足够的空间
public class MemorySafeLinkedBlockingQueue<E> extends VariableLinkedBlockingQueue<E> {

    private static final long serialVersionUID = 8032578371739960142L;

    public static final int THE_256_MB = 256 * 1024 * 1024;

    /**
     * 队列的容量
     */
    private int maxFreeMemory;

    public MemorySafeLinkedBlockingQueue() {
        // 默认256MB
        this(THE_256_MB);
    }

    public MemorySafeLinkedBlockingQueue(final int maxFreeMemory) {
        super(Integer.MAX_VALUE);
        this.maxFreeMemory = maxFreeMemory;
    }

    public MemorySafeLinkedBlockingQueue(final int capacity, final int maxFreeMemory) {
        super(capacity);
        this.maxFreeMemory = maxFreeMemory;
    }

    public MemorySafeLinkedBlockingQueue(final Collection<? extends E> c, final int maxFreeMemory) {
        super(c);
        this.maxFreeMemory = maxFreeMemory;
    }

    /**
     * set the max free memory.
     *
     * @param maxFreeMemory the max free memory
     */
    public void setMaxFreeMemory(final int maxFreeMemory) {
        this.maxFreeMemory = maxFreeMemory;
    }

    /**
     * get the max free memory.
     *
     * @return the max free memory limit
     */
    public int getMaxFreeMemory() {
        return maxFreeMemory;
    }

    /**
     * determine if there is any remaining free memory.
     *
     * @return true if has free memory
     */
    public boolean hasRemainedMemory() {
        if (MemoryLimitCalculator.maxAvailable() > maxFreeMemory) {
            return true;
        }
        throw new RejectedExecutionException("No more memory can be used.");
    }

    @Override
    public void put(final E e) throws InterruptedException {
        // 我们往队列添加元素的时候,会先判断有没有足够的空间
        if (hasRemainedMemory()) {
            super.put(e);
        }
    }

    @Override
    public boolean offer(final E e, final long timeout, final TimeUnit unit)
            throws InterruptedException {
        return hasRemainedMemory() && super.offer(e, timeout, unit);
    }

    @Override
    public boolean offer(final E e) {
        return hasRemainedMemory() && super.offer(e);
    }
}
回到上文我们说刷新完线程池后,发送异步事件RefreshEvent,来继续看下
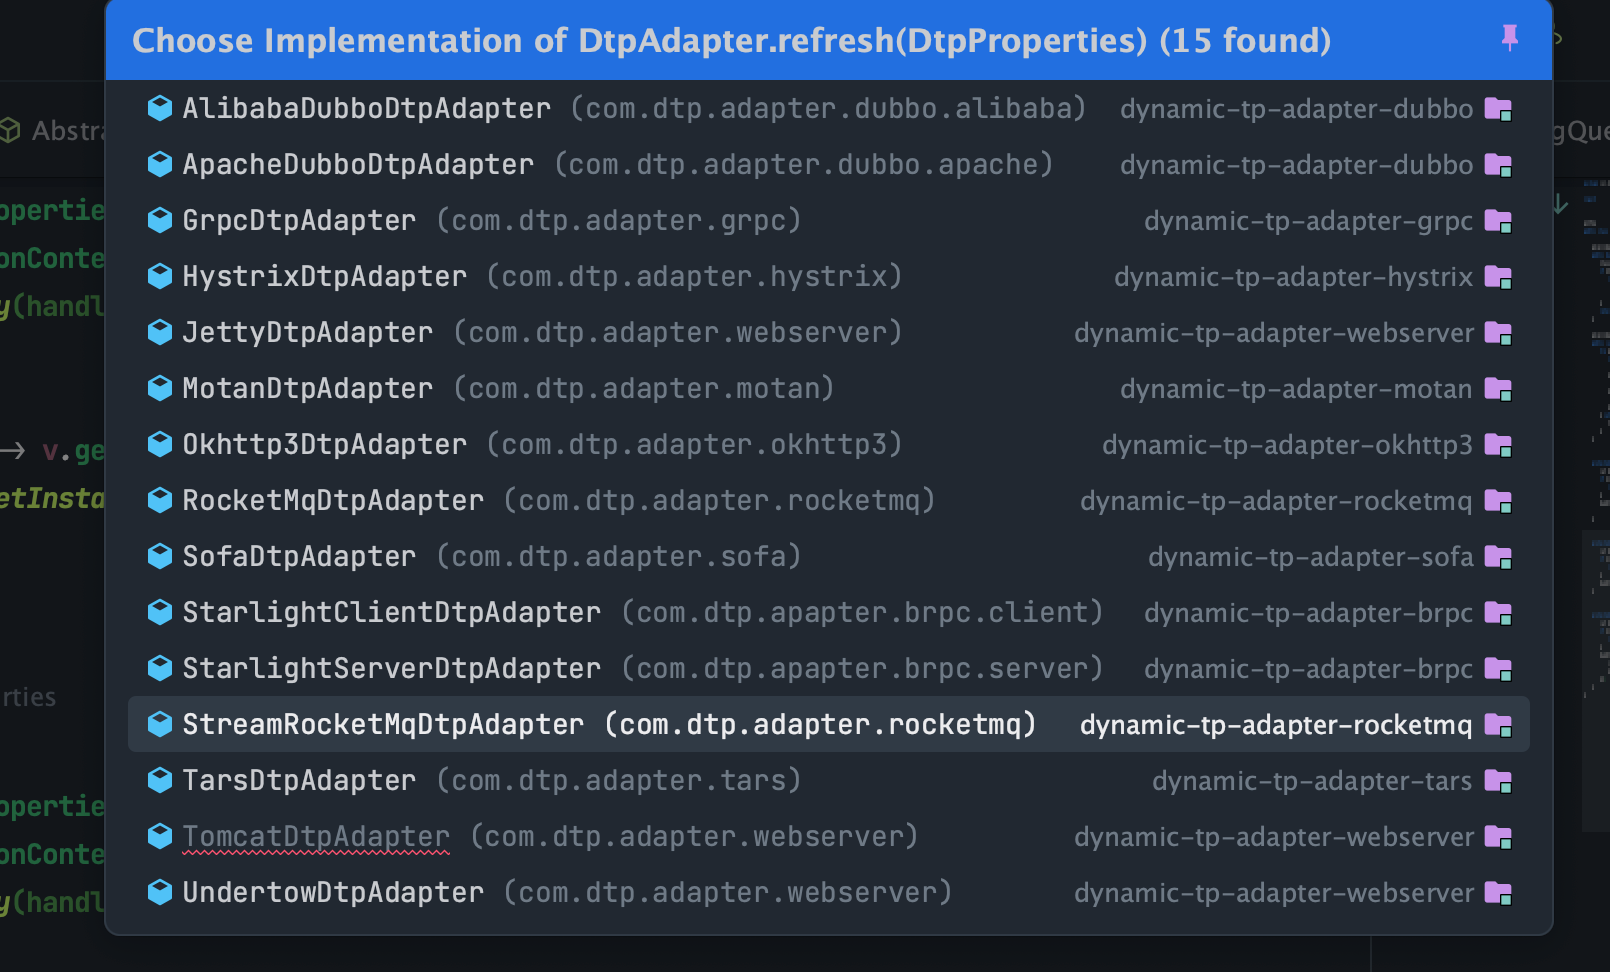
DtpAdapterListener处于adapter模块,该模块主要是对些三方组件中的线程池进行管理(例如Tomcat,Jetty等),通过spring的事件发布监听机制来实现与核心流程解耦
@Slf4j
public class DtpAdapterListener implements GenericApplicationListener {

    @Override
    public boolean supportsEventType(ResolvableType resolvableType) {
        Class<?> type = resolvableType.getRawClass();
        if (type != null) {
            return RefreshEvent.class.isAssignableFrom(type)
                    || CollectEvent.class.isAssignableFrom(type)
                    || AlarmCheckEvent.class.isAssignableFrom(type);
        }
        return false;
    }

    @Override
    public void onApplicationEvent(@NonNull ApplicationEvent event) {
        try {
            if (event instanceof RefreshEvent) {
                doRefresh(((RefreshEvent) event).getDtpProperties());
            } else if (event instanceof CollectEvent) {
                doCollect(((CollectEvent) event).getDtpProperties());
            } else if (event instanceof AlarmCheckEvent) {
                doAlarmCheck(((AlarmCheckEvent) event).getDtpProperties());
            }
        } catch (Exception e) {
            log.error("DynamicTp adapter, event handle failed.", e);
        }
    }

}
/**
 * Do refresh.
 *
 * @param dtpProperties dtpProperties
 */
protected void doRefresh(DtpProperties dtpProperties) {
    val handlerMap = ApplicationContextHolder.getBeansOfType(DtpAdapter.class);
    if (CollectionUtils.isEmpty(handlerMap)) {
        return;
    }
    handlerMap.forEach((k, v) -> v.refresh(dtpProperties));
}
2.3 线程池类型
DtpLifecycleSupport
DtpLifecycleSupport继承了JUC ThreadPoolExecutor,对原生线程池进行了增强
@Slf4j
public abstract class DtpLifecycleSupport extends ThreadPoolExecutor
        implements InitializingBean, DisposableBean {

    protected String threadPoolName;

    /**
     * Whether to wait for scheduled tasks to complete on shutdown,
     * not interrupting running tasks and executing all tasks in the queue.
     * <p>
     * 在关闭线程池的时候是否等待任务执行完毕,不会打断运行中的任务,并且会执行队列中的所有任务
     */
    protected boolean waitForTasksToCompleteOnShutdown = false;

    /**
     * The maximum number of seconds that this executor is supposed to block
     * on shutdown in order to wait for remaining tasks to complete their execution
     * before the rest of the container continues to shut down.
     * <p>
     * 在线程池关闭时等待的最大时间,目的就是等待线程池中的任务运行完毕。
     */
    protected int awaitTerminationSeconds = 0;

    public DtpLifecycleSupport(int corePoolSize,
                               int maximumPoolSize,
                               long keepAliveTime,
                               TimeUnit unit,
                               BlockingQueue<Runnable> workQueue,
                               ThreadFactory threadFactory) {
        super(corePoolSize, maximumPoolSize, keepAliveTime, unit, workQueue, threadFactory);
    }

    @Override
    public void afterPropertiesSet() {
        DtpProperties dtpProperties = ApplicationContextHolder.getBean(DtpProperties.class);
        // 子类实现
        initialize(dtpProperties);
    }
}
提供了两个增强字段waitForTasksToCompleteOnShutdown和awaitTerminationSeconds
我们以此来看下
waitForTasksToCompleteOnShutdown作用在线程池销毁阶段
public void internalShutdown() {
    if (log.isInfoEnabled()) {
        log.info("Shutting down ExecutorService, poolName: {}", threadPoolName);
    }
    // 如果需要等待任务执行完毕,则调用 shutdown()会执行先前已提交的任务,拒绝新任务提交,线程池状态变成 SHUTDOWN
    if (this.waitForTasksToCompleteOnShutdown) {
        this.shutdown();
    } else {
        // 如果不需要等待任务执行完毕,则直接调用shutdownNow()方法,尝试中断正在执行的任务,
        // 返回所有未执行的任务,线程池状态变成 STOP, 然后调用 Future 的 cancel 方法取消
        for (Runnable remainingTask : this.shutdownNow()) {
            cancelRemainingTask(remainingTask);
        }
    }
    awaitTerminationIfNecessary();
}
总结下它的作用就是在关闭线程池的时候看是否等待任务执行完毕,如果需要等待则会拒绝新任务的提交,执行先前已提交的任务,否则中断正在执行的任务。
而awaitTerminationSeconds字段主要是配合shutdown使用,阻塞当前线程,等待已提交的任务执行完毕或者超时的最大时间,等待线程池中的任务运行结束。
DtpExecutor
DtpExecutor也就是我们项目中横贯整个流程的动态线程池,它继承自DtpLifecycleSupport,主要是也是实现对基本线程池的增强。
@Slf4j
public class DtpExecutor extends DtpLifecycleSupport implements SpringExecutor {

    /**
     * Simple Business alias Name of Dynamic ThreadPool. Use for notify.
     */
    private String threadPoolAliasName;

    /**
     * RejectHandler name.
     */
    private String rejectHandlerName;

    /**
     * If enable notify.
     */
    private boolean notifyEnabled;

    /**
     * Notify items, see {@link NotifyItemEnum}.
     * <p>
     * 需要提醒的平台
     */
    private List<NotifyItem> notifyItems;

    /**
     * Task wrappers, do sth enhanced.
     */
    private List<TaskWrapper> taskWrappers = Lists.newArrayList();

    /**
     * If pre start all core threads.
     * <p>
     * 线程是否需要提前预热,真正调用的还是ThreadPoolExecutor的对应方法
     */
    private boolean preStartAllCoreThreads;

    /**
     * Task execute timeout, unit (ms), just for statistics.
     */
    private long runTimeout;

    /**
     * Task queue wait timeout, unit (ms), just for statistics.
     */
    private long queueTimeout;

    /**
     * Total reject count.
     */
    private final LongAdder rejectCount = new LongAdder();

    /**
     * Count run timeout tasks.
     */
    private final LongAdder runTimeoutCount = new LongAdder();

    /**
     * Count queue wait timeout tasks.
     */
    private final LongAdder queueTimeoutCount = new LongAdder();

    public DtpExecutor(int corePoolSize, int maximumPoolSize, long keepAliveTime,
                       TimeUnit unit, BlockingQueue<Runnable> workQueue, ThreadFactory threadFactory,
                       RejectedExecutionHandler handler) {
        super(corePoolSize, maximumPoolSize, keepAliveTime, unit, workQueue, threadFactory);
        this.rejectHandlerName = handler.getClass().getSimpleName();
        setRejectedExecutionHandler(RejectHandlerGetter.getProxy(handler));
    }

    @Override
    public void execute(Runnable task, long startTimeout) {
        execute(task);
    }

    /**
     * 增强方法
     *
     * @param command the runnable task
     */
    @Override
    public void execute(Runnable command) {
        String taskName = null;
        if (command instanceof NamedRunnable) {
            taskName = ((NamedRunnable) command).getName();
        }

        if (CollectionUtils.isNotEmpty(taskWrappers)) {
            for (TaskWrapper t : taskWrappers) {
                command = t.wrap(command);
            }
        }

        if (runTimeout > 0 || queueTimeout > 0) {
            command = new DtpRunnable(command, taskName);
        }
        super.execute(command);
    }

    /**
     * 增强方法
     *
     * @param t the thread that will run task {@code r}
     * @param r the task that will be executed
     */
    @Override
    protected void beforeExecute(Thread t, Runnable r) {
        if (!(r instanceof DtpRunnable)) {
            super.beforeExecute(t, r);
            return;
        }
        DtpRunnable runnable = (DtpRunnable) r;
        long currTime = TimeUtil.currentTimeMillis();
        if (runTimeout > 0) {
            runnable.setStartTime(currTime);
        }
        if (queueTimeout > 0) {
            long waitTime = currTime - runnable.getSubmitTime();
            if (waitTime > queueTimeout) {
                queueTimeoutCount.increment();
                AlarmManager.doAlarmAsync(this, QUEUE_TIMEOUT);
                if (StringUtils.isNotBlank(runnable.getTaskName())) {
                    log.warn("DynamicTp execute, queue timeout, poolName: {}, " +
                            "taskName: {}, waitTime: {}ms", this.getThreadPoolName(),
                            runnable.getTaskName(), waitTime);
                }
            }
        }

        super.beforeExecute(t, r);
    }

    /**
     * 增强方法
     *
     * @param r the runnable that has completed
     * @param t the exception that caused termination, or null if
     *          execution completed normally
     */
    @Override
    protected void afterExecute(Runnable r, Throwable t) {
        if (runTimeout > 0) {
            DtpRunnable runnable = (DtpRunnable) r;
            long runTime = TimeUtil.currentTimeMillis() - runnable.getStartTime();
            if (runTime > runTimeout) {
                runTimeoutCount.increment();
                AlarmManager.doAlarmAsync(this, RUN_TIMEOUT);
                if (StringUtils.isNotBlank(runnable.getTaskName())) {
                    log.warn("DynamicTp execute, run timeout, poolName: {}," +
                            " taskName: {}, runTime: {}ms", this.getThreadPoolName(),
                            runnable.getTaskName(), runTime);
                }
            }
        }
        super.afterExecute(r, t);
    }

    @Override
    protected void initialize(DtpProperties dtpProperties) {
        NotifyHelper.initNotify(this, dtpProperties.getPlatforms());

        if (preStartAllCoreThreads) {
            // 在没有任务到来之前就创建corePoolSize个线程或一个线程 因为在默认线程池启动的时候是不会启动核心线程的,
            // 只有来了新的任务时才会启动线程
            prestartAllCoreThreads();
        }
    }
}
EagerDtpExecutor
EagerDtpExecutor继承了DtpExecutor,专为IO密集场景提供,为什么这么说呢,请看下文分析
public class EagerDtpExecutor extends DtpExecutor {

    /**
     * The number of tasks submitted but not yet finished.
     * 已经提交的但还没有完成的任务数量
     */
    private final AtomicInteger submittedTaskCount = new AtomicInteger(0);

    public EagerDtpExecutor(int corePoolSize,
                            int maximumPoolSize,
                            long keepAliveTime,
                            TimeUnit unit,
                            BlockingQueue<Runnable> workQueue,
                            ThreadFactory threadFactory,
                            RejectedExecutionHandler handler) {
        super(corePoolSize, maximumPoolSize, keepAliveTime, unit, workQueue, threadFactory, handler);
    }

    public int getSubmittedTaskCount() {
        return submittedTaskCount.get();
    }

    @Override
    protected void afterExecute(Runnable r, Throwable t) {
        submittedTaskCount.decrementAndGet();
        super.afterExecute(r, t);
    }

    @Override
    public void execute(Runnable command) {
        if (command == null) {
            throw new NullPointerException();
        }
        submittedTaskCount.incrementAndGet();
        try {
            super.execute(command);
        } catch (RejectedExecutionException rx) {
            // 被拒绝时
            if (getQueue() instanceof TaskQueue) {
                // If the Executor is close to maximum pool size, concurrent
                // calls to execute() may result (due to use of TaskQueue) in
                // some tasks being rejected rather than queued.
                // If this happens, add them to the queue.
                final TaskQueue queue = (TaskQueue) getQueue();
                try {
                    // 加入队列中
                    if (!queue.force(command, 0, TimeUnit.MILLISECONDS)) {
                        submittedTaskCount.decrementAndGet();
                        throw new RejectedExecutionException("Queue capacity is full.", rx);
                    }
                } catch (InterruptedException x) {
                    submittedTaskCount.decrementAndGet();
                    throw new RejectedExecutionException(x);
                }
            } else {
                submittedTaskCount.decrementAndGet();
                throw rx;
            }
        }
    }
}
来看execute执行方法,当捕获住拒绝异常时,说明线程池队列已满且大于最大线程数,如果当前队列是
TaskQueue则重新将拒绝任务加入队列中,加入失败则抛出任务拒绝异常。
来看TaskQueue代码实现
public class TaskQueue extends VariableLinkedBlockingQueue<Runnable> {

    private static final long serialVersionUID = -1L;

    private transient EagerDtpExecutor executor;

    public TaskQueue(int queueCapacity) {
        super(queueCapacity);
    }

    public void setExecutor(EagerDtpExecutor exec) {
        executor = exec;
    }

    @Override
    public boolean offer(@NonNull Runnable runnable) {
        if (executor == null) {
            throw new RejectedExecutionException("The task queue does not have executor.");
        }
        int currentPoolThreadSize = executor.getPoolSize();
        // 线程池中的线程数等于最大线程数的时候,就将任务放进队列等待工作线程处理
        if (currentPoolThreadSize == executor.getMaximumPoolSize()) {
            return super.offer(runnable);
        }
        // 如果当前未执行的任务数量小于等于当前线程数,还有剩余的worker线程,就将任务放进队列等待工作线程处理
        if (executor.getSubmittedTaskCount() < currentPoolThreadSize) {
            return super.offer(runnable);
        }
        // 如果当前线程数大于核心线程,但小于最大线程数量,则直接返回false,外层逻辑线程池创建新的线程来执行任务
        if (currentPoolThreadSize < executor.getMaximumPoolSize()) {
            return false;
        }
        // currentPoolThreadSize >= max
        return super.offer(runnable);
    }
}
上述代码我们看到 currentPoolThreadSize < executor.getMaximumPoolSize()会返回false
底层实现还是JUC的ThreadPoolExecutor,来看execute方法,当前线程数大于核心线程,但小于最大线程数量,则执行addWorker(command, false),创建新的线程来执行任务。
public void execute(Runnable command) {
    if (command == null)
        throw new NullPointerException();
    // 线程池状态和线程数的整数
    int c = ctl.get();
    // 如果当前线程数小于核心线程数,创建 Worker 线程并启动线程
    if (workerCountOf(c) < corePoolSize) {
        // 添加任务成功,那么就结束了 结果会包装到 FutureTask 中
        if (addWorker(command, true))
            return;
        c = ctl.get();
    }
    // 要么当前线程数大于等于核心线程数,要么刚刚addWorker失败了,如果线程池处于RUNNING状态,
    // 把这个任务添加到任务队列 workQueue 中
    if (isRunning(c) && workQueue.offer(command)) {
        // 二次状态检查
        int recheck = ctl.get();
        // 如果线程池已不处于 RUNNING 状态,那么移除已经入队的这个任务,并且执行拒绝策略
        if (! isRunning(recheck) && remove(command))
            reject(command);
        // 如果线程池还是 RUNNING 的,并且线程数为 0,重新创建一个新的线程 这里目的担心任务提交到队列中了,但是线程都关闭了
        else if (workerCountOf(recheck) == 0)
            // 创建Worker,并启动里面的Thread,为什么传null,线程启动后会自动从阻塞队列拉任务执行
            addWorker(null, false);
    }
    // workQueue.offer(command)返回false,以 maximumPoolSize 为界创建新的 worker线程并启动线程,
    // 如果失败,说明当前线程数已经达到 maximumPoolSize,执行拒绝策略
    else if (!addWorker(command, false))
        reject(command);
}
一看这不就是Tomcat线程池处理流程吗,对比于原生JUC线程池提交任务流程
看下原生JUC线程池提交任务的流程
- 当前线程数小于核心线程数,则创建一个新的线程来执行任务
- 当前线程数大于等于核心线程数,且阻塞队列未满,则将任务添加到队列中
- 如果阻塞队列已满,当前线程数大于等于核心线程数,当前线程数小于最大线程数,则创建并启动一个线程来执行新提交的任务
- 若当前线程数大于等于最大线程数,且阻塞队列已满,此时会执行拒绝策略
来看下原生JUC线程池提交流程,引用美团线程池篇中的图
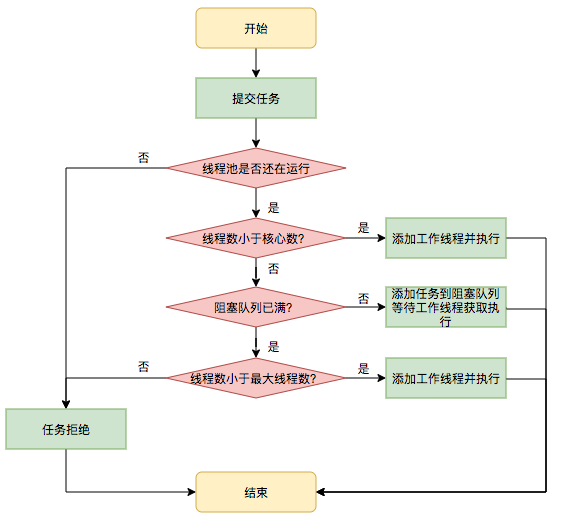
原生JUC线程池核心思想就是就是先让核心线程数的线程工作,多余的任务统统塞到阻塞队列,阻塞队列塞不下才再多创建线程来工作,这种情况下当大量请求提交时,大量的请求很有可能都会被阻塞在队列中,而线程还没有创建到最大线程数,导致用户请求处理很慢用户体验很差。
那如何解决呢?
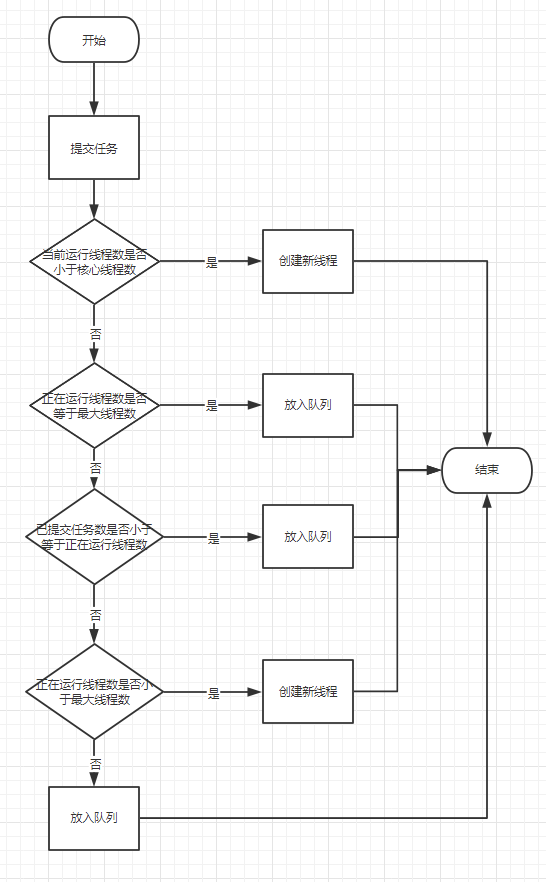
重写了execute()方法,当抛出拒绝策略了尝试一次往阻塞队列里插入任务,尽最大努力的去执行任务,新增阻塞队列继承了LinkedBlockingQueue,重写了offer()方法,重写了offer()方法,每次向队列插入任务,判断如果当前线程数小于最大线程数则插入失败。进而让线程池创建新线程来处理任务。
如下图所示:
总结:知识是相通的,要学以致用
2.4 报警通知
关于分析报警通知,可以从AlarmManager和NoticeManager这两个类入手,实际就是分别构造了一个报警通知责任链,在需要报警通知的时候,调用责任链执行。
先来看AlarmManager的代码实现
@Slf4j
public class AlarmManager {

    private static final ExecutorService ALARM_EXECUTOR = ThreadPoolBuilder.newBuilder()
            .threadPoolName("dtp-alarm")
            .threadFactory("dtp-alarm")
            .corePoolSize(2)
            .maximumPoolSize(4)
            .workQueue(LINKED_BLOCKING_QUEUE.getName(), 2000, false, null)
            .rejectedExecutionHandler(RejectedTypeEnum.DISCARD_OLDEST_POLICY.getName())
            .buildCommon();

    private static final InvokerChain<BaseNotifyCtx> ALARM_INVOKER_CHAIN;

    static {
        // 构造责任链
        ALARM_INVOKER_CHAIN = NotifyFilterBuilder.getAlarmInvokerChain();
    }

    private AlarmManager() {
    }

}
责任链的构造
public class NotifyFilterBuilder {

    private NotifyFilterBuilder() { }

    public static InvokerChain<BaseNotifyCtx> getAlarmInvokerChain() {
        val filters = ApplicationContextHolder.getBeansOfType(NotifyFilter.class);
        Collection<NotifyFilter> alarmFilters = Lists.newArrayList(filters.values());
        alarmFilters.add(new AlarmBaseFilter());
        alarmFilters = alarmFilters.stream()
                .filter(x -> x.supports(NotifyTypeEnum.ALARM))
                .sorted(Comparator.comparing(Filter::getOrder))
                .collect(Collectors.toList());
        // 构造ALARM_FILTER_CHAIN链
        return InvokerChainFactory.buildInvokerChain(new AlarmInvoker(),
                alarmFilters.toArray(new NotifyFilter[0]));
    }

    public static InvokerChain<BaseNotifyCtx> getCommonInvokerChain() {
        val filters = ApplicationContextHolder.getBeansOfType(NotifyFilter.class);
        Collection<NotifyFilter> noticeFilters = Lists.newArrayList(filters.values());
        noticeFilters.add(new NoticeBaseFilter());
        noticeFilters = noticeFilters.stream()
                .filter(x -> x.supports(NotifyTypeEnum.COMMON))
                .sorted(Comparator.comparing(Filter::getOrder))
                .collect(Collectors.toList());
        return InvokerChainFactory.buildInvokerChain(new NoticeInvoker(),
                noticeFilters.toArray(new NotifyFilter[0]));
    }
}
public final class InvokerChainFactory {

    private InvokerChainFactory() { }

    @SafeVarargs
    public static<T> InvokerChain<T> buildInvokerChain(Invoker<T> target, Filter<T>... filters) {

        InvokerChain<T> invokerChain = new InvokerChain<>();
        Invoker<T> last = target;
        for (int i = filters.length - 1; i >= 0; i--) {
            Invoker<T> next = last;
            Filter<T> filter = filters[i];
            last = context -> filter.doFilter(context, next);
        }
        invokerChain.setHead(last);
        return invokerChain;
    }
}
执行报警方法调用如下
public static void doAlarm(ExecutorWrapper executorWrapper, NotifyItemEnum notifyItemEnum) {
    // 根据告警类型获取告警项配置,一个线程池可以配置多个NotifyItem,这里需要过滤
    NotifyHelper.getNotifyItem(executorWrapper, notifyItemEnum).ifPresent(notifyItem -> {
        // 执行责任链
        val alarmCtx = new AlarmCtx(executorWrapper, notifyItem);
        ALARM_INVOKER_CHAIN.proceed(alarmCtx);
    });
}
执行责任链,真正执行报警通知的代码如下
public class AlarmInvoker implements Invoker<BaseNotifyCtx> {

    @Override
    public void invoke(BaseNotifyCtx context) {

        val alarmCtx = (AlarmCtx) context;
        val executorWrapper = alarmCtx.getExecutorWrapper();
        val notifyItem = alarmCtx.getNotifyItem();
        val alarmInfo = AlarmCounter.getAlarmInfo(executorWrapper.getThreadPoolName(),
                notifyItem.getType());
        alarmCtx.setAlarmInfo(alarmInfo);

        DtpNotifyCtxHolder.set(context);
        // 真正的发送告警的逻辑
        NotifierHandler.getInstance().sendAlarm(NotifyItemEnum.of(notifyItem.getType()));
        AlarmCounter.reset(executorWrapper.getThreadPoolName(), notifyItem.getType());
    }
}
调用NotifierHandler#sendAlarm()
@Slf4j
public final class NotifierHandler {

    private static final Map<String, DtpNotifier> NOTIFIERS = new HashMap<>();

    private NotifierHandler() {
        ServiceLoader<DtpNotifier> loader = ServiceLoader.load(DtpNotifier.class);
        for (DtpNotifier notifier : loader) {
            NOTIFIERS.put(notifier.platform(), notifier);
        }

        DtpNotifier dingNotifier = new DtpDingNotifier(new DingNotifier());
        DtpNotifier wechatNotifier = new DtpWechatNotifier(new WechatNotifier());
        DtpNotifier larkNotifier = new DtpLarkNotifier(new LarkNotifier());
        NOTIFIERS.put(dingNotifier.platform(), dingNotifier);
        NOTIFIERS.put(wechatNotifier.platform(), wechatNotifier);
        NOTIFIERS.put(larkNotifier.platform(), larkNotifier);
    }

    public void sendAlarm(NotifyItemEnum notifyItemEnum) {

        try {
            NotifyItem notifyItem = DtpNotifyCtxHolder.get().getNotifyItem();
            for (String platform : notifyItem.getPlatforms()) {
                DtpNotifier notifier = NOTIFIERS.get(platform.toLowerCase());
                if (notifier != null) {
                    notifier.sendAlarmMsg(notifyItemEnum);
                }
            }
        } finally {
            DtpNotifyCtxHolder.remove();
        }
    }
}
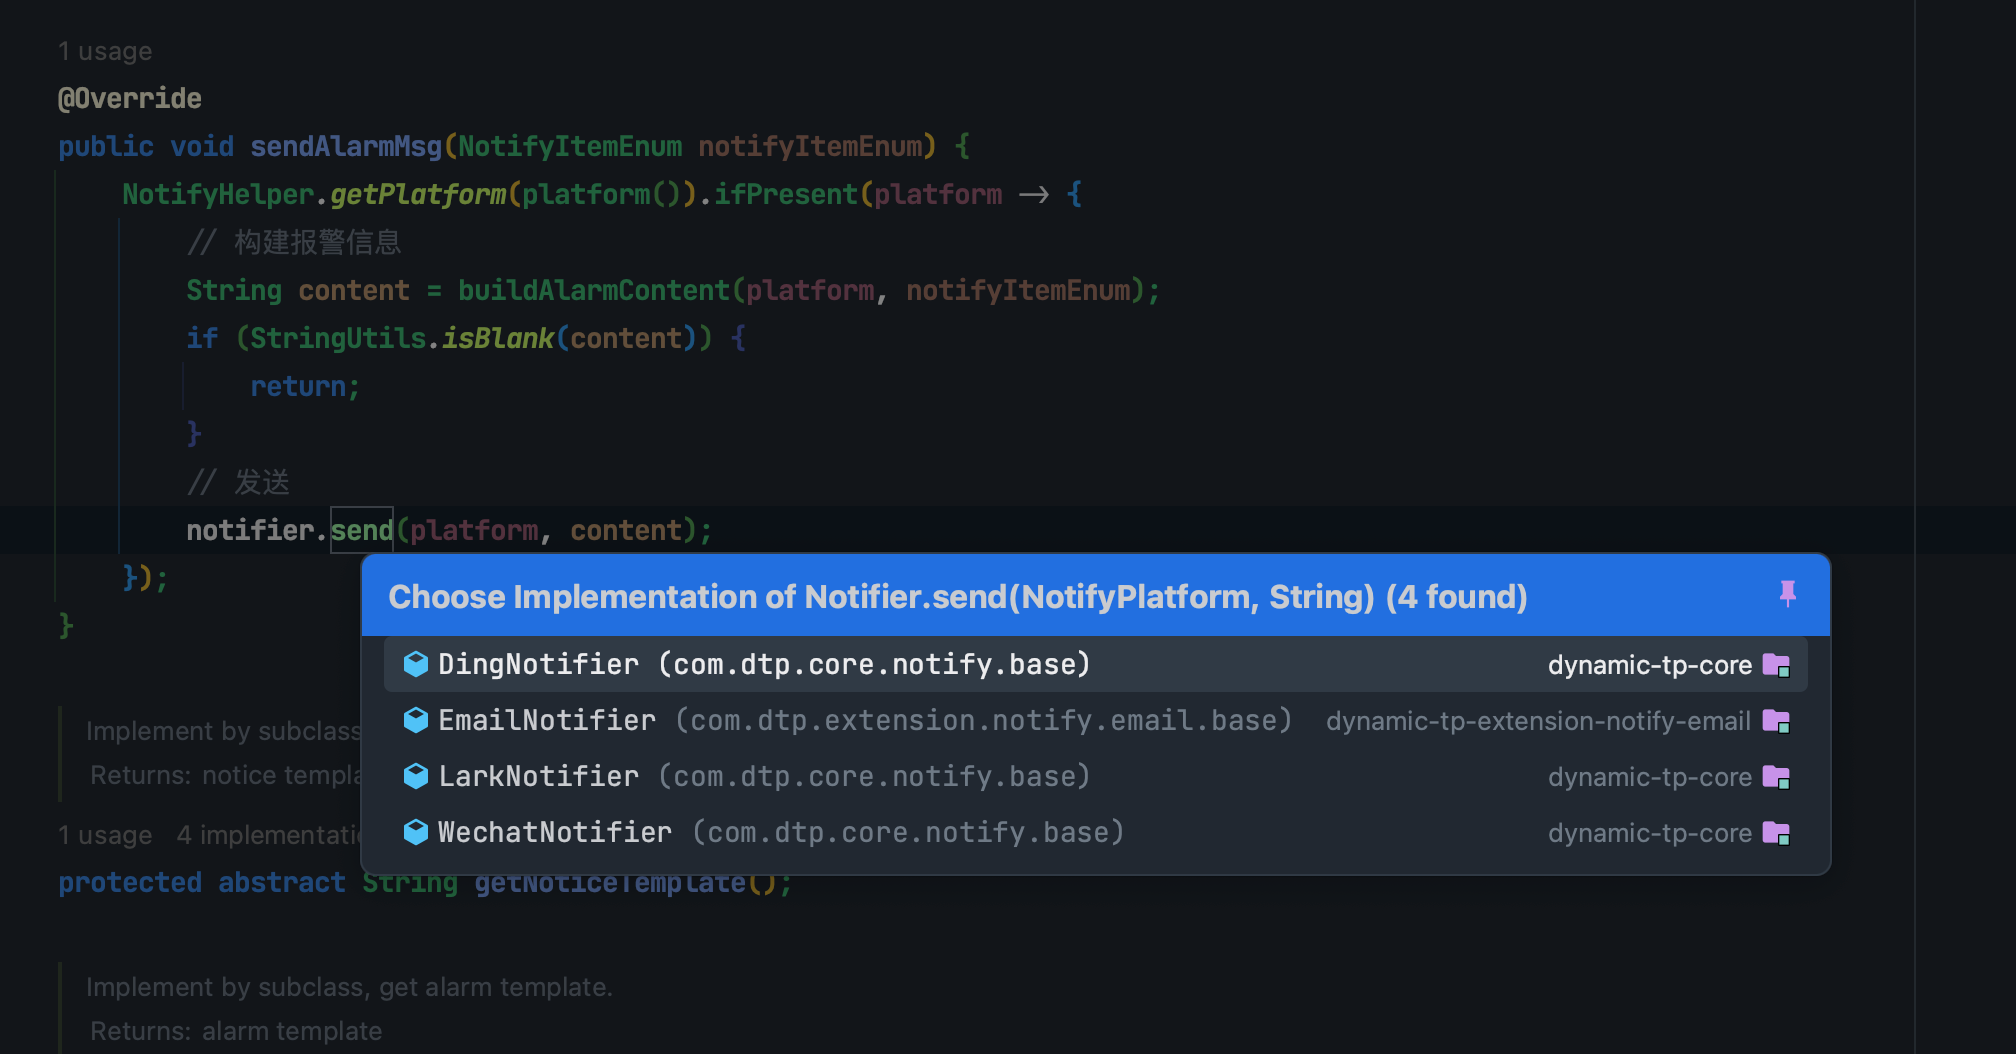
最后调用notifier.sendAlarmMsg(notifyItemEnum)发送消息
@Override
public void sendAlarmMsg(NotifyItemEnum notifyItemEnum) {
    NotifyHelper.getPlatform(platform()).ifPresent(platform -> {
        // 构建报警信息
        String content = buildAlarmContent(platform, notifyItemEnum);
        if (StringUtils.isBlank(content)) {
            return;
        }
        // 发送
        notifier.send(platform, content);
    });
}
2.5 监控
入口DtpMonitor
@Slf4j
public class DtpMonitor implements ApplicationRunner, Ordered {

    private static final ScheduledExecutorService MONITOR_EXECUTOR = new ScheduledThreadPoolExecutor(
            1, new NamedThreadFactory("dtp-monitor", true));

    @Resource
    private DtpProperties dtpProperties;

    /**
     * 每隔 monitorInterval(默认为5) 执行监控
     *
     * @param args
     */
    @Override
    public void run(ApplicationArguments args) {
        MONITOR_EXECUTOR.scheduleWithFixedDelay(this::run,
                0, dtpProperties.getMonitorInterval(), TimeUnit.SECONDS);
    }

    private void run() {
        // 所有线程池的名称
        List<String> dtpNames = DtpRegistry.listAllDtpNames();
        // 所有标有DynamicTp注解的线程池
        List<String> commonNames = DtpRegistry.listAllCommonNames();
        // 检查告警
        checkAlarm(dtpNames);
        // 指标收集
        collect(dtpNames, commonNames);
    }

    private void collect(List<String> dtpNames, List<String> commonNames) {
        // 不收集指标
        if (!dtpProperties.isEnabledCollect()) {
            return;
        }

        // 拿到所有的线程池对象,获取到线程池的各种属性统计指标
        dtpNames.forEach(x -> {
            DtpExecutor executor = DtpRegistry.getDtpExecutor(x);
            ThreadPoolStats poolStats = MetricsConverter.convert(executor);
            // 指标收集
            doCollect(poolStats);
        });
        commonNames.forEach(x -> {
            ExecutorWrapper wrapper = DtpRegistry.getCommonExecutor(x);
            // 转换 ThreadPoolStats
            ThreadPoolStats poolStats = MetricsConverter.convert(wrapper);
            // 指标收集
            doCollect(poolStats);
        });
        // 发送一个CollectEvent事件
        publishCollectEvent();
    }

    /**
     * 针对每一个线程池,使用其名称从注册表中获取到线程池对象,然后触发告警
     *
     * @param dtpNames
     */
    private void checkAlarm(List<String> dtpNames) {
        dtpNames.forEach(x -> {
            DtpExecutor executor = DtpRegistry.getDtpExecutor(x);
            AlarmManager.doAlarmAsync(executor, SCHEDULE_NOTIFY_ITEMS);
        });
        // 发送告警AlarmCheckEvent事件
        publishAlarmCheckEvent();
    }

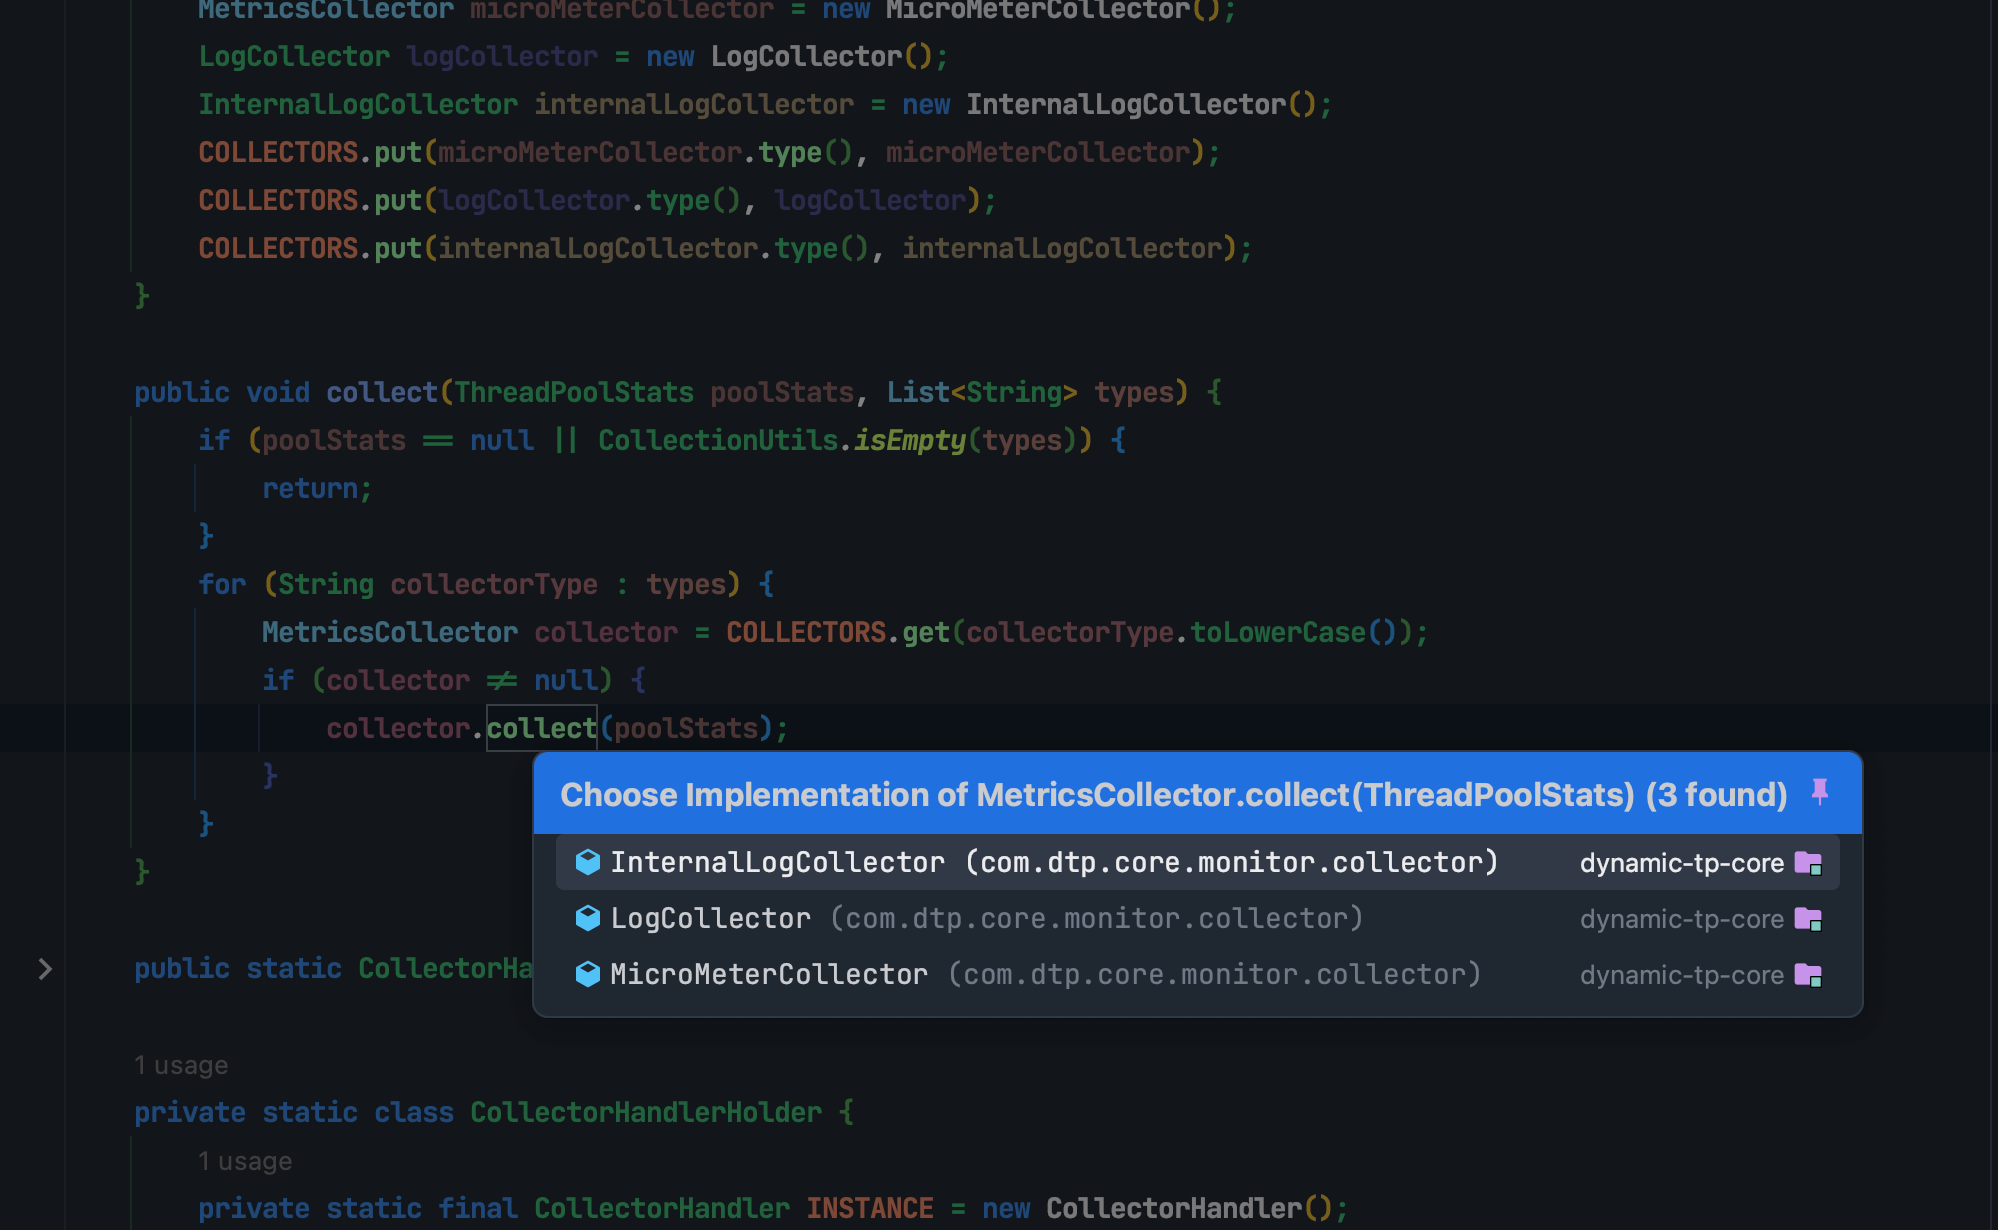
    private void doCollect(ThreadPoolStats threadPoolStats) {
        try {
            CollectorHandler.getInstance().collect(threadPoolStats, dtpProperties.getCollectorTypes());
        } catch (Exception e) {
            log.error("DynamicTp monitor, metrics collect error.", e);
        }
    }

    private void publishCollectEvent() {
        CollectEvent event = new CollectEvent(this, dtpProperties);
        ApplicationContextHolder.publishEvent(event);
    }

    private void publishAlarmCheckEvent() {
        AlarmCheckEvent event = new AlarmCheckEvent(this, dtpProperties);
        ApplicationContextHolder.publishEvent(event);
    }

    @Override
    public int getOrder() {
        return Ordered.HIGHEST_PRECEDENCE + 2;
    }
}
代码比较易懂,这里就不在叙述了。
三、总结
dynamic-tp设计巧妙,代码中设计模式先行,结构清晰易懂,代码规整,同时提供了很多扩展点,通过利用了Spring的扩展,和JUC原生线程池优势,功能强大。
