1 预备知识
Linux中主要的IPC机制有:管道(pipe)、信号(signal)、信号量(semophore)、消息队列(Message)、共享内存(Share Memory)、套接字(Socket)等。OpenHarmony基于binder驱动封装了一套ipc机制(foundation\communication\ipc)用于实现设备内的跨进程通信。 Binder机制通常采用客户端-服务器(Client-Server)模型,服务请求方(Client)可获取服务提供方(Server)的代理 (Proxy),并通过此代理读写数据来实现进程间的数据通信。通常,系统能力(SystemAbility)Server侧会先注册到系统能力管理者(System Ability Manager,缩写SAMgr)中,SAMgr负责管理这些SA并向Client提供相关的接口(添加,查询,获取,删除等)。Client要和某个具体的SA通信,必须先从SAMgr中获取该SA的代理,然后使用代理和SA通信。
注:SAMgr本身也是IPC的Server端,Client通过SAMgr的代理,调用SAMgr的接口。
1.1 binder机制架构图
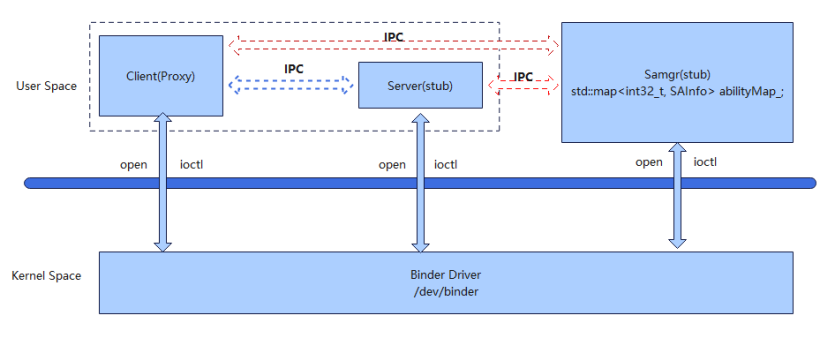
说明:
SAMgr中保存了一个map,key为saId, value为SAInfo。SAInfo结构体定义如下:
struct SAInfo {
    sptr<IRemoteObject> remoteObj;
    bool isDistributed = false;
    std::u16string capability;
    std::string permission;
};
1.2 实现IPC的基本步骤
- 定义接口类 接口类继承IRemoteBroker,定义描述符、业务函数和消息码。
- 实现服务提供端(Stub) Stub继承IRemoteStub,除了接口类中未实现方法外,还需要实现OnRemoteRequest方法。
- 实现服务请求端(Proxy) Proxy继承IRemoteProxy,封装业务函数,调用SendRequest将请求发送到Stub。
- 服务端进程注册SA 服务提供方所在进程启动后,申请SA的唯一标识,将Stub注册到SAMgr。
- 客户端进程通过SA的标识(saId),从SAMgr获取Proxy,通过Proxy实现与Stub的跨进程通信。
ohos中的SystemAbility可以运行在独立的进程中,也可以多个SystemAbility同时依附在某个进程内(如 foundation进程),通过这个进程对外提供服务。其他进程通过IPC(binder机制)使用这些服务提供的接口。
2 系统服务管理子系统简介
系统服务管理子系统由两部分构成。 系统服务框架组件(safwk):定义了SystemAbility的实现方法,并提供启动、发布等接口实现。 系统服务管理组件(samgr): 提供系统服务注册、查询等功能。
架构图如下

代码目录
/foundation/systemabilitymgr
│── safwk               # 组件目录
│  ├── bundle.json      # 组件描述及编译脚本
│  ├── etc              # 配置文件
│  ├── interfaces       # 对外接口目录
│  ├── services         # 框架实现
│  ├── test             # 测试用例
├── samgr
│   ├── bundle.json  # 部件描述及编译文件
│   ├── frameworks   # 框架实现存在目录
│   ├── interfaces   # 接口目录
│   ├── services     # 组件服务端目录
│   ├── test         # 测试代码存放目录
│   ├── utils        # 工具类目录
3 系统服务框架组件
SystemAbility实现一般采用XXX.cfg + saId.xml + libXXX.z.so的方式由init进程解析对应的XXX.cfg文件拉起SystemAbility所依赖的进程。(注:多个系统服务可能跑在同一个进程里。比如AbilityManagerService、BatteryService、WindowManagerService都在foundation进程,MMIService在独立的进程multimodalinput中。)
SystemAbility类图如下:
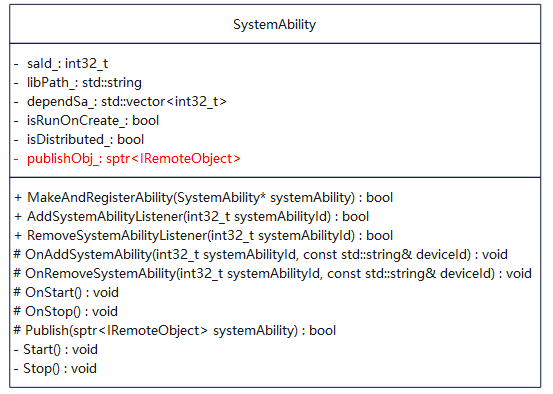
说明:
SystemAbility子类需要重写OnStart()和OnStop()方法,并且在OnStart()方法中调用Publish(sptr<IRemoteObject> systemAbility)方法把系统服务发布出去。
3.1 系统服务实现步骤
下面以AbilityManagerService为例说明SystemAbility的实现。
1.定义IPC对外接口IXXX
定义该服务对外提供的能力集合函数,统一继承IPC接口类IRemoteBroker;同时声明该IPC对外接口唯一标识符DECLARE_INTERFACE_DESCRIPTOR(XXX);该标识符用于IPC通信的校验等目的。 foundation\ability\ability_runtime\interfaces\inner_api\ability_manager\include\ability_manager_interface.h
class IAbilityManager : public OHOS::IRemoteBroker {
public:
    DECLARE_INTERFACE_DESCRIPTOR(u"ohos.aafwk.AbilityManager")

    /**
     * StartAbility with want, send want to ability manager service.
     *
     * @param want, the want of the ability to start.
     * @param userId, Designation User ID.
     * @param requestCode, Ability request code.
     * @return Returns ERR_OK on success, others on failure.
     */
    virtual int StartAbility(
        const Want &want,
        int32_t userId = DEFAULT_INVAL_VALUE,
        int requestCode = DEFAULT_INVAL_VALUE) = 0;
    //...此处省略若干行
}
2.定义客户端代码XXXProxy
foundation\ability\ability_runtime\services\abilitymgr\include\ability_manager_proxy.h
class AbilityManagerProxy : public IRemoteProxy<IAbilityManager> {
public:
    explicit AbilityManagerProxy(const sptr<IRemoteObject> &impl) : IRemoteProxy<IAbilityManager>(impl)
    {}

    virtual ~AbilityManagerProxy()
    {}

    /**
     * StartAbility with want, send want to ability manager service.
     *
     * @param want, the want of the ability to start.
     * @param requestCode, Ability request code.
     * @param userId, Designation User ID.
     * @return Returns ERR_OK on success, others on failure.
     */
    virtual int StartAbility(
        const Want &want,
        int32_t userId = DEFAULT_INVAL_VALUE,
        int requestCode = DEFAULT_INVAL_VALUE) override;
//...此处省略若干行
private:
    static inline BrokerDelegator<AbilityManagerProxy> delegator_;
};
foundation\ability\ability_runtime\services\abilitymgr\src\ability_manager_proxy.cpp
int AbilityManagerProxy::StartAbility(const Want &want, int32_t userId, int requestCode)
{
    int error;
    MessageParcel data;
    MessageParcel reply;
    MessageOption option;

    if (!WriteInterfaceToken(data)) {
        return INNER_ERR;
    }
    if (!data.WriteParcelable(&want)) {
        HILOG_ERROR("want write failed.");
        return INNER_ERR;
    }

    if (!data.WriteInt32(userId)) {
        HILOG_ERROR("userId write failed.");
        return INNER_ERR;
    }

    if (!data.WriteInt32(requestCode)) {
        HILOG_ERROR("requestCode write failed.");
        return INNER_ERR;
    }

    error = Remote()->SendRequest(IAbilityManager::START_ABILITY, data, reply, option);
    if (error != NO_ERROR) {
        HILOG_ERROR("Send request error: %{public}d", error);
        return error;
    }
    return reply.ReadInt32();
}
AbilityManagerProxy::StartAbility()实现代码中会调用Remote()->SendRequest(IAbilityManager::START_ABILITY, data, reply, option);把消息码和数据发送给服务端。
3.定义服务端代码XXXStub
foundation\ability\ability_runtime\services\abilitymgr\include\ability_manager_stub.h
class AbilityManagerStub : public IRemoteStub<IAbilityManager> {
public:
    AbilityManagerStub();
    ~AbilityManagerStub();
    virtual int OnRemoteRequest(
        uint32_t code, MessageParcel &data, MessageParcel &reply, MessageOption &option) override;
//...此处省略若干行
};
foundation\ability\ability_runtime\services\abilitymgr\src\ability_manager_stub.cpp
int AbilityManagerStub::OnRemoteRequest(uint32_t code, MessageParcel &data, MessageParcel &reply, MessageOption &option)
{
    std::u16string descriptor = AbilityManagerStub::GetDescriptor();
    std::u16string remoteDescriptor = data.ReadInterfaceToken();
    if (descriptor != remoteDescriptor) {
        HILOG_INFO("local descriptor is not equal to remote");
        return ERR_INVALID_STATE;
    }

    auto itFunc = requestFuncMap_.find(code);
    if (itFunc != requestFuncMap_.end()) {
        auto requestFunc = itFunc->second;
        if (requestFunc != nullptr) {
            return (this->*requestFunc)(data, reply);
        }
    }
    HILOG_WARN("default case, need check.");
    return IPCObjectStub::OnRemoteRequest(code, data, reply, option);
}
requestFuncMap_[START_ABILITY] = &AbilityManagerStub::StartAbilityInner; 消息码START_ABILITY对应的函数为AbilityManagerStub::StartAbilityInner
int AbilityManagerStub::StartAbilityInner(MessageParcel &data, MessageParcel &reply)
{
    Want *want = data.ReadParcelable<Want>();
    if (want == nullptr) {
        HILOG_ERROR("want is nullptr");
        return ERR_INVALID_VALUE;
    }
    int32_t userId = data.ReadInt32();
    int requestCode = data.ReadInt32();
    int32_t result = StartAbility(*want, userId, requestCode);
    reply.WriteInt32(result);
    delete want;
    return NO_ERROR;
}
StartAbility()的实现在AbilityManagerStub的实现类AbilityManagerService中
4.SystemAbility的实现类
foundation\ability\ability_runtime\services\abilitymgr\include\ability_manager_service.h
class AbilityManagerService : public SystemAbility,
                              public AbilityManagerStub,
                              public AppStateCallback,
                              public std::enable_shared_from_this<AbilityManagerService> {
    DECLARE_DELAYED_SINGLETON(AbilityManagerService)
    DECLEAR_SYSTEM_ABILITY(AbilityManagerService)
public:
    void OnStart() override;
    void OnStop() override;
    ServiceRunningState QueryServiceState() const;

    /**
     * StartAbility with want, send want to ability manager service.
     *
     * @param want, the want of the ability to start.
     * @param requestCode, Ability request code.
     * @param userId, Designation User ID.
     * @return Returns ERR_OK on success, others on failure.
     */
    virtual int StartAbility(
        const Want &want, int32_t userId = DEFAULT_INVAL_VALUE, int requestCode = DEFAULT_INVAL_VALUE) override;
// ...此处省略若干行
}
AbilityManagerService同时继承了SystemAbility和AbilityManagerStub。 在重写的SystemAbility的接口函数OnStart()中,调用Publish(instance_)把自己发布出去。
void AbilityManagerService::OnStart()
{
    //...此处省略若干行
    /* Publish service maybe failed, so we need call this function at the last,
     * so it can't affect the TDD test program */
    instance_ = DelayedSingleton<AbilityManagerService>::GetInstance().get();
    if (instance_ == nullptr) {
        HILOG_ERROR("AMS enter OnStart, but instance_ is nullptr!");
        return;
    }
    bool ret = Publish(instance_);
    if (!ret) {
        HILOG_ERROR("Publish AMS failed!");
        return;
    }
//...此处省略若干行
}
注:在实现SystemAbility的时候,必须调用宏REGISTER_SYSTEM_ABILITY_BY_ID或者SystemAbility::MakeAndRegisterAbility()把SystemAbility注册到LocalAbilityManager中。 可参考如下代码:
const bool REGISTER_RESULT =
    SystemAbility::MakeAndRegisterAbility(DelayedSingleton<AbilityManagerService>::GetInstance().get());
或者
REGISTER_SYSTEM_ABILITY_BY_ID(AppMgrService, APP_MGR_SERVICE_ID, true);
5.SystemAbility配置
以c++实现的SA必须配置相关SystemAbility的profile配置文件才会完成SA的自动加载注册逻辑,否则没有编写配置文件的SystemAbility不会完成自动加载注册。配置方法如下: 在子系统的根目录新建一个以sa_profile为名的文件夹,然后在此文件夹中新建两个文件:一个以saId为前缀的xml文件,另外一个为BUILD.gn文件。 比如AbilityManagerService,saId为ABILITY_MGR_SERVICE_ID(即180),对应的配置文件为180.xml。内容如下:
<info>
    <process>foundation</process>
    <systemability>
        <name>180</name>
        <libpath>libabilityms.z.so</libpath>
        <run-on-create>true</run-on-create>
        <distributed>false</distributed>
        <dump-level>1</dump-level>
    </systemability>
</info>
BUILD.gn内容如下:
ohos_sa_profile("ams_sa_profile") {
  sources = [
    "180.xml",
    "182.xml",
    "183.xml",
    "184.xml",
    "501.xml",
  ]

  part_name = "ability_runtime"
}
说明:
-
进程名字即该SystemAbility要运行的进程空间,此字段是必填选项。上例中,AbilityManagerService跑在foundation进程中。
-
一个SystemAbility配置文件只能配置一个SystemAbility节点,配置多个会导致编译失败。
-
SystemAbility的name为对应的saId必须与代码中注册的saId保持一致,必配项。
-
libpath为SystemAbility的加载路径,必配项。
-
run-on-create:true表示进程启动后即向samgr组件注册该SystemAbility;false表示按需启动,即在其他模块访问到该SystemAbility时启动,必配项。
-
distributed:true表示该SystemAbility为分布式SystemAbility,支持跨设备访问;false表示只有本地跨进程访问。
-
bootphase:可不设置;可以设置的值有三种:BootStartPhase、CoreStartPhase、OtherStartPhase(默认类型),三种优先级依次降低,在同一个进程中,会优先拉起注册配置BootStartPhase的SystemAbility,然后是配置了CoreStartPhase的SystemAbility,最后是OtherStartPhase;当高优先级的SystemAbility全部启动注册完毕才会启动下一级的SystemAbility的注册启动。
-
dump-level:表示systemdumper支持的level等级,默认配置1。
-
BUILD.gn中part_name为相应部件名称;sources表示当前子系统需要配置的SystemAbility列表,可支持配置多个SystemAbility。
以上步骤完成后,全量编译代码后会在out路径下生成一个以进程名为前缀的xml文件(比如foundation.xml),路径为:out\...\system\profile\foundation.xml。该文件整合了所有需要在该进程中运行的SA的saId.xml文件内容。(比如AbilityManagerService,WindowManagerService,PowerManagerService等SA的配置文件都会被集成到foundation.xml中)
6.Cfg配置文件
cfg配置文件为linux提供的native进程拉起策略,开机启动阶段由init进程解析cfg文件把目标进程拉起(动态加载的除外)。 foundation进程的配置文件在systemabilitymgr子系统中。 foundation\systemabilitymgr\safwk\etc\profile\foundation.cfg
    "services" : [{
            "name" : "foundation",
            "path" : ["/system/bin/sa_main", "/system/profile/foundation.xml"],
            "importance" : -20,
            "uid" : "foundation",
            //...此处省略若干行
        }
    ]
3.2 SystemAbility所在进程启动时序图
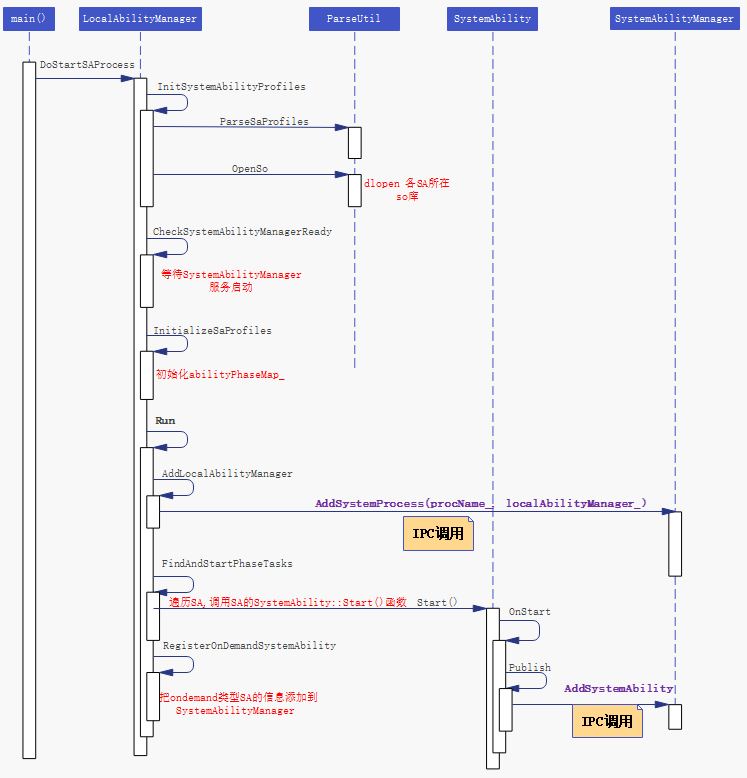 时序图1
时序图1
该流程即为/system/bin/sa_main可执行文件的启动流程,main()函数(代码路径foundation\systemabilitymgr\safwk\services\safwk\src\main.cpp)在调用LocalAbilityManager::GetInstance().DoStartSAProcess(profilePath, saId)之前会把进程改名为saId.xml配置文件中指定的进程名。
3 系统服务管理组件
SystemAbilityManager本身是IPC接口ISystemAbilityManager的服务端。提供了添加、删除、查询系统服务,以及订阅系统服务状态等接口。IPCSkeleton::SetContextObject()通过该方法告诉binder我是服务管理器,我是0号选手。
constexpr int REGISTRY_HANDLE = 0;
foundation\systemabilitymgr\samgr\services\samgr\native\source\main.cpp
int main(int argc, char *argv[])
{
    HILOGI("%{public}s called, enter System Ability Manager ", __func__);

    OHOS::sptr<OHOS::SystemAbilityManager> manager = OHOS::SystemAbilityManager::GetInstance();
    manager->Init();
    OHOS::sptr<OHOS::IRemoteObject> serv = manager->AsObject();

    if (!IPCSkeleton::SetContextObject(serv)) {
        HILOGE("set context fail!"); // add log for dfx
    }
    int result = SetParameter("bootevent.samgr.ready", "true");
    HILOGI("set samgr ready ret : %{public}s", result == 0 ? "succeed" : "failed");
    manager->StartDfxTimer();
    OHOS::IPCSkeleton::JoinWorkThread();
    return -1;
}
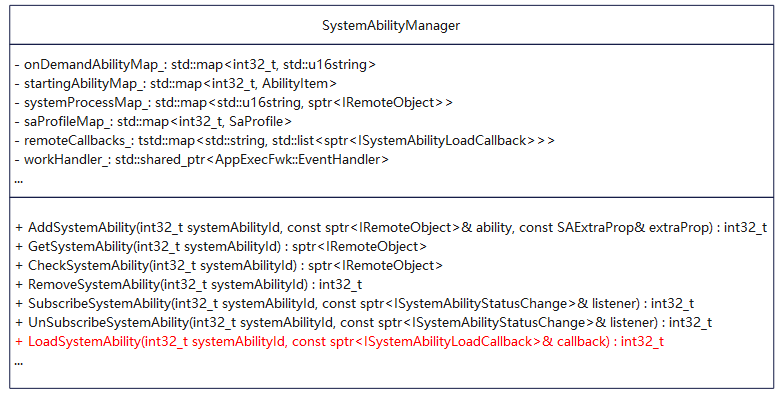 标红的方法LoadSystemAbility适用于动态加载系统服务进程的场景。
前面章节讲的AbilityManagerService所在的foundation进程,开机即被init进程拉起。
有些系统服务进程需要动态加载,比如QuickFixManagerService所在的quick_fix进程。
foundation\ability\ability_runtime\services\quickfixmgr\quick_fix.cfg
标红的方法LoadSystemAbility适用于动态加载系统服务进程的场景。
前面章节讲的AbilityManagerService所在的foundation进程,开机即被init进程拉起。
有些系统服务进程需要动态加载,比如QuickFixManagerService所在的quick_fix进程。
foundation\ability\ability_runtime\services\quickfixmgr\quick_fix.cfg
{
    "services" : [{
            "name" : "quick_fix",
            "path" : ["/system/bin/sa_main", "/system/profile/quick_fix.xml"],
            "ondemand" : true,
            "uid" : "quickfixserver",
            "gid" : ["system"],
            "secon" : "u:r:quick_fix:s0"
        }
    ]
}
cfg文件指定了"ondemand"为 true,说明quick_fix进程要按需启动。拉起quick_fix进程的关键在于SystemAbilityManager::LoadSystemAbility方法。 foundation\ability\ability_runtime\interfaces\inner_api\quick_fix\src\quick_fix_manager_client.cpp
bool QuickFixManagerClient::LoadQuickFixMgrService()
{
    // ...此处省略若干行
    sptr<QuickFixLoadCallback> loadCallback = new (std::nothrow) QuickFixLoadCallback();
    if (loadCallback == nullptr) {
        HILOG_ERROR("Create load callback failed.");
        return false;
    }

    auto ret = systemAbilityMgr->LoadSystemAbility(QUICK_FIX_MGR_SERVICE_ID, loadCallback);
    if (ret != 0) {
        HILOG_ERROR("Load system ability %{public}d failed with %{public}d.", QUICK_FIX_MGR_SERVICE_ID, ret);
        return false;
    }

    {
        std::unique_lock<std::mutex> lock(loadSaMutex_);
        auto waitStatus = loadSaCondation_.wait_for(lock, std::chrono::milliseconds(LOAD_SA_TIMEOUT_MS),
            [this]() {
                return loadSaFinished_;
            });
        if (!waitStatus) {
            HILOG_ERROR("Wait for load sa timeout.");
            return false;
        }
    }

    return true;
}
SystemAbilityManager::LoadSystemAbility()中,会先判断目标SA是否已存在,如不存在,则调用StartDynamicSystemProcess()函数把目标SA所在进程拉起。(SystemAbilityManager在初始化的时候会遍历/system/profile/目录下的文件并解析,把所有SA的配置信息保存到saProfileMap_中。所以目标SA所在的进程名,SystemAbilityManager都有保存。)
int32_t SystemAbilityManager::StartDynamicSystemProcess(const std::u16string& name, int32_t systemAbilityId)
{
    std::string strExtra = std::to_string(systemAbilityId);
    auto extraArgv = strExtra.c_str();
    auto result = ServiceControlWithExtra(Str16ToStr8(name).c_str(), ServiceAction::START, &extraArgv, 1);
    HILOGI("StartDynamicSystemProcess call ServiceControlWithExtra result:%{public}d!", result);
    return (result == 0) ? ERR_OK : ERR_INVALID_VALUE;
}
ServiceControlWithExtra()函数的实现在base\startup\init\interfaces\innerkits\service_control\service_control.c文件中,实际就是通知init进程把目标进程拉起。目标进程被拉起之后会再走一遍时序图1的流程。跟开机启动的系统服务进程的不同点在于,动态加载的系统服务进程main()函数参数多了目标saId。
4 系统服务接口使用方法
foundation\systemabilitymgr\samgr\interfaces\innerkits\samgr_proxy\include\system_ability_definition.h 定义了所有系统服务的saId。
比如要使用AbilityManagerService的StartAbility()接口
- 包含头文件
#include "ability_manager_interface.h"
#include "if_system_ability_manager.h"
#include "ipc_skeleton.h"
#include "iservice_registry.h"
#include "system_ability_definition.h"
- 获取系统服务,调用接口
    OHOS::sptr<OHOS::ISystemAbilityManager> systemAbilityManager =
        OHOS::SystemAbilityManagerClient::GetInstance().GetSystemAbilityManager();
    OHOS::sptr<OHOS::IRemoteObject> abilityObject =
        systemAbilityManager->GetSystemAbility(OHOS::ABILITY_MGR_SERVICE_ID);
    auto abms = OHOS::iface_cast<OHOS::AAFwk::IAbilityManager>(abilityObject);
   abms->StartAbility(want, userId, requestCode);
5 系统服务不配置saId.xml,不走自动加载注册流程行不行?
答案是可以的。 参考SysEventServiceOhos,是SystemAbility,但没有配置saId.xml,直接在hiview进程中初始化并注册。 SysEventService::OnLoad() => (hiview进程加载SysEventService插件) SysEventServiceAdapter::StartService() => OHOS::HiviewDFX::SysEventServiceOhos::StartService() => samgr->AddSystemAbility(DFX_SYS_EVENT_SERVICE_ABILITY_ID, instance)
6 总结
本文详细讲解了系统服务的实现方法和注意事项。通过这篇文章相信大家对系统服务管理子系统有了一定的了解。
更多原创内容请关注:深开鸿技术团队
入门到精通、技巧到案例,系统化分享OpenHarmony开发技术,欢迎投稿和订阅,让我们一起携手前行共建生态。
https://ost.51cto.com/#bkwz
标签:OpenHarmony,return,ability,foundation,管理子系统,SystemAbility,源码,want,进程 From: https://blog.51cto.com/harmonyos/6202722