用C++ 编写QML 扩展
Qt,QML,Qt Quick这是关于用C++ 来扩展QML的教程。源文:Writing QML Extensions with C++
Qt QML模块提供了一系列API以实现通过C++ 来扩展QML。可以编写扩展并添加到自定义的QML类型中、扩展有存在类型、或调用在普通QML代码中无法访问的C/C++ 函数。
本教程涉及如何使用C++ 来编写QML扩展,包括QML核心特性、属性、信号及绑定。也包含了如何通过插件来部署扩展。
本文中的很多课题细节被进一步记录在文章 QML和C++ 的集成及其子课题的相关章中。特别地,或许你会对子课题 将C++ 类的属性暴露给QML和 从C++ 中定义C++ 类型有兴趣
运行教程例子
本教程中的示例项目,由与教程中的每个章节相关的子工程组成。在Qt Creator中,打开Welcome欢迎模式,从Examples示例中选择教程。在Edit编辑模式,展开extending-qml项目,在想要运行的子项目(章节)上点击,在右键菜单中点运行。

打开示例项目
第一章:创建新类型
扩展QML之~基础章节。
当扩展QML时的一个通常的任务是,设计一个新的QML类型以满足在内置Qt Quick 类型中所不具有的用户功能。比如,实现部分数据模型、或提供具有自绘能力的类型、或访问通过内置QML不能访问的系统特性。
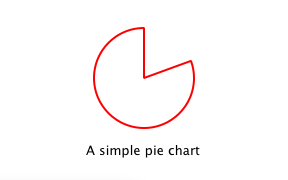
本教程中,将会揭示在Qt Quick模式下如何使用C++ 类来扩展QML。最终的结果会展示一个简单的饼形图,它是由做了信号和绑定的几个用户自定义QML类型来实现的,并通过插件实现了对QML运行时可见。
首先,创建一个名为“PieChart”饼图的QML类型,有两个属性:name和color。将其放在名为“Charts”的导入类型空间,版本为1.0。
我们想让PieChart类型从QML中象如下这样来使用:
import Charts 1.0

PieChart {
	width: 100; height: 100;
	name: "A Simple Pie Chart"
 	color: "red"
}
为此,我们需要一个C++ 类来封装PieChart和它的两个属性。因为QML扩展需要用到Qt的元对象系统meta object system,这个即将产生的新的类必须:
- 继承自 QObject
- 使用宏 Q_PROPERTY 来声明其属性
以下是定义于piechart.h的类PieChart
#include <QtQuick/QQuickPaintedItem>
#include <QColor>

class PieChart : public QQuickPaintedItem
{
    Q_OBJECT
    Q_PROPERTY(QString name READ name WRITE setName)
    Q_PROPERTY(QColor color READ color WRITE setColor)
    QML_ELEMENT

public:
    PieChart(QQuickItem *parent = 0);

    QString name() const;
    void setName(const QString &name);

    QColor color() const;
    void setColor(const QColor &color);

    void paint(QPainter *painter);

private:
    QString m_name;
    QColor m_color;
};
类继承自 QQuickPaintedItem,因我们想通过重写 QQuickPaintedItem::paint() ,以实现用 QPainter API 来做一些绘制操作。如果此类仅用于某些数据展示,而不需要图形展示,它仅从QObject就可以了。或者,如果我们想从已存在的基于QObject的类上扩展一些功能,也可以从那些类上继承。又或者,如果想创建一个可视项目但不涉及使用QPainter API的绘制操作,可以仅从QuickItem继承。
类PieChart定义了两个属性,name和color,用到了Q_PROPERTY宏,并重写了QQuickPaintedItem::paint()。类PieChart通过宏QML_ELEMENT来实现注册。如果不注册这个类,app.qml将不能创建PieChart。
为了使注册生效,要在工程文件的配置CONFIG中加入qmltypes选项,并配上QML_IMPORT_NAME 和QML_IMPORT_MAJOR_VERSION赋相应值。
CONFIG += qmltypes
QML_IMPORT_NAME = Charts
QML_IMPORT_MAJOR_VERSION = 1在类piechart.cpp中仅简单实现了m_name 和 m_color的值存取,并以paint()来实现了一个简单饼形的绘制。也关闭了 QGraphicsItem::ItemHasNoContents标志以允许绘制:
PieChart::PieChart(QQuickItem *parent)
    : QQuickPaintedItem(parent)
{
}
//其它代码略...
void PieChart::paint(QPainter *painter)
{
    QPen pen(m_color, 2);
    painter->setPen(pen);
    painter->setRenderHints(QPainter::Antialiasing, true);
    painter->drawPie(boundingRect().adjusted(1, 1, -1, -1), 90 * 16, 290 * 16);
}现在已经定义好了类PieChart,接下来看下如何在QML中使用。文件app.qml创建了PieChart项目并用QML的Text项来展示了饼图的细节。
import Charts 1.0
import QtQuick 2.0

Item {
    width: 300; height: 200

    PieChart {
        id: aPieChart
        anchors.centerIn: parent
        width: 100; height: 100
        name: "A simple pie chart"
        color: "red"
    }

    Text {
        anchors { bottom: parent.bottom; horizontalCenter: parent.horizontalCenter; bottomMargin: 20 }
        text: aPieChart.name
    }
}注意,虽然在QML中color属性被赋值为字符串,但它会自动转换为QColor对象,作为PieChart的color属性。其它基础类型也提供类似的类型自动转换;比如,字符串“640x480”能够自动转换为QSize的值。
接着用QQuickView来创建C++ 应用以运行和展示app.qml
以下是应用的main.cpp源码:
#include "piechart.h"
#include <QtQuick/QQuickView>
#include <QGuiApplication>

int main(int argc, char *argv[])
{
    QGuiApplication app(argc, argv);

    QQuickView view;
    view.setResizeMode(QQuickView::SizeRootObjectToView);
    view.setSource(QUrl("qrc:///app.qml"));
    view.show();
    return app.exec();
}在应用的工程文件.pro中包含文件和qml库,并为任意暴露给QML的类型定义一个类型命名空间“Charts”,版本号为1.0:
QT += qml quick

CONFIG += qmltypes
QML_IMPORT_NAME = Charts
QML_IMPORT_MAJOR_VERSION = 1

HEADERS += piechart.h
SOURCES += piechart.cpp \
           main.cpp

RESOURCES += chapter1-basics.qrc

DESTPATH = $$[QT_INSTALL_EXAMPLES]/qml/tutorials/extending-qml/chapter1-basics
target.path = $$DESTPATH
INSTALLS += target
这样就可以编译并运行应用了:

注意:可能会看到警告Expression...depends on non-NOTIFYable properties: PieChart::name。这是因为我们添加了一个绑定到可写的name属性,但并未为其定义一个通知信号。因此当name的值变化时,QML引擎不能更新绑定。这在以下章节中会重点强调。
以下代码会被本章节引用。
第二章:连接C++ 方法与信号
扩展QML之~方法篇
假定想让PieChart有“clearChart()”方法,能够擦除绘图并发出“chartCleared”信号。app.qml应该能够调用clearChart()并收到chartCleared()信号,代码如下:
import Charts 1.0
import QtQuick 2.0

Item {
    width: 300; height: 200

    PieChart {
        id: aPieChart
        anchors.centerIn: parent
        width: 100; height: 100
        color: "red"

        onChartCleared: console.log("The chart has been cleared") //方法(被调用后)发出的信号
    }

    MouseArea {
        anchors.fill: parent
        onClicked: aPieChart.clearChart()  //调用方法
    }

    Text {
        anchors { bottom: parent.bottom; horizontalCenter: parent.horizontalCenter; bottomMargin: 20 }
        text: "Click anywhere to clear the chart"
    }
}
为此,要在C++ 类上添加 clearChart() 方法 和 chartCleared()信号。
class PieChart : public QQuickPaintedItem
{
    ...
public:
    ...
    Q_INVOKABLE void clearChart();

signals:
    void chartCleared();
    ...
};Q_INVOKABLE宏的应用,使得clearChart()方法对Qt Meta-Object元对象系统可见,也因而,对QML可见。注意,它也可以被声明为Qt slot 槽,因为slot 槽也是可从QML调用的。这两种方法都可以。
clearChart()方法仅是将color属性设置为 Qt::transparent ,重绘图表,并发出 chartCleared() 信号:
void PieChart::clearChart()
{
    setColor(QColor(Qt::transparent));
    update();

    emit chartCleared();
}
现在,当运行应用并点击程序窗体,饼形图会消失,并在控制台输出:
qml: The Chart has been cleared第三章:添加属性绑定
扩展qml之~绑定
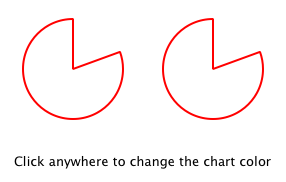
属性绑定是非常强大的QML特性,它允许不同类型的值自动同步。当属性值变化时,它使用信号去通知并更新其它类型的值。
以下为color属性赋予绑定。这意味着代码长这样:
import Charts 1.0
import QtQuick 2.0

Item {
    width: 300; height: 200

    Row {
        anchors.centerIn: parent
        spacing: 20

        PieChart {
            id: chartA
            width: 100; height: 100
            color: "red"
        }

        PieChart {
            id: chartB
            width: 100; height: 100
            color: chartA.color
        }
    }

    MouseArea {
        anchors.fill: parent
        onClicked: { chartA.color = "blue" }
    }

    Text {
        anchors { bottom: parent.bottom; horizontalCenter: parent.horizontalCenter; bottomMargin: 20 }
        text: "Click anywhere to change the chart color"
    }
}
"color: chartA.color" 这一表达式将ChartB的color值与ChartA的color值绑到了一起。A图的color变了,B也跟着变。当窗体被点击,MouseArea中的方法
onClicked改变了A表的颜色,因此A、B两表颜色都成了蓝色。为
color属性赋予绑定能力也很简单。在宏Q_PROPERTY()声明里添加上NOTIFY特性,以表明当值发生变化时,“colorChanged”信号会被发出。
class PieChart : public QQuickPaintedItem
{
    ...
    Q_PROPERTY(QColor color READ color WRITE setColor NOTIFY colorChanged)
public:
    ...
signals:
    void colorChanged();
    ...
};
然后,在setColor()中发出这个信号
void PieChart::setColor(const QColor &color)
{
    if (color != m_color) {
        m_color = color;
        update();   // repaint with the new color
        emit colorChanged();
    }
}
在setColor() 方法中在发出colorChanged()信号前,对颜色值是否真正改变的检查非常重要,这确保了不必要的信号发出,也避免了对绑定过该信号的其它类型(的槽slot)不必要地响应信号。
绑定的使用对QML非常必要。应该始终为可实现的属性添加NOTIFY信号,如此属性便可应用于绑定。那些不能被绑定的属性,不能实现自动更新,也因此不能被灵活地应用于QML。而且, 因为绑定会被频繁和高度依赖于QML调用,自定义的QML类型如果不实现绑定,则有可能会有不可预见的行为。
每四章:使用自定义属性类型
扩展qml之~自定义属性类型
PieChart 类型目前具有一个string类型的属性,和一个color类型的属性。它也可以有其它类型的属性。比如,它也可以有一个int类型的属性,作为每个图表的标识。
// C++
class PieChart : public QQuickPaintedItem
{
    Q_PROPERTY(int chartId READ chartId WRITE setChartId NOTIFY chartIdChanged)
    ...

public:
    void setChartId(int chartId);
    int chartId() const;
    ...

signals:
    void chartIdChanged();
};

// QML
PieChart {
    ...
    chartId: 100
}除了int,可以使用各种其它属性类型。很多其它类型,如QColor,QSize和QRect都在QML里自动支持。(参见QML与C++ 间的数据类型转换 一文,有详细列出)。
如果想要创那一个在QML中默认未支持的类型,我们需要向QML引擎注册该类型。
比如,用一个名为“PieSlice”,且有一个color属性的类型来替换PieChart原来的color属性。原本向color赋值,现在将一个PieSlice类型的值:
import Charts 1.0
import QtQuick 2.0

Item {
    width: 300; height: 200

    PieChart {
        id: chart
        anchors.centerIn: parent
        width: 100; height: 100

        pieSlice: PieSlice {
            anchors.fill: parent
            color: "red"
        }
    }

    Component.onCompleted: console.log("The pie is colored " + chart.pieSlice.color)
}就象PieChart那样,新的PieSlice类型继承自QQuickPaintedItem并使用宏 Q_PROPERTY()来声明属性。
class PieSlice : public QQuickPaintedItem
{
    Q_OBJECT
    Q_PROPERTY(QColor color READ color WRITE setColor)
    QML_ELEMENT

public:
    PieSlice(QQuickItem *parent = 0);

    QColor color() const;
    void setColor(const QColor &color);

    void paint(QPainter *painter);

private:
    QColor m_color;
};
要PieChart中使用它们,需要修改color属性声明,并修改相关方法签名:
class PieChart : public QQuickItem
{
    Q_OBJECT
    Q_PROPERTY(PieSlice* pieSlice READ pieSlice WRITE setPieSlice)
    ...
public:
    ...
    PieSlice *pieSlice() const;
    void setPieSlice(PieSlice *pieSlice);
    ...
};
在实现setPieSlice()时,要特别注意一点,PieSlice 是可见项,所以它必须用 QQuickItem::setParentItem() 设为PieChart的子项,以PieChart在重绘时包含这一子项。
void PieChart::setPieSlice(PieSlice *pieSlice)
{
    m_pieSlice = pieSlice;
    pieSlice->setParentItem(this);
}
要象PieChart类那样,PieSlice 类也要用宏 QML_ELEMENT来把自己暴露/注册给QML(引擎)。象处理PieChart那样,要将命名空间“Charts”,版本1.0加到.pro工程文件中。
class PieSlice : public QQuickPaintedItem
{
    Q_OBJECT
    Q_PROPERTY(QColor color READ color WRITE setColor)
    QML_ELEMENT

public:
    PieSlice(QQuickItem *parent = 0);

    QColor color() const;
    void setColor(const QColor &color);

    void paint(QPainter *painter);

private:
    QColor m_color;
};
    ...
第五章:使用列表属性类型
扩展qml之~列表属性
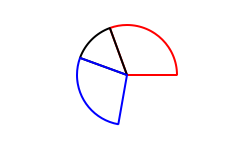
现在PieChart仅可以有一个PieSlice。通过一个图表应该可以有多个不同颜色和尺寸的slices切片。为此,可以设置一个slices属性,来接收PieSlice列表项:
import Charts 1.0
import QtQuick 2.0

Item {
    width: 300; height: 200

    PieChart {
        anchors.centerIn: parent
        width: 100; height: 100

        slices: [
            PieSlice {
                anchors.fill: parent
                color: "red"
                fromAngle: 0; angleSpan: 110
            },
            PieSlice {
                anchors.fill: parent
                color: "black"
                fromAngle: 110; angleSpan: 50
            },
            PieSlice {
                anchors.fill: parent
                color: "blue"
                fromAngle: 160; angleSpan: 100
            }
        ]
    }
}
为此,我们将PieChart的pieSlice属性替换为slices属性,并声明为 QQmlListProperty 类型。QQmlListProperty类允许在QML扩展中创建一个列表属性。要将方法pieSlice() 替换为slices() ,以返回一个slices切片列表;并添加一个内联的append_slice() 函数(下面会涉及到)。使用QList类型的变量m_slices来存储内部切片slices列表。
class PieChart : public QQuickItem
{
    Q_OBJECT
    Q_PROPERTY(QQmlListProperty<PieSlice> slices READ slices)
    ...
public:
    ...
    QQmlListProperty<PieSlice> slices();

private:
    static void append_slice(QQmlListProperty<PieSlice> *list, PieSlice *slice);

    QString m_name;
    QList<PieSlice *> m_slices;
};虽然slices属性没有相应的WRITE函数,但由于QQmlListProperty的机制,它仍然是可被修改的。在PieChart的实现中,我们实现了 PieChart::slices()来返回QQmlListProperty 类型的值,也表明每当从QML中调用向列表添加明细的请求时,都会调用内部的PieChart::append_slice() 方法。
QQmlListProperty<PieSlice> PieChart::slices()
{
    return QQmlListProperty<PieSlice>(this, nullptr, &PieChart::append_slice, nullptr,
                                      nullptr, nullptr, nullptr, nullptr);
}

void PieChart::append_slice(QQmlListProperty<PieSlice> *list, PieSlice *slice)
{
    PieChart *chart = qobject_cast<PieChart *>(list->object);
    if (chart) {
        slice->setParentItem(chart);
        chart->m_slices.append(slice);
    }
}
函数 append_slice() 仅指定了父项,并向列表m_slices添加了新项。如你所见,调用QQmlListProperty的append函数需要两个参数:list属性,以及将要被添加到列表的项目。
PieSlice类已被修改为包含了fromAngle和angleSpan属性,并根据这些值来画出饼图切片。
第六章:写一个扩展插件
扩展qml之~插件
现在,PieSlice和PieChart类都用在app.qml里,并在C++ 应用程序中以QQuickView形式来呈现。使用QML扩展的另外一种方式是创建一个插件library库,以新的QML导入模块形式,使得扩展类型对QML引擎可见。这使得 PieChart 和 PieSlice 类型注册到一个命名空间,这个命名空间可以导入任意QML应用中,而不限于仅在一个应用中使用这些类型。
创建插件的步骤在文章 为QML创建C++ 插件首先,我们创建一个名为ChartsPlugin的插件类。它继承自QQmlExtensionPlugin,并用继承来的 registerTypes() 方法来注册QML类型。
以下是在chartsplugin.h对类ChartsPlugin的定义:
#include <QQmlEngineExtensionPlugin>

class ChartsPlugin : public QQmlEngineExtensionPlugin
{
    Q_OBJECT
    Q_PLUGIN_METADATA(IID QQmlEngineExtensionInterface_iid)
};
以及在chartsplugin.cpp中的实现
然后,在工程文件里定义项目为插件库(plugin library),并指定DESTDIR值为../Charts,库文件(library files)将会被编译输出到这里。
TEMPLATE = lib
CONFIG += plugin qmltypes
QT += qml quick

QML_IMPORT_NAME = Charts
QML_IMPORT_MAJOR_VERSION = 1

DESTDIR = ../$$QML_IMPORT_NAME
TARGET = $$qtLibraryTarget(chartsplugin)

HEADERS += piechart.h \
           pieslice.h \
           chartsplugin.h

SOURCES += piechart.cpp \
           pieslice.cpp

DESTPATH=$$[QT_INSTALL_EXAMPLES]/qml/tutorials/extending-qml/chapter6-plugins/$$QML_IMPORT_NAME

copy_qmltypes.files = $$OUT_PWD/plugins.qmltypes
copy_qmltypes.path = $$DESTDIR
COPIES += copy_qmltypes

target.path=$$DESTPATH
qmldir.files=$$PWD/qmldir
qmldir.path=$$DESTPATH
INSTALLS += target qmldir

CONFIG += install_ok  # Do not cargo-cult this!

OTHER_FILES += qmldir

# Copy the qmldir file to the same folder as the plugin binary
cpqmldir.files = qmldir
cpqmldir.path = $$DESTDIR
COPIES += cpqmldir
当在Windows或Linux上编译这个例子时,Charts目录将被放在与使用新导入模块的应用程序同级。这样,QML引擎就会找到我们的模块,因为QML导入的默认搜索路径包括应用程序的可执行目录。在macOS系统,插件库被拷贝到应用程序包的Contents/PlugIns目录;路径的设置在文件chapter6-plugins/app.pro:
osx {
    charts.files = $$OUT_PWD/Charts
    charts.path = Contents/PlugIns
    QMAKE_BUNDLE_DATA += charts
}
要达到此目的,我们需要在main.cpp里添加这个路径:
    QQuickView view;
#ifdef Q_OS_OSX
    view.engine()->addImportPath(app.applicationDirPath() + "/../PlugIns");
#endif
    //...
当多个应用使用相同的QML导入时,自定义导入路径也很有用。
.pro 工程文件也有附带的魔力以确保定义模块的qmldir文件将总会被拷贝到与插件库相同的路径。
qmldir文件声明了模块名称和使模块生效的插件:
module Charts
plugin chartsplugin
现在,就有了一个可以被任意应用程序导入的QML模块,QML引擎也因此(qmldir)能够知道如何找到它。本例包含的可执行程序加载app.qml,在qml的import Charts 1.0语句。或者,你也可以用qmlscene tool,将当前路径设置为导入路径,以便可以找到qmldir文件:
qmlscene -I . app.qml"Charts"模块将被qml引擎加载,模块所提供的类型可用于任一导入过该模块的qml文档。
第七章:总结
本教程中,演示了创建QML扩展的基本步骤:
- 定义一个继承自QObject的新的QML类型,并使用宏QML_ELEMENT或QML_NAMED_ELEMENT()来注册该类型
- 通过宏Q_INVOKABLE或Qt插槽来添加可调用方法,并通过onSignal语法连接到Qt信号
- 通过定义NOTIFY信号来添加属性绑定
- 如果内置类型无法满足要求,则自定义类型
- 使用QQmlListProperty来定义列表类型属性
- 通过定义Qt插件和编写qmldir文件,来创建插件库文件
文章QML与C++ 的整合/集成对可以添加到QML扩展的其它有用特性进行了说明。比如,我们可以使用默认属性来添加 slices 而不必使用 slices 属性。
PieChart {
    PieSlice { ... }
    PieSlice { ... }
    PieSlice { ... }
}
或使用 属性值来源 不定时地随机添加或移除slices,
PieChart {
    PieSliceRandomizer on slices {}
}