前言
JDK8 为我们带来了 CompletableFuture 这个有意思的新类,它提供比 Future 更灵活更强大的回调功能,借助 CompletableFuture 我们可以更方便的编排异步任务。
本着知其然也要知其所以然的想法,笔者结合源码深入了解了一下 CompletableFuture 的部分实现,然后写了这边文章作为总结。
一、数据结构
1、CompletableFuture
CompletableFuture 实现了 Future 接口和 CompletionStage,Future 不必多说,而 CompletionStage 定义了各种任务编排的 API:
CompletableFuture<T> implements Future<T>, CompletionStage<T> {
    volatile Object result;       // Either the result or boxed AltResult
    volatile Completion stack;    // Top of Treiber stack of dependent actions
}
CompletableFuture 的数据结构包括用于记录结果的 result,以及用于持有任务以及任务间依赖关系的 Completion 类型的成员变量 stack。
如果阅读过 spring 注解相关功能的源码的同学,对于 CompletableFuture 和 Completion 应该会有一种 TypeMappedAnnotation 和 AnnotationTypeMapping 的既视感,实际上他们两者之间的关系确实也非常相似。
2、Completion
数据结构
Completion 是 CompletableFuture 中的一个内部类,我们可以简单的认为它就是我们一般所说的“操作”。
abstract static class Completion extends ForkJoinTask<Void>
    implements Runnable, AsynchronousCompletionTask {
    volatile Completion next;
}
它通过 next 指针在 CompletableFuture 中形成一个链表结构。
依赖关系
它还有两个抽象的实现类 UniCompletion 和 BiCompletion:
abstract static class UniCompletion<T,V> extends Completion {
        Executor executor;                 // executor to use (null if none)
        CompletableFuture<V> dep;          // the dependent to complete
        CompletableFuture<T> src;          // source for action
}

abstract static class BiCompletion<T,U,V> extends UniCompletion<T,V> {
        CompletableFuture<U> snd; // second source for action
}
其中 executor 表示该操作的执行者,而 src 和 snd 两个指针表示要执行的操作对应的 CompletableFuture 实例,而 dep 则表示要执行的操作依赖的前置操作对应的 CompletableFuture 实例。多个 Completion 彼此之间通过这些指针维护彼此的依赖关系。
实现类
在 CompletableFuture,我们会看到很多格式为 UniXXX 或者 BiXXX 的内部类,它们大多数都基于上述两抽象类实现,分别对应不同的操作。我们以 UniApply 为例:
static final class UniApply<T,V> extends UniCompletion<T,V> {
    Function<? super T,? extends V> fn;
}
其本质上就是一个额外挂载了 Function 接口的 UniCompletion,同理,XXXAccept 就是挂载了 Consumer 的 Completion,而 XXXRun 就是挂载的 Runnable 接口的 Completion。
二、构建流程
对 CompletableFuture 和 Completion 的数据结构有了基本的概念以后,我们一个简单任务的构建-执行过程来分析以下源码。
假设现在有两个异步任务 task1 与 task2,task2 需要在 task1 执行完毕后再执行:
CompletableFuture<String> task1 = new CompletableFuture<>();
CompletableFuture<String> task2 = task1.thenApplyAsync(s -> s + " 2");
thenApplyAsync 本身提供两个方法,唯一的区别在于后者需要指定线程池,而前者使用默认的线程池:
public <U> CompletableFuture<U> thenApplyAsync(
    Function<? super T,? extends U> fn) {
    return uniApplyStage(asyncPool, fn);
}

public <U> CompletableFuture<U> thenApplyAsync(
    Function<? super T,? extends U> fn, Executor executor) {
    return uniApplyStage(screenExecutor(executor), fn);
}
它们都需要通过 uniApplyStage 方法完成新任务的构建:
private <V> CompletableFuture<V> uniApplyStage(
    Executor e, Function<? super T,? extends V> f) {
    if (f == null) throw new NullPointerException();
    // 1、构建一个 CompletableFuture,对应下一个任务 Task2
    CompletableFuture<V> d =  new CompletableFuture<V>();
    if (e != null || !d.uniApply(this, f, null)) {
        // 2、构建一个 Completion,dep 指向 Task2,src 指向 Task1
        UniApply<T,V> c = new UniApply<T,V>(e, d, this, f);
        // 3、将该 Completion 压入当前 CompletableFuture 栈顶
        push(c);
        // 4、尝试以异步模式执行该Completion
        c.tryFire(SYNC);
    }
    return d;
}

final void push(UniCompletion<?,?> c) {
    if (c != null) {
        while (result == null && !tryPushStack(c))
            lazySetNext(c, null); // clear on failure
    }
}

final boolean tryPushStack(Completion c) {
    Completion h = stack;
    // 将 c.next 设置为当前 Task1 持有的 Completion
    lazySetNext(c, h);
    // CAS,Task1 持有的 Completion 替换为 c
    return UNSAFE.compareAndSwapObject(this, STACK, h, c);
}

static void lazySetNext(Completion c, Completion next) {
    // 通过 CAS 把 c.next 指向 next
    UNSAFE.putOrderedObject(c, NEXT, next);
}
uniApplyStage 方法做了四件事:
- 若将当前任务作为
Task1,则会为下一个任务构建一个新的CompletableFuture,姑且称为Task2; - 若将
Task1持有的Completion称为C1,则创建一个UniApply类型的CompletionC2,其中C2dep指向Task2,src指向Task1; - 将
C2的next指向C1,然后通过 CAS 将Task1持有的C1替换为C2; - 尝试执行
C2;
1、多级任务的构建流程
步骤 2 和 3 算是一个组合操作,它完成了创建 Completion - 压入当前 CompletableFuture 栈的操作。
我们在原本示例中的 Task1 和 Task2 的基础上再最加一个 Task3,这样或许会更有助于了解这一过程。
CompletableFuture<String> task1 = new CompletableFuture<>();
CompletableFuture<String> task2 = task1.thenApplyAsync(s -> s + " 2");
CompletableFuture<String> task2 = task2.thenApplyAsync(s -> s + " 3");
首先,在不考虑 Task2 和 Task3 在构建过程中就完成的情况下,会有如下过程:
第一个任务
最开始,Task1 被创建,此时 Task1 是个空任务,它的 stack 和 result 都为 null,为了便于理解,我们姑且认为它在 stack 指向一个虚拟的空 Completion,称其为 c1 。
第二个任务
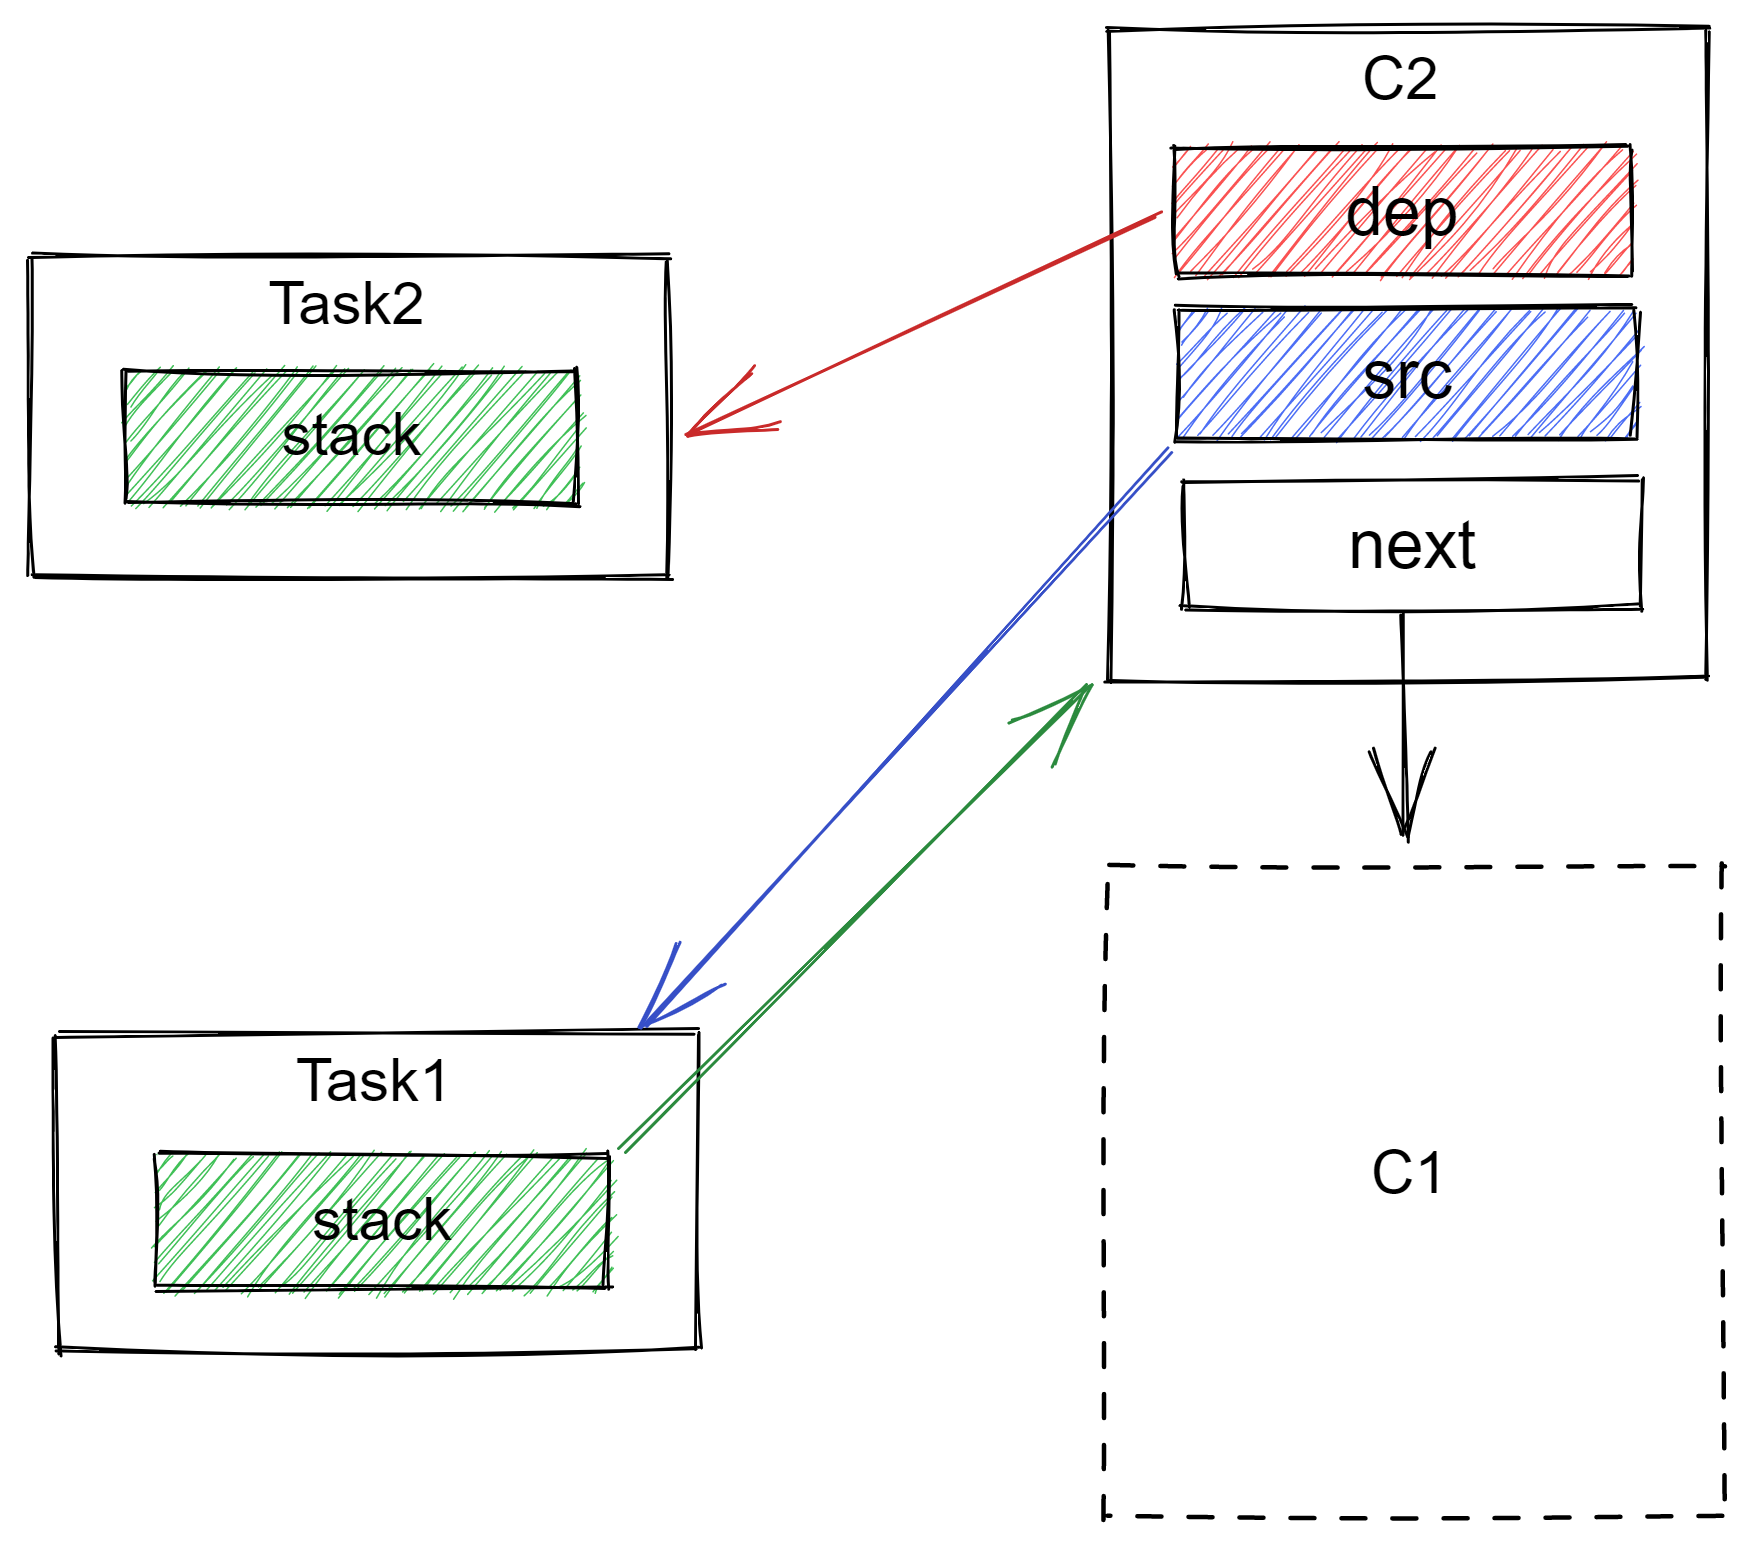
接着,task2 通过 task1.thenApplyAsync 方法被创建,此时:
- 一个新的
Completion被创建,我们称其为c2,c2的dep指向task2,src指向task1; c2的next指向c1;task1的stack从指向c1变成指向c2;
第三个任务
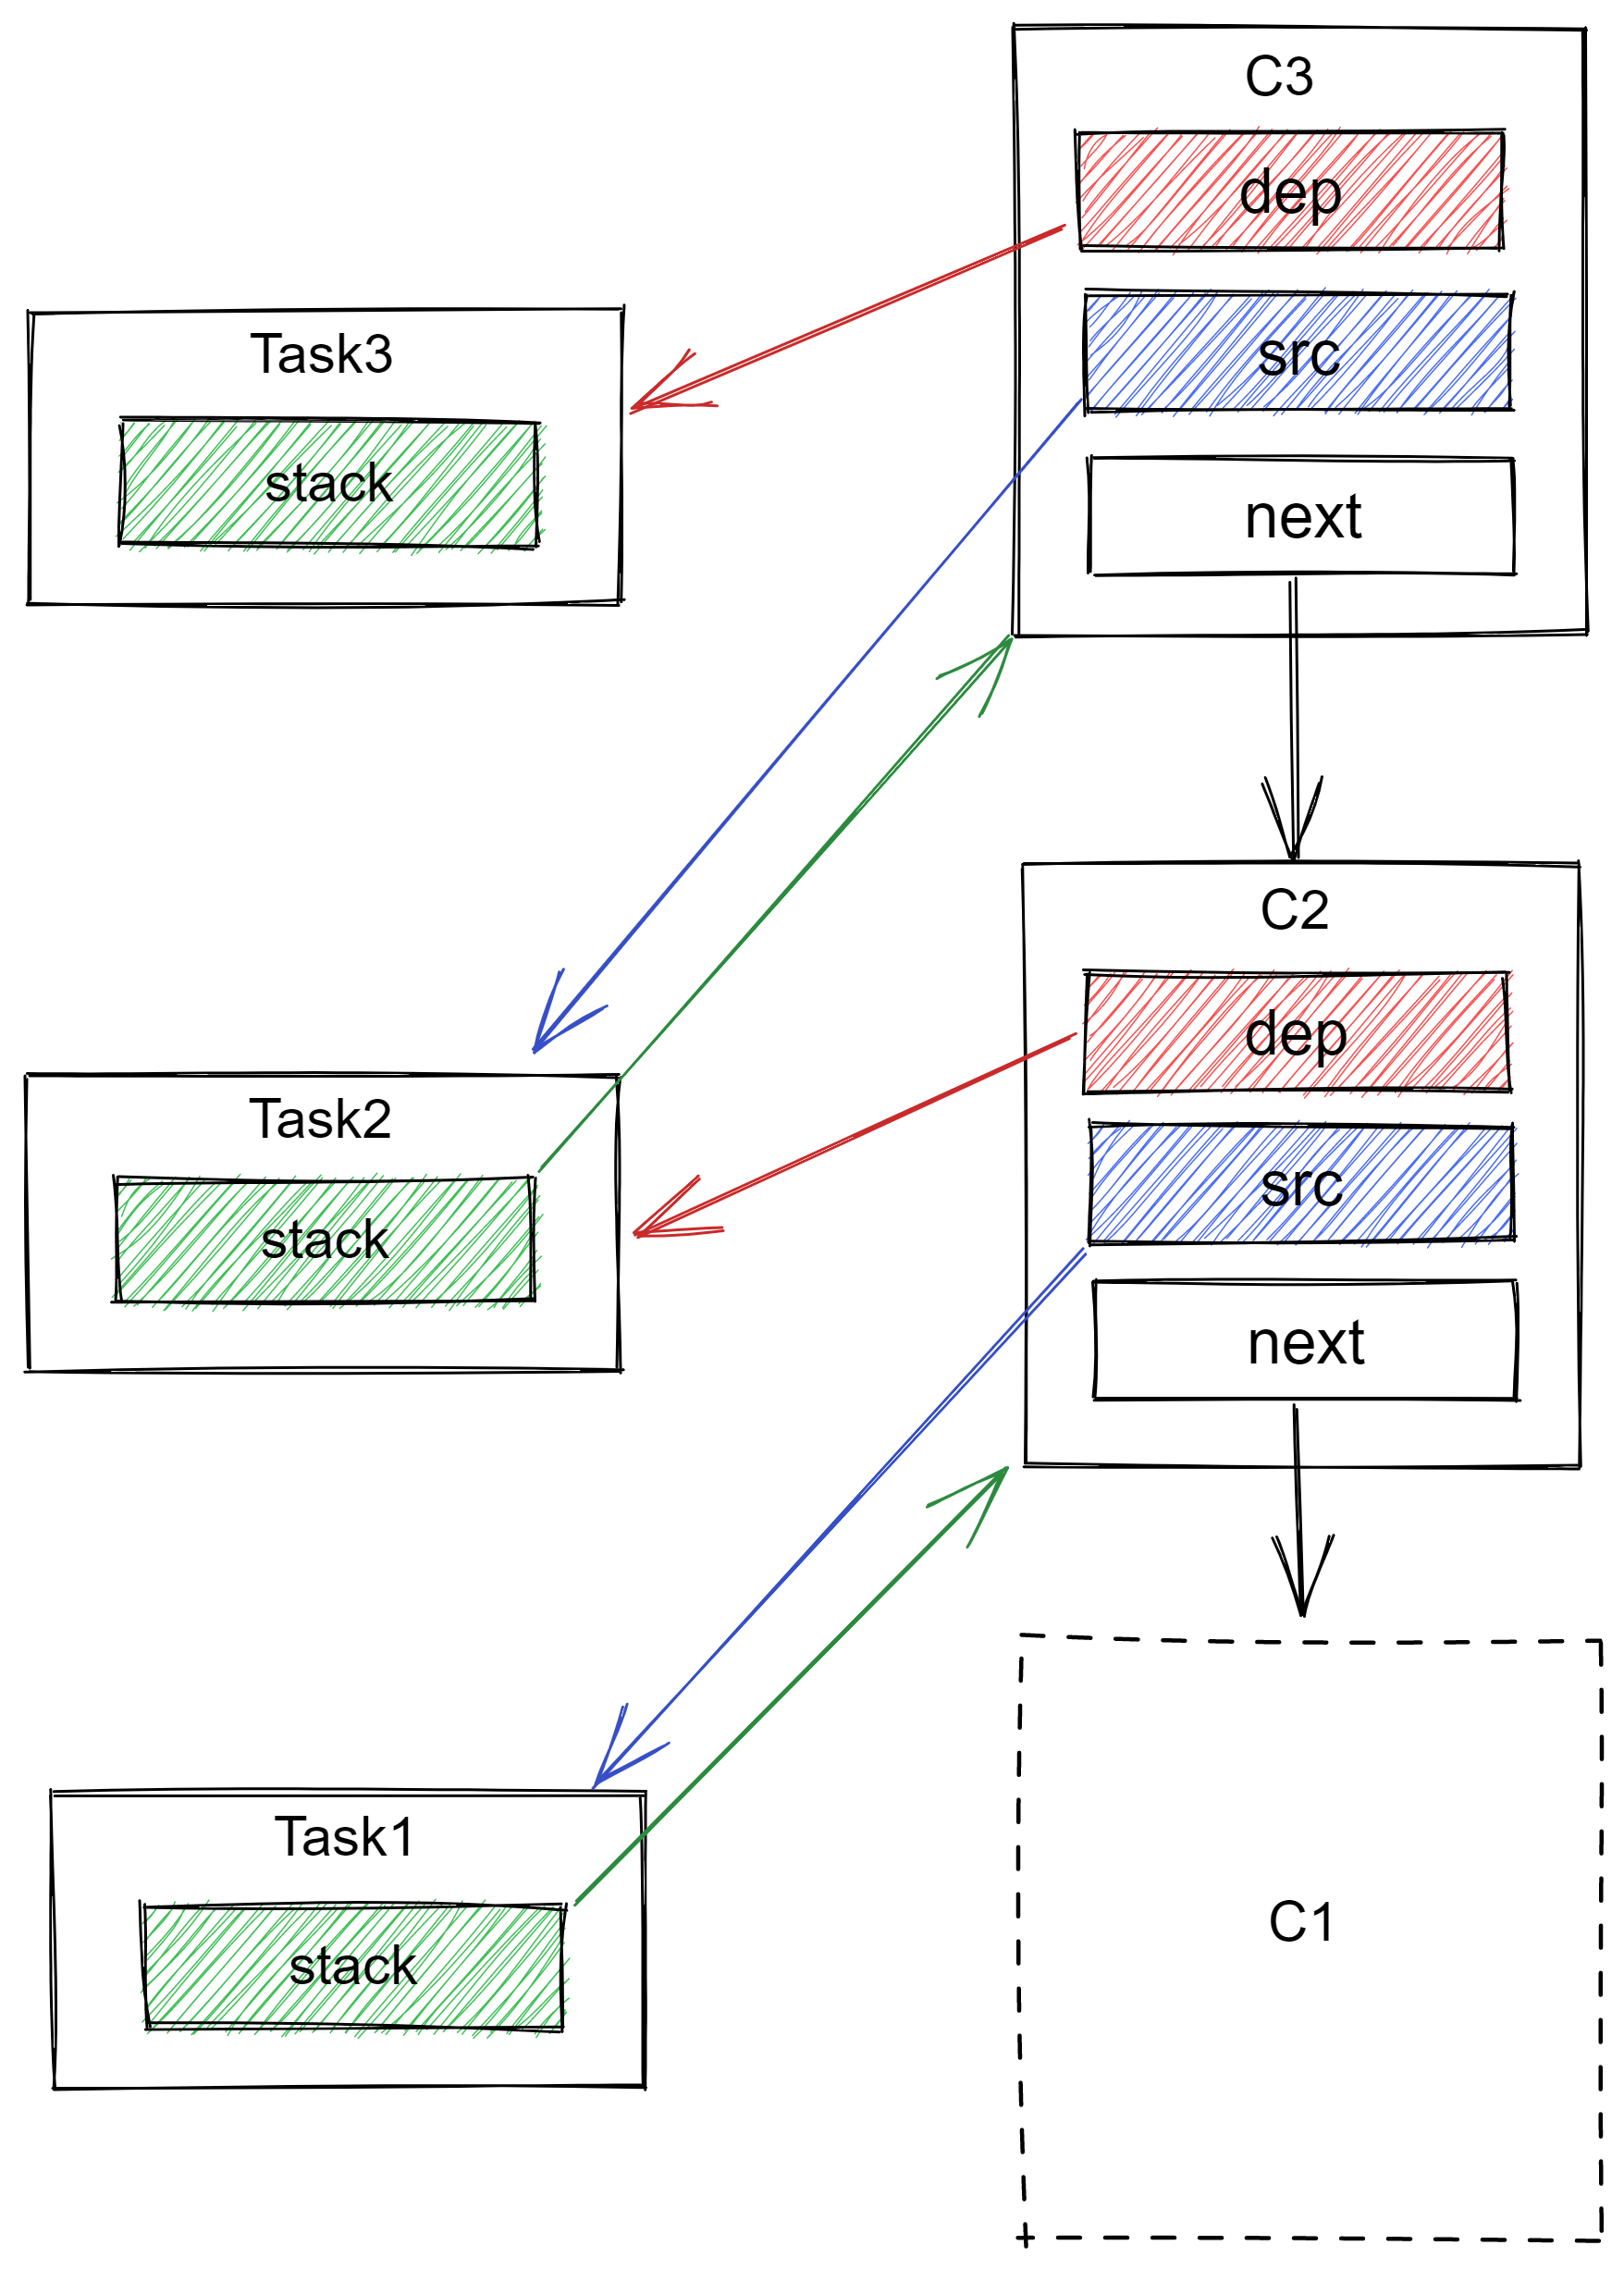
然后,task3 通过task2.thenApplyAsync 方法被创建,此时:
- 一个新的
Completion被创建,我们称其为c3,c3的dep指向task3,src指向task2; c3的next指向c2;task2的stack从指向c2变成指向c3;
2、平级任务的构建流程
如果这个时候我们再回头往 Task1 上追加一个与 Task2 平级的任务 Task4 呢?
CompletableFuture<String> task1 = new CompletableFuture<>();
CompletableFuture<String> task2 = task1.thenApplyAsync(s -> s + " 2");
CompletableFuture<String> task2 = task2.thenApplyAsync(s -> s + " 3");

CompletableFuture<String> task4 = task1.thenApplyAsync(s -> s + " 4");
- 一个新的
Completion被创建,我们称其为c4,c4的dep指向task4,src指向task1; c4的next指向c2;task2的stack从指向c2变成指向c4;

3、整体结构
至此,我们可以总结出一些信息:
CompletableFuture 所谓的栈,其实就是 Completion 的先进后出队列,假设现在有一个头结点 a,调用 thenApply 方法将会向 a 之前追加一个新的头结点 b,然后持有 a 的 CompletableFuture 转而去持有 b,这样就永远可以通过持有的头结点遍历获取队列中的所有节点;
而当我们调用 thenApply 时,都会创建一个 Completion,Completion 的 src 总是指向被调用 thenApply 方法的 CompletableFuture,换而言之,Completion 被压入谁的栈,则 Completion.src 就指向谁。
基于上述逻辑,我们再对上面这张图进行简化,忽略栈中 Completion 间的 next 指针与指向栈所有者的 src 指针,则有:
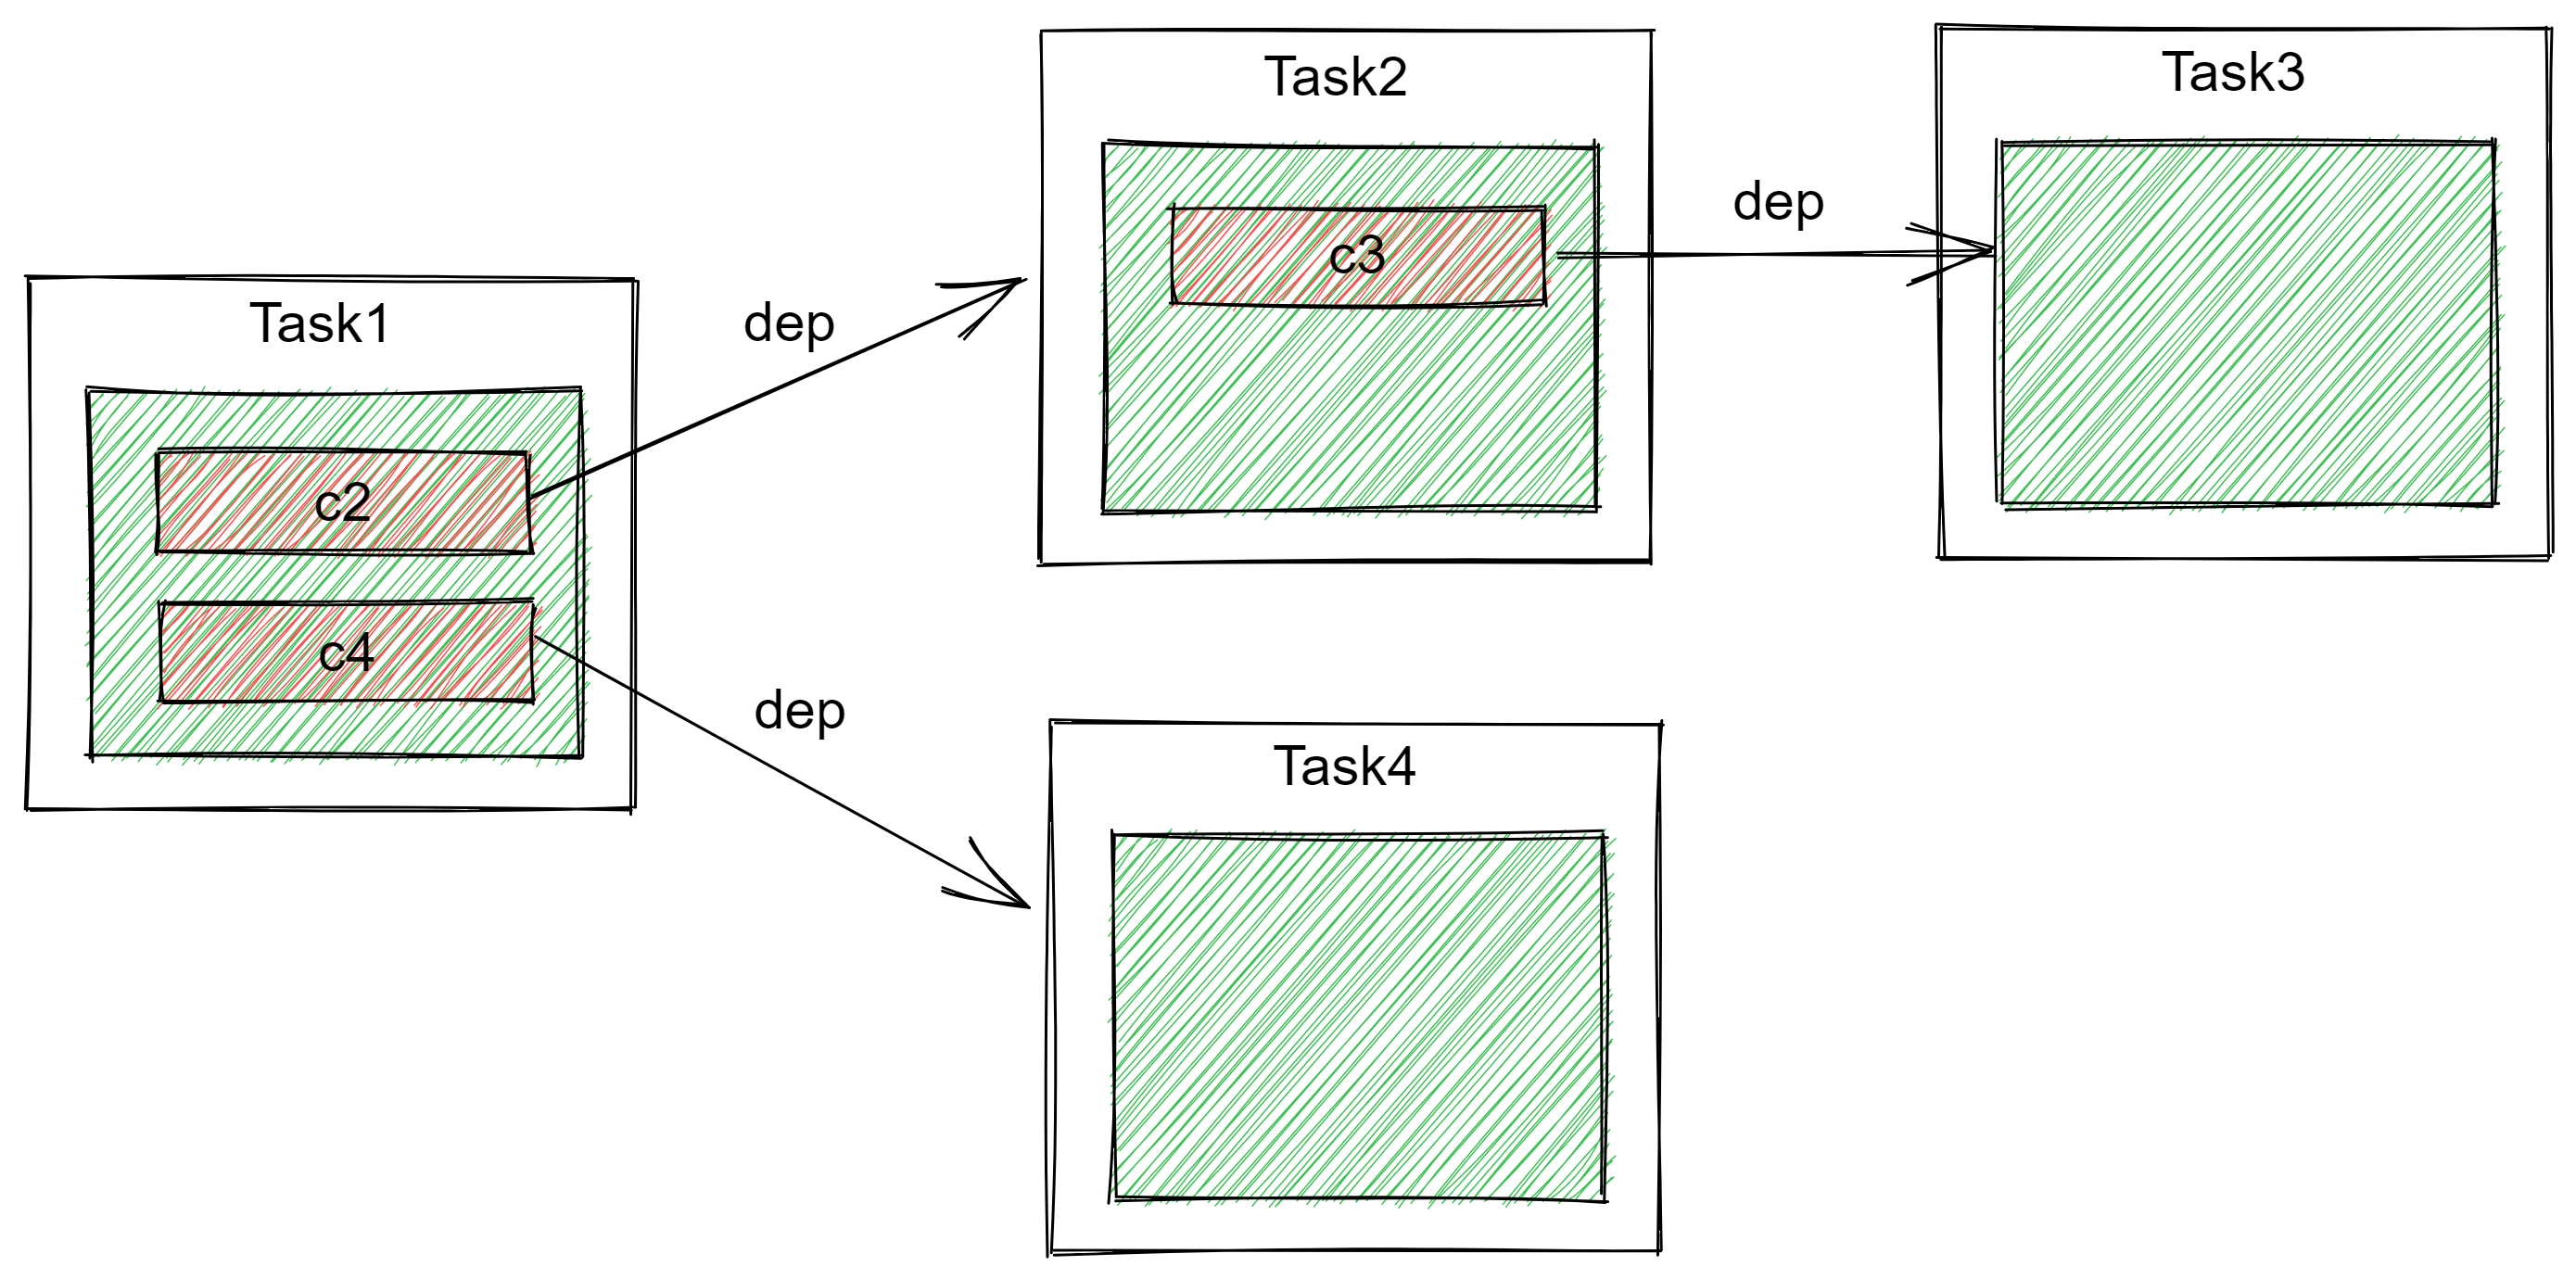
这样看结构就非常清晰了,同理,如果 Task2 或者 Task4 也有多个后续任务,则这里就会变成一个多叉树结构,反之,若 Task2 或者 Task4 有多个 src(比如调用了 thenCombine 方法)则就可能会变成一张图。
三、执行流程
我们依然回顾 uniApplyStage 这个方法:
private <V> CompletableFuture<V> uniApplyStage(
    Executor e, Function<? super T,? extends V> f) {
    if (f == null) throw new NullPointerException();
    // 构建新的 CompletableFuture
    CompletableFuture<V> d =  new CompletableFuture<V>();
    // 如果是个异步任务,或者是个同步任务但是还没完成才进入判断
    if (e != null || !d.uniApply(this, f, null)) {
        // 构建 Completion,dep 指向新 CompletableFuture,src 指向 this
        UniApply<T,V> c = new UniApply<T,V>(e, d, this, f);
        // 将新的 Complection 压入 this 的栈中
        push(c);
        // 尝试执行新的 Complection
        c.tryFire(SYNC);
    }
    return d;
}
实际上当我们调用 thenXXX 的时候,新的任务就已经在尝试执行了,接下来我们继续以 UniApply 为例,分析 Completion 的执行流程。
1、执行CompletableFuture
在 uniApplyStage 中,可以看到当新的 CompletableFuture 创建后,若该任务未指定 executor,即这是一个同步的任务,则在 !d.uniApply(this, f, null) 这段代码先执行一次 uniApply 方法,也就是直接尝试执行用户指定的逻辑:
final <S> boolean uniApply(CompletableFuture<S> a, // 源任务,即若 this 为 Task2,则 a 为 Task1
                           Function<? super S,? extends T> f,
                           UniApply<S,T> c) {
    Object r;Throwable x;

    // 1、Task1没完成,就直接返回false
    if (a == null || (r = a.result) == null || f == null)
        return false;

    // 2、如果 Task1 已经完成,并且 Task1 抛出异常了,那么 this 就没必要执行了,也直接抛异常结束
    tryComplete: if (result == null) {
        if (r instanceof AltResult) {
            if ((x = ((AltResult)r).ex) != null) {
                completeThrowable(x, r);
                break tryComplete;
            }
            r = null;
        }

        // 3、如果 Task1 已经完成了,并且没抛出异常,那么直接执行 this
        try {
            if (c != null && !c.claim())
                return false;
            @SuppressWarnings("unchecked") S s = (S) r;
            // 3.1 执行成功,将结果记录到 this.result
            completeValue(f.apply(s));
        } catch (Throwable ex) {
            // 3.2 执行失败,将异常封装一下也作为一个结果记录到 this.result
            completeThrowable(ex);
        }
    }
    return true;
}
uniApply 主要逻辑如下:
- 如果源任务未完成,则什么都不做,直接返回
false; - 如果源任务发生了异常,那么让当前任务也变为完成,并把源任务的结果(异常)作为当前任务的结果;
- 如果源任务已经正常完成,则获取源任务的结果,然后再将其作为输入参数执行当前任务,并且记录任务的执行结果;
这个方法实际上就是执行 Completion 挂载的用户业务逻辑的代码,由于考虑到源任务有可能是个异步任务,当尝试执行子任务的时候源任务还没完成,因此这个方法在后续实际上会被调用多次。
而 uniApplyStage 在没有指定 executor 是默认它就是一个同步任务,因此会直接在创建新的 CompletableFuture 的时候就执行一次,如果直接完成那后续也不需要再创建 Completion 了。
此外,在这里,我们可以很清楚的看到,发生异常的任务也被视为已完成,异常本身也被看成一个任务的执行结果。
2、执行Completion
tryFire 方法是 Completion 的执行触发点,他会尝试执行当前的 Completion,并在完成后触发 dep 指向的 CompletableFuture 中,栈里面的 Completion 的执行。
执行模式
在看 tryFire 方法前,我们需要先简单了解一下 mode 参数,它表示 tryFire 时的执行模式,默认提供三个选项值:
static final int SYNC   =  0; // 同步执行
static final int ASYNC  =  1; // 异步执行
static final int NESTED = -1; // 嵌套执行,即 CompletableFuture 在递归中执行栈内的 Completion
SYNC 和 ASYNC 没什么可介绍的,CompletableFuture 中大部分的 Completion 都是以 SYNC 模式执行的。
不过在接下来的代码中,我们需要重点关注 mode < 0 这类判断,它涉及到栈中 Completion 的递归执行。
tryFire
tryFire 用于主动触发一个 Completion 的执行,但与 CompletableFutrue 的 uniApplyStage 方法不同的是,它还会处理源任务和子任务栈中的其他任务:
final CompletableFuture<V> tryFire(int mode) {
    CompletableFuture<V> d; // 子任务 (this.dep)
    CompletableFuture<T> a; // 源任务 (this.src)

    // 没有后续的子任务, 或者有子任务但是当前任务执行失败了
    if ((d = dep) == null ||
        !d.uniApply(a = src, fn, mode > 0 ? null : this))
        return null;

    // 2、置空相关属性,表示当前 Completion 已完成
    dep = null; src = null; fn = null;

    // 3、则尝试把 dep 中栈里的 Completion 出栈,压入 src 的栈并执行
    return d.postFire(a, mode);
}
3、执行关联Completion
在 tryFire 后,当前 Completion 就实际完成了,接着就需要处理 Completion 的 dep 指向的 CompletableFuture 的栈内的哪些子任务,对应到代码就是调用 dep 的 postFire 方法,然后再在 dep 中调用 postComplete 方法:
final CompletableFuture<T> postFire(
    CompletableFuture<?> a, // 当前任务的源任务,即 src 指向大 CompletableFuture
    int mode) {
    // 1、源任务的栈不为空
    if (a != null && a.stack != null) {
        // 1.1 处于递归执行过程,或者源任务未完成,先清除栈中已经完成的任务
        if (mode < 0 || a.result == null)
            a.cleanStack();
        else
        // 1.2 不处于递归过程,且源任务已完成,将栈中的任务出栈并完成
            a.postComplete();
    }
    // 2、当前子任务已完成,且当前子任务的栈不为空
    if (result != null && stack != null) {
        // 2.1 如果处于递归过程,就直接返回子任务本身
        if (mode < 0)
            return this;
        // 2.2 如果不处于递归过程,则将子任务栈中的任务出栈并完成
        else
            postComplete();
    }
    return null;
}
而在 postComplete 中,当发现源任务或者子任务完成时,会将当前源任务或者子任务的栈中全部任务都出栈,并尝试执行:
final void postComplete() {
    /*
     * On each step, variable f holds current dependents to pop
     * and run.  It is extended along only one path at a time,
     * pushing others to avoid unbounded recursion.
     */
    CompletableFuture<?> f = this;
    Completion h;

    // 递归直到当前任务以及dep的栈都为空为止
    while ((h = f.stack) != null ||
           (f != this && (h = (f = this).stack) != null)) {
        CompletableFuture<?> d; Completion t;
        if (f.casStack(h, t = h.next)) { // 将 f 的栈顶任务 h 出栈

            // 1、h 还不是 f 栈中的最后一个任务
            if (t != null) {
                if (f != this) {
                    pushStack(h); // 将 f 的栈顶任务 h 压入 this 的栈中
                    continue;
                }
                h.next = null;    // detach
            }
            // 2、h 已经是 f 栈中的最后一个任务了,
            // 直接执行任务 h,并让 f 指向该任务的 dep,然后再次循环
            f = (d = h.tryFire(NESTED)) == null ? this : d;
        }
    }
}
tryFire -> postFire -> postComplete -> tryFire...... 构成了一个递归的过程,光看代码可能不是很直观,我们举个例子:
CompletableFuture<String> task2 = task1.thenApply(t -> { System.out.println("2"); return "2"; });
task2.thenAccept(t -> System.out.println("2.1"));
task2.thenAccept(t -> System.out.println("2.2"))
    .thenAccept(t -> System.out.println("2.2.1"))
    .thenAccept(t -> System.out.println("2.2.1.1"));

CompletableFuture<String> task3 = task1.thenApply(t -> { System.out.println("3"); return "3"; });
task3.thenAccept(t -> System.out.println("3.1"));
task3.thenAccept(t -> System.out.println("3.2"))
    .thenAccept(t -> System.out.println("3.2.1"))
    .thenAccept(t -> System.out.println("3.2.1.1"));

CompletableFuture<String> task4 = task1.thenApply(t -> { System.out.println("4"); return "4"; });

task1.complete("1");

// 控制台输出
// 4
// 3
// 3.1
// 3.2
// 3.2.1
// 3.2.1.1
// 2
// 2.1
// 2.2
// 2.2.1
// 2.2.1.1
根据上述代码的输出,我们可以很直观的意识到,在以 task1 为根节点的树结构中,各个任务的调用过程实际上就是深度优先遍历的过程,以被调用 postComplete 方法的 Completion 为根节点,会将其 dep 对应的 CompletableFuture 栈中的 Completion 弹出并压入根 Completion 的栈,然后执行并从夫上述过程。、
接下来我们结合上述代码,简单验证一下这个思路:
**task4 分支的执行 **
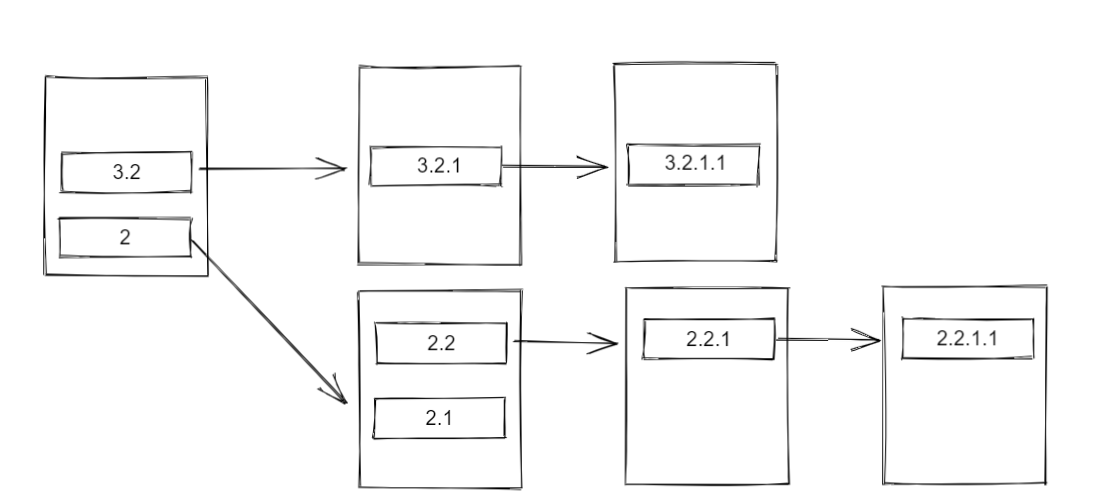
在最开始,task1 的栈中从上到下存放有 4、3、2 三个 Completion:
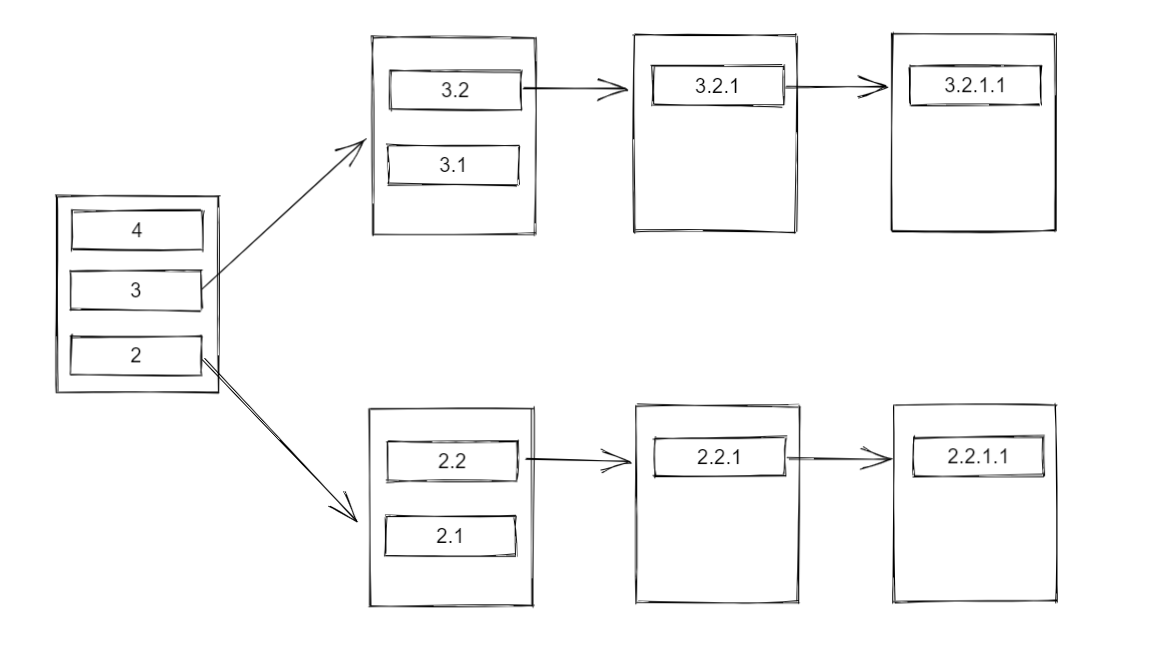
首先,将 task1 的栈顶元素 4 出栈并执行,由于 4 的 dep 没有指向任何 CompletableFuture,因此 4 这个分支全部的 Completion 都执行完毕。
现在,task1 的栈目前还有 3 和 2 两个 Completion。
task3 分支的执行
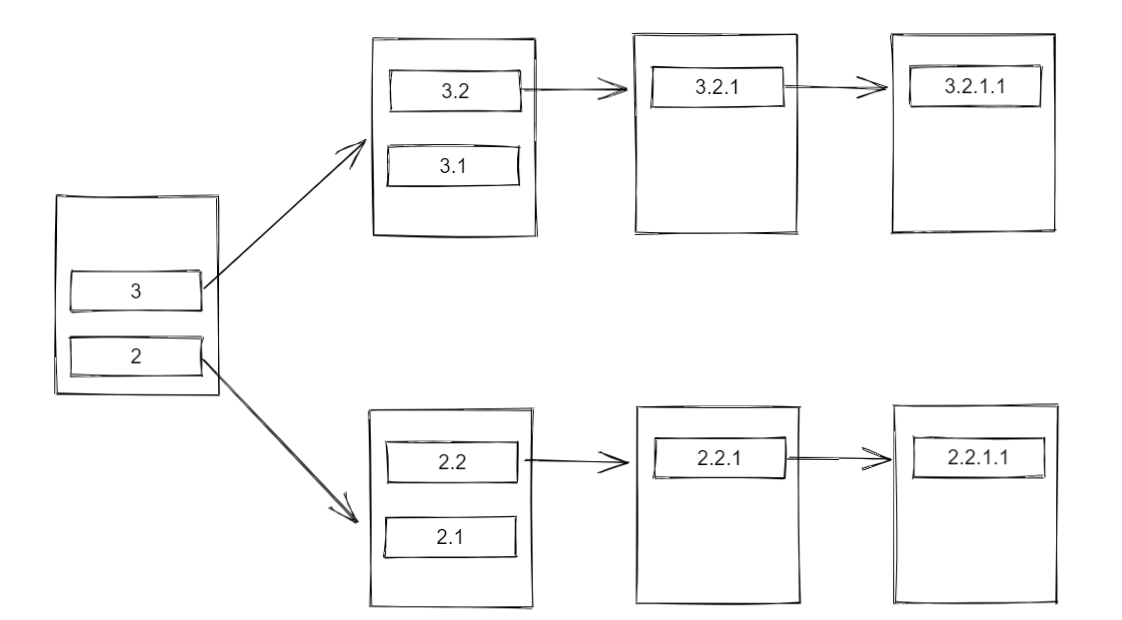
将 task1 的栈顶元素 3 出栈并执行,由于 3 的 dep 指向了另一个 CompletableFuture,该 CompletableFuture 的栈中存放有 3.2、3.1 两个 Completion,所以:
- 先将栈顶元素 3.2 出栈,由于 3.2 不为栈中的最后一个元素,因此将 3.2 压入
task1的栈顶; - 再将栈顶元素 3.1 出栈,由于 3.1 已经是栈中最后一个元素,因此直接执行 3.1;
此时 task1 中的栈情况如下:
然后将 task1 的栈顶元素 3.2 出栈并执行,由于 3.2 的 dep 指向的另一个 CompletableFuture,该 CompletableFuture 的栈中存放有 3.2.1 ,因此将 3.2.1 出栈,又由于 3.2.1 已经是栈中最后一个元素,因此直接将其执行并返回 dep。
由于 3.2.1 的 dep 指向了另一个 CompletableFuture,该 CompletableFuture 的栈中存放有 3.2.1.1 ,因此将 3.2.1.1 出栈,又由于 3.2.1.1 已经是栈中最后一个元素,因此直接将其执行并返回 dep。
3.2.1.1 的 dep 没有指向任何 CompletableFuture,说明此时 3.2 这条分支上的所有栈都已经清空,此轮执行结束。
现在,task1 的栈目前只剩 2 一个 Completion。
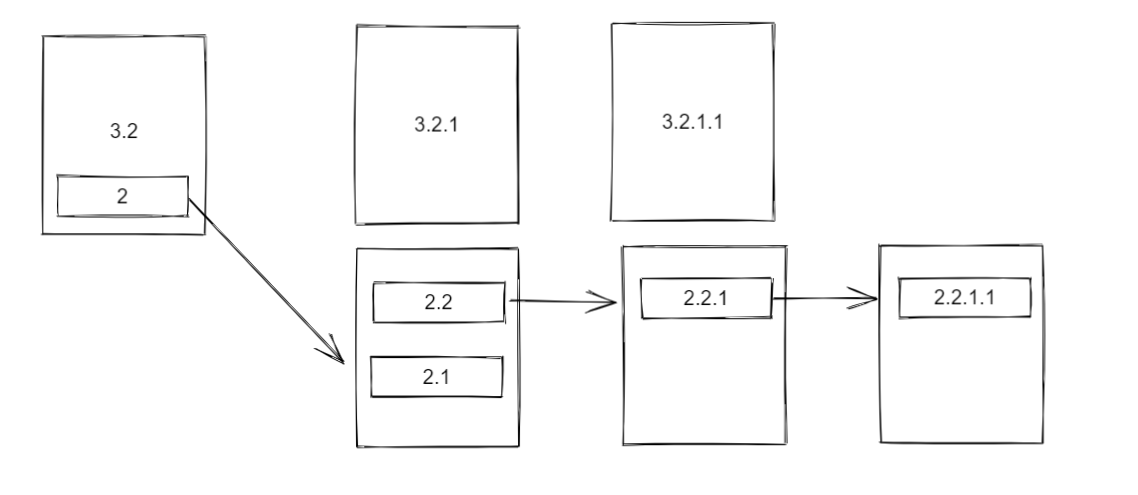
task2 分支的执行
task2 分支的执行与 task3 完全一致,因此这里只简单的说明:
- 弹出
task1栈顶元素 2 并执行,返回dep指向的CompletableFuture; - 该
CompletableFuture栈存在 2.2 与 2.1 两个Completion:- 先弹出 2.2,由于 2.2 不是栈中最后一个元素,因此将其压入
task1的栈; - 再弹出 2.1,由于 2.1 已经是栈中最后一个元素,因此将其直接执行;
- 先弹出 2.2,由于 2.2 不是栈中最后一个元素,因此将其压入
- 弹出
task1栈顶元素 2.1 并执行,返回dep指向的CompletableFuture; - 该
CompletableFuture栈仅存在 2.2.1 一个Completion,因此直接执行并返回dep指向的CompletableFuture; - 该
CompletableFuture栈仅存在 2.2.1.1 一个Completion,因此直接执行并返回dep指向的CompletableFuture; - 由于 2.2.1.1 的
dep没有指向任何CompletableFuture,因此递归到这里就结束了。
总结
到这里,CompletableFuture 的构建-执行过程也基本讲完了。回顾整篇文章,不难发现其实大部分内容其实还是在说明以 CompletableFuture 和 Completion 为基础构建出来的数据结构。
每个 CompletableFuture 都会持有一个 Completion 栈,当我们向一个 CompletableFuture 追加任务时,本质上就是生成一个 Completion 并压入到栈中。而每个 Completion 则关联到另一个 CompletableFuture,该 CompletableFuture 对应此 Completion 的完成状态。
明白这一点后,我们对 CompletableFuture 和 Completion 的定位就会有更加清晰的了解,如果我们将整个复杂异步流程视为树或者图,那么 CompletableFuture 和 Completion 实际上就是对应着点和边。当我们执行一个 CompletableFuture,实际上就是基于关联的 Completion 路径遍历所有的 CompletableFuture。
当然,实际上由于 CompletableFuture 执行 either、any、both、all 等模式,因此实际在执行的时候还会有更多的判断逻辑,不过数据结构是不会变的。